Sunday, 20 May 2018

Clarity Stamps - Mixed Media

Piece de Resistance
This was created from the idea that one of the stamps reminded me of the mysterious Omani ladies who wore intricately embroidered and beaded veils. It is a mixed media canvas with altered printed photos as a topper. It was fun to do!

Clarity Stamps


Ingredients:-
·         Clarity Stamps – Tina’s Henna Doodles
·         Ink Pads:- Archival Black; Artistry – Rich Mocha, Sweet Toffee, Black Shadow
·         Grunge Paste
·         Various Spray Colours – found whilst rearranging stash
·         Rice Paper
·         Photocopied photograph x 2
How to:-
1.       Tear around both photo face images and set aside. Add texture paste to canvas, roughen the surface with a palette knife.
2.       Stamp around photo using black ink followed by clear detail. Repeat with gold embossing powder.
3.       Apply photos onto canvas and brush glue over.
4.       Stamp a variety of stamps onto rice paper, add embossing powder and heat set.
5.       Glue around perimeter of canvas.
6.       Add Inka Gold around edge.

Thank you for your visit. There will be another blog at the beginning of June.
Until then, take care and craft happily.
Best wishes,
Shelagh
'The Making Lady'


Clarity Stamps - Tina's Henna Dangles - Barbara Gray - Sunday 20th May 2018

Clarity Stamps
Tina's Henna Dangles
Hello again and welcome to 'The Making Lady's' blog. This name came about when I used to volunteer at my old school and spend many hours each week teaching Art and Craft to two classes of five, six and seven year olds'. They had the use of many of my various crafting accoutrements and it all began as whilst on a visit, I discovered few could use scissors with confidence. We all looked forward to the 'Making Hours' and it was great teach and interact with small groups - a luxury I never experienced as a teacher. 
These are examples using the stamps Barbara demonstrated today on Hochanda. 


Celebration Box

Ingredients:-
·         Tina’s Stamps
·         Card
·         Archival Black
·         Silver Pearl Embossing Powder
How to:-
1.       Cut card to measure 1 x 7.5ins square, scored at 2.5ins and 5ins; 1 x 6ins, scored at 2ins, 4ins; 1 x 4.5ins, scored at 1.5ins, 3ins so that each square is divided into 9 equal squares.
2.       Cut away each corner square from each layer. Edge each layer front and back with silver pen. Set aside.
3.       Cut eight squares of each measuring 2.25ins x 2.25ins; 1.75ins x 1.75ins; 1.25ins x 1.5ins.
4.       Stamp and emboss images of choice on each square and attach to front and back of each box net.
5.       Layer and glue smaller boxes inside largest.
6.       Make a lid to fit and decorate with stamped images.
7.       Stamp and emboss two strips of card, form into a double heart and glue to centre of box.
8.       Add self-adhesive gems.


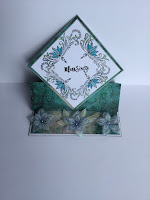
Easel card

Ingredients:-
·         Tina’s Stamps
·         Shenandoah Card
·         Theuva Card
·         Ink Pads:- Archival Black
·         Colours
How to:-
1.       Create an easel card using Shenandoah card.
2.       Stamp chosen image four times to form square.
3.       Colour, trim and mount onto Shenandoah card.
4.       Add to easel card.
5.       Add stopper and decorate with stamped image.


Black Gold

Ingredients:-
·         Clarity Black Card
·         Kraft Card
·         White Card Blank
·         Archival Black
·         Gold Detail Embossing Powder
How to:-
1.       Stamp semi-circular stamp twice onto black card. Emboss with gold detail.
2.       Mount onto double kraft card, edging each layer with black alcohol marker.
3.       Add to white card blank, cut to fit.
4.       Embellish.

 Dream Catcher

Ingredients:-
·         Clarity Black Card
·         Kraft Card
·         White Card, White Card Blank
·         Archival Black
·         Gold Detail Embossing Powder
How to:-
1.       Cut black card to a square.
2.       Stamp dream catcher and emboss with gold detail.
3.       Stamp partial dream catcher in each corner and emboss.
4.       Stamp partial dream catcher between each corner and emboss; fill in gaps with partial stamp and emboss.
5.       Add corner decoration and self-adhesive gems.


Stamped Pattern

Ingredients:-
·         Tina’s Stamps
·         Black Archival
·         Theuva Card
·         Shenandoah Card
·         Colours
How to:-
1.       Stamp image in each corner of half sheet of Theuva. Stamp same image centrally top and bottom.
2.       Colour.
3.       Edge with black pen.
4.       Mount onto Shenandoah card. Trim.
5.       Add to card blank.
6.       Stamp same image back to back on Theuva then again at each side. Cut to fit, edge with black pen then adhere to foot of card.


Pattern 2

Ingredients:-
·         Tina’s Stamps
·         Archival Black
·         Theuva Card
·         Shenandoah Card
·         Colours
·         Glaze pen
How to:-
1.       Stamp chosen image back to back on Theuva card.
2.       Stamp image in each corner. Fill gaps by stamping foot of stamp.
3.       Colour.
4.       Layer onto Shenandoah and white card.
5.       Stamp and add sentiment.

Thank you for taking the time to look in. I'm sure you will find plenty of uses for these stamps. Weddings must be on the cards, methinks!
Best wishes,
Shelagh,
'The Making Lady'


Clarity Stamps - Geckos, Chameleons and Frogs - Wednesday 16th May 2018

Amphibian and Reptilian Beauties!

Hello there. A bit late with the blog but we've been away from home this week thus no lap tops! Love these little creatures particularly the geckos and frogs as they remind me of my halcyon days in Brunei and Malaysia.


 Chameleon


Ingredients:-
Clarity Stamps
·         Chameleon and Frog set – Chameleon
·         Three Way Overlay – Spiral
Card/Paper
·         Shenandoah Card – ACC-CA-30555-57
·         Theuva - ACC-CA-30371-A5
Ink Pads
·         Archival Black - INK-AR-50030-XX
Miscellany
·         Colouring Pencils
How to:-
1.       Stamp outline spiral stamp three times in a line. Choose two colour themes and colour 1st stamped image with both colours, 2nd image with one only and 3rd with both but in opposite areas.
2.       Stamp chameleon, colour with similar colours and cut out. Add to background.
3.       Layer onto two complementary sheets of Shenandoah card which have been trimmed to size and edged with black alcohol marker. Attach to card blank.

 Faith

Ingredients:-
Clarity Stamps
·         Chameleons and Frogs set – salamander
·         Mini Word Chain 5&6 – STA-WO-10572-XX
Clarity Stencils
·         Stone Wall – STE-PA-00204-77
·         Rings and Brick Wall – Brick Wall – STE-PA-00375-44
Ink Pads:-
·         Archival Black - INK-AR-50030-XX
·         Artistry Black Shadow –  Golden Turmeric Collection - kINK-AT-50225-XX
Card/Paper
·         Theuva - ACC-CA-30371-A5
·         Stencil – ACC-CA-30095-77

How to:-
1.       Ink Stone Wall stencil with Black Shadow, brayer over then run through die-cutting machine to transfer and emboss image onto stencil. (Repeat a number of times until ink is used up; these may be set aside for other projects.) Edge with black pen.
2.       Ink mini Brick Wall with Archival Black and run through die-cutting machine onto stencil card to emboss. (Repeat as in 2.) Trim. Add centrally onto stencilled card from 1.)
3.       Stamp salamander onto Theuva card using Archival Black, cut out and add to background.
4.        Mount onto card blank and add sentiment/word of choice.

Happy Birthday!

Ingredients:-
Clarity Stamps
·         Chameleon and Frog set – frog
·         Mini Word Chain
Card/Paper
·         Shenandoah Card - ACC-CA-30555-57
·         Theuva - ACC-CA-30371-A5
Ink Pads
·         Archival Black - INK-AR-50030-XX
Miscellany
·         Colouring Pencils
How to:-
1.       Stamp frog onto card, colour and cut out.
2.       Trim Shenandoah card to fit card blank, leaving a narrow white border. Edge Shenandoah with black marker and add to card blank.
3.       Add frog. Stamp sentiment/word.


                                                            Crazy 4U

Ingredients:-
Clarity Stamps
·         Chameleons and Frogs – salamander
·         Three Way Overlay – Group 2 – spiral outline
Clarity Stencil
·         Stone Wall – STE-PA-00204-77
·         Fossil Leaves – STE-PA-00373-PS
Ink Pads
·         Archival Black - INK-AR-50030-XX
·         Artistry Black Shadow – Mini Ink Pads Golden Turmeric Collection –INK-AT-50225-XX
Groovi
·         Alphabet Plate – GRO-MA-40559-13
Card/Paper
·         Theuva - ACC-CA-30371-A5
·         Stencil - – ACC-CA-30095-77
·         Parchment Scrap
Miscellany
·         Colouring Pencils
·         Wink of Stella – Clear
How to:-
1.       Stamp outline from Three Way Overlay a number of times to form a tile pattern. Colour with grey and black. Trim and edge with black pen.
2.       Ink Stone Wall stencil with Black Shadow, run through a die-cutting machine onto stencil card, trim and edge with black pen.
3.       Stamp salamander onto Theuva, cut out and add to stamped background. Add this onto stencilled background, followed by card blank.
4.       Ink leaf with Archival Black and run through machine three times onto parchment. Cut out.
5.       Emboss sentiment on one leaf using Border Alphabet Plate Mate. Colour then top with Wink of Stella. Add to card.

                                                       Calm Down, Dear!

Ingredients:-
Clarity Stamps
·         Chameleon and Frogs set – Chameleon
Clarity Stencils
·         Ocean Swirl – STE-SE-00014-77
·         Dotty Leaves – STE-TR-00121-A5
Groovi Plate
·         Groovi Go! A6 Plate Mate – GRO-MA-40748-18
Card/Paper
·         Rainbow River Paper – ACC-CA-30539-88
·         Rainbow River Parchment – ACC-CA-30540-88
·         Stencil – ACC-CA-30095-77
·         Theuva - ACC-CA-30371-A5
Ink Pads
·         Archival Black - INK-AR-50030-XX

Artistry – Mini Ink Pads
·         Golden Turmeric Collection – INK-AT-50225-XX - Black Shadow, Elegant Emerald            
·         Haystack Collection – INK-AT-50226-XX - Green Garland, Martini Olive


Miscellany
·         Colouring Pencils
How to:-
1.       Ink Ocean Swirl with Martini Olive and emboss onto Stencil card using die-cutting machine. Keeping stencil in place, blend over a mixture of Elegant Emerald and Green Garland.
2.       Edge with black pen and add to white stencil card. Trim and edge this with black pen.
3.       Rip around all four edges of Rainbow River. Add to card blank. Place background from 1) and 2) centrally onto this.
4.       Repeat 1) onto Theuva card using Green Garland and leaf stencil; make two prints from one inking. Cut out leaves. Add to background.
5.       Stamp one of each chameleon images onto Theuva, colour and cut out. Add to background.
6.       Using the Groovi Go Plate Mate, Alphabet and Designer Parchment, emboss sentiment and cut out.
7.       Add to card.
How


Thanks for visiting my blog - these stamps are great fun and available from Clarity. 

Hope to see you soon,
Best wishes,
Shelagh
'The Making Lady '