Clarity Stamps –
Three Knights Stencil – Maria Moorhouse – April 2019
Materials from Clarity
Stencil
Three Knights
Card/Paper
Stencil – ACC-CA-30095-77
Card Blanks – ACC-CA-30647-XX
Designer – Indian Summer – ACC-CA-30525-88
Ink Pads
· Artistry – Old Parchment set – INK-AT-50228-XX – Wild
Bilberry, Old Parchment, Indian Jamun; Golden Turmeric set – Ink-AT-50225-XX -
Lush Lilac
·
Embossing – Versamark – INK-VE-50221-XX
Miscellany
·
Micron Pens – Black – ACC-PE-30778-XX
·
Inka Gold – Gold – ACC-PA-30479-XX, Silver –
ACC-PA-30480-XX
·
Mica Powder – Perfect Pearl – ACC-MI-30254-XX
·
Texture Paste – ACC-PA-30522-XX
From Stash
·
Black Gesso with an added dash of pearl mica
powder
·
Paint – Pale Gold, Silver
·
Embossing Powder – Chunky Black Enamel
·
Distress Inks – Picket Fence
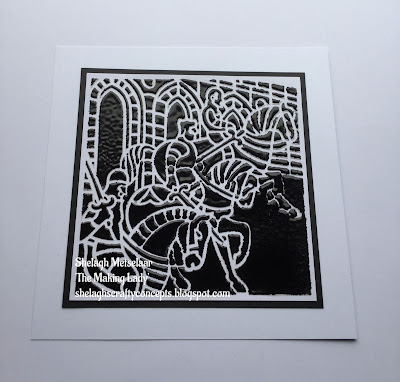
Example 1
Faux Brass Rubbing
Materials
·
Texture Paste
·
Black Gesso
·
Pearl Mica Powder – e.g. Perfect Pearls -
·
Gold, Silver Paint
·
Distress Ink Pad – Picket Fence
·
Inka Gold – Gold Silver
·
Card – Stencil, Black, Card Blank
Instructions
1.
Tape stencil centrally onto Stencil Card. Spread
texture paste over smoothly using spatula or plastic spreader. Remove stencil
and clean. Allow image to dry. (I left it overnight.)
2.
Mix a small amount of mica powder into black
gesso and paint over stencilled image, right to the edges. Dry with heat gun
and allow to bubble thus creating texture.
3.
Re-attach stencil and blend over Picket Fence.
Remove stencil, clean then replace.
4.
Paint card with silver paint and remove stencil.
Dry with heat gun for more texture.
5.
Apply gold paint around edges and in towards
centre. Remove stencil and clean. Dry stencilled image with heat gun as in 4.)
6.
Replace stencil and brush over Inka Gold in
Silver. Repeat with Inka Gold – Gold around the perimeter.
7.
Trim away border, mat onto black card followed
by white card blank.
Example
2
Ethereal
Knights
Materials
·
Stencil – Three Knights
·
Artistry Inks – Old Parchment, Golden Turmeric
·
Stencil Card, Indian Summer Designer Paper
·
Micron Pen – 03
Instructions
1.
Tape stencil onto stencil card and blend Lush
Lilac over all. Follow with Indian Jamun towards the edges.
2.
Blend over Old Parchment in centre of stencil,
concentrating on the knights.
3.
Swoosh some Wild Bilberry around perimeter for
added depth.
4.
Leaving stencil in place, outline with micron
pen.
5.
Layer onto two different but toning sheets of
Indian Summer paper before attaching to card blank.
Knights in Black
Satin!
Materials
·
Stencil – Three Knights
·
Stencil Card, Matte Black, Card Blank
·
Embossing Ink Pad
·
Chunky Black Enamel Embossing Powder
Instructions
1.
Tape stencil over stencil card. Apply embossing
ink over, using a brayer. Remove stencil.
2.
Sprinkle over chunky black enamel embossing
powder. Remove stray specks with fine point, dry paintbrush.
3.
Heat-set enamel from below to prevent particles
blowing over design. Once semi-set, heat from above to enhance glaze on enamel.
4.
Layer onto matte black followed by white card.


