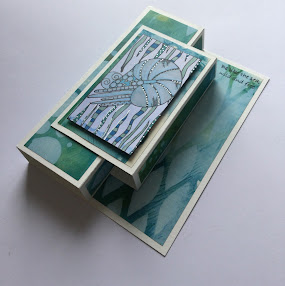
Wednesday, 5 October 2022

Cleverprints Woodland Creatures by Jane Royston


Hello and welcome to my blog. 

This episode comprises all of the figures from Jane's 'Woodland Creatures' collection as I thought I'd try something different - well for me atleast! The Wiggle Circle dies created just the look I was after.

Stamps, dies and background papers available from https://www.cleverprints.co.uk

A thriving community with lots of inspiration and ideas to be found at Cleverprints LTD on Facebook.

Happy crafting!

Woodland Tunnel Card 


Materials:-


  • Woodland Creatures Stamp Sets by Jane Royston:- Hedgehugs, Fantastic Fox, Have a Hoot, BrightEyed and Bushy Tailed
  • 'The Little Things' Stamp Set by Jane Royston (Leaves only)
  • Black Ink Pad (Versafine Clair 'Nocturne' used here.) 
  • Colouring Medium of choice (Watercolour Pens used here)
  • Cleverprints Background Papers
  • Cleverprints Wiggle Circles Dies
  • Card - Brown 300gsm used here for card construction; smooth watercolour card used for stamped images.
  • Die-cutting machine 
Instructions:-

Images of the panels cut to construct the tunnel card - actual example in brown card, above examples to illustrate. 

Card base:-
  1. Cut base card to measure 14cm x14cm, three times as in photo above.
  2. Cut panel to measure 13.5cm x 13.5cm from Cleverprints papers, three times. Adhere one coloured 13.5cm x 13.5cm centrally to each base.


3. Attach Second and Third Largest Wiggle Circle Dies - one each to covered base, reserving the last covered base uncut for the card back. Run through die cutting machine.

 4. Cut four strips of matching card to measure 4cm x 14cm - the folded brown strip as in photo above. (These will form the pleats to attach to either side of the two aperture cards.) 

5. Score from top to bottom on each strip at 1cm, 2cm and 3cm. Mountain, valley and mountain fold along each score line, crisping up each fold with a bone folder.
The pleat is attached to the base above only as an illustration, but the choice is there whether to add to the base or the apertures whichever you find easiest.  

6. Run red liner tape along both edges of each of the four strips and attach one each to left and right of aperture cards (as shown above at right hand side.) 

7. Stamp chosen images onto watercolour card, colour with chosen colouring medium and trim. 
8. Attach trimmed images to tunnel card using foam tape or wet glue to create a woodland scene as shown below. 

N.B. I added tiny glass beads to the flower centres

Many thanks for visiting; I hope this has given you a few ideas for your own creations. 

More ideas coming soon. 

Take care and happy crafting!

Shelagh  


Friday, 5 August 2022

Cleverprints Patterned Flowers designed by Jane Royston


Cleverprints Inspiration Week 5th August 2022

Jane Royston Designs

Patterned Flowers

Hi,

Welcome to my blog, a bit of a lull but now that my computer is once again reliable, time to resume posting. 

The new Patterned Flowers collection designed by Jane Royston is such a joy to not only work with but explore possibilities, the Patterned Borders Stencil and Retro Flower Leaf, suggested a beach them to me, hence my card. Once again endless possibilities with these stamps - have fun!

'Surf's Up!'


Materials:-

·         Cleverprints Stamps – Patchwork Flower Set, Droplet Set, Retro Set

·         Cleverprints Stencil – Patterned Borders Stencil

·         Ink Pads – Distress Oxide Speckled Egg; Distress Inks – Faded Jeans, Chipped Sapphire, Mustard Seed, Spiced Marmalade; Versafine Clair – Nocturne

·         Card


Instructions:-


Cut card to measure 10ins x 5 ½ ins. Score at 1 ½ ins, 3ins, 6 ½ ins. Mountain fold at 1 1/2 ins and 6 ½ ins and valley fold at 3ins. Set aside.              


   Cut card to measure 5 ins x 5 1/2 ins for the topper.
Blend Speckled Egg Oxide around edge of card, fading colour intensity towards centre. 

 Place Patterned Borders stencil over card as shown, masking areas above and below 'wave' pattern and lining up the card edge with the bottom wave stencil line. Blend Chipped Sapphire over the ‘wave’ image.

4.       Remove stencil and repeat, this time placing the ‘wave’ pattern above and slightly to the right. Repeat this process until desired amount of ‘crested’ waves completed.

Draw around small lid or bottle on sticky note, trimming away circle centre. Place this mask at top of stencilled topper and blend over Mustard Seed and a small amount of Spiced Marmalade to create sun. Remove mask.

6.       Spritz entire image lightly with water, allow to settle then blot. When dry, trim to 1 ½ ins and 3 ½ ins but removing a sliver down both long and short sides.

7.       Adhere each piece to both steps of the reserved card blank.


 Stamp leaves from Droplet Flower set, single leaf from Retro Flower and leafy branch from Patchwork Flower twice, colour (I used Windsor and Newton water colour pens - two greens for leaves, yellow, orange and ochre for leafy branch and a medley for the leaf/surfboards) and trim leaving a narrow border. Attach to card, ensuring the single leavesare positioned to resemble surfboards. If desired, fussy cut some 'wavelets' and adhere over first surfboard.


9.       Add sentiment. (this was hand written.)

10.   Draw in some birds close to sun using a micron pen.

11.   Add white highlights with a white Sakura pen.


Thank you for following this. It was certainly great fun working out my original idea. 

All stamps may be found on Cleverprints website. 

#cleverprints #janeroystondesigns #patternedflowers


Kind regards,

Shelagh

The Making Lady


Friday, 8 April 2022

Cleverprints 'Under the Sea'

 Pop Up Card


'Under the Sea'

by Jane Royston for Cleverprints

Hi and thank you for visiting. 

Today's blogpost is a pop up card which folds flat for mailing, although any amount of embellishments may be added for effect. Stamps and papers are from Jane Royston's latest designs for Cleverprints - 'Under the Sea' collection. 


Materials:-

  • Card
  • 'Under the Sea' Background Paper 
  • 'Nautilus' and 'Jellyfish' Stamp sets
  • Ink Pad - Versafine Onyx Black
  • Sparkle Pens (or Quickie Glue Pen and glitter)
Instructions:-
Step 1
Cut Card 1 to measure 10ins x 5ins and score along the long edge at 3/4ins, 1and3/4ins, 4 and 1/8ins and 5 and 1/8ins. Add red liner tape.

Step 2
Cut Card 2 to measure 5ins x 5ins and score at 3ins and 4ins. Add red liner tape.


(Metric  Card 1 - 26.5cm x 17.5cm scored at 2cm, 4.5cm, 10.5cm and 13cm. Card 2 - 12.5cm x12.5cm scored at 7.5cm and 10cm.) 

Step 3

Cut panel a tad shorter and narrower than scored areas - from background paper and adhere to card base as shown. Repeat for all visible sides.

Step 4

Repeat with smaller card and attach over, ensuring the card folds flat when attached. 

Step 5

Cut card topper to measure 2 and 1/2ins x 4ins and stamp Nautilus.

Step 6

Stamp a second image onto a 'sticky note' and cut out to form a mask. 
Apply over nautilus on card. Stamp Jellyfish tentacles along base and top of card. Remove Nautilus mask and colour. (Alcohol markers used here.)

Step 7

Add detail with sparkle pens, glue pen and glitter etc. 
Add chosen sentiment. 

The possibilities are endless!

Enjoy your creativity.

Best wishes,

Shelagh
'The Making Lady'

Thursday, 17 March 2022

Cleverprints Inspiration Week 'Follow Your Dreams' collection of stamps and dies.

Hi and many thanks for looking in. My project is a quick and easy home decor hanging using minimal materials and with the variety of stamps in the collection, the possibilities are endless.

 Follow Your Dreams by Cleverprints


Materials:-
  • Cleverprints 'Follow Your Dreams' stamp collection and 'Paper Leaves' die set. 
  • Alcohol Pens
  • Ink Pads - Versafine Onyx Black, Distress Oxide Mermaid Lagoon
  • White Card - 3 squares of 4inch sides
  • Ribbon
  • Cropodile or hole punch
Instructions:-

Step 1

          1. Cut three pieces of white card to measure 4inches x 4inches.
              (Round corners if desired.)
Step 2
 

2. Stamp chosen design 'off the page' from 'Fly High' set on first card.

Step 3


3. Repeat with card 2 using 'Fly High' and 'Curly Blooms'.

Step 4

4. Stamp images from 'Curly Blooms' 'off the page' on either side of third square.

Step 5


5. Colour images with medium of choice - I used alcohol markers. 

Step 6
6. Blend Mermaid Lagoon Oxide around edge of coloured cars, flick some water over, allow to settle then blot with cloth or kitchen roll. 

Step 7
7. On Cards 1 and 2, punch two holes top and bottom. On Card 3, punch two holes at top only. Thread ribbon through to complete.

*Flowers from 'Paper Leaves' die set were cut from 'mop up' papers and added as extras. 

Many thanks for checking in with my blog. 

Back sometime soon.

Best wishes,

Shelagh, 
'The Making Lady.' 


Saturday, 29 January 2022

Take One Stamp!


Hello and thank you for visiting my blog.

How exciting it is to be part of Cleverprints Inspiration Week! 

#createwithcleverprints

For my contribution, I have used one small stamp and one stamp only from Jane Royston's 'In the Garden' collection. 

Having a love of stamps and ink, pattern building is another joy and this is the route followed here. 

The project began with one card however I caught the 'pattern bug,' continued experimenting, created a series of cards and a folder to store them - all of which are on view at the end of this blog.

I hope you find the series of photos and explanations useful and that they encourage you to create patterns of your own.  Immediately below is my original card. 


Things I used


Materials:-

Card
  • Cleverprints 'Explore the Wild Flowers' stamp set by Jane Royston - small flower
  • Stamp block (or stamp platform if preferred)
  • Card Square 5 1/4ins x 5 1/4 ins (13.4 cms x 13.4cms)
  • Black Ink Pad (I used Versafine Clair as this was at hand)
  • Colouring Pencils (Polychromos are my choice of pencil)
  • Rule 
  • Pencil
  • Card Blank 5 1/2ins x 5 1/2ins (14cm x 14cm.)
  1. With pencil and rule, lightly draw in the two diagonal lines as a guide. (I used a soft 4B pencil so that the lines may be easily erased.) 
  2. Stamp image as shown. 
  3. Turn card by180 degrees and stamp again as in photo. 


5.  Continue adding images to create a cross of flowers. 

6. Using the pencilled lines as a guide continue stamping until pattern achieved.

7. Colour to suit.
8. Attach to card blank, adding a border if desired. *(I used a selection of toning Cleverprints papers.)
9. Finished example!

Further examples
*Some left deliberately without colour; the recipient may wish to add their own. 

Folder:-
Measurements:-
Folder Cover
1. Cut card to measure 13 1/4 ins x 7 1/2 ins. (34.8cm x 20cm.)
2. Score and burnish at 6 1/4 ins and 7ins to create book form. (16.4cm and 18.4cm.)


Folder Pockets
1. Cut card square to measure 5 1/2 ins x 5 1/2 ins. (14cm x 14cm)
2. Score at 1/4 ins and 1/2 ins on each side. (7mm and 14mm)
3. Cut square across diagonal, fold in and burnish on each score line. 
4. Trim away excess card at each corner. 
5. Adhere to each inner side of folder. (I used strong double sided tape.)

Cover
1. Stamp pattern on white card rectangle measuring 6 3/4ins x 5 1/2ins (17 1/2cm x 14cm.)
2. Stamp pattern and colour.
3. Attach ribbon across centre of front cover. Secure firmly by adhering decorated cover over.

Many thanks for taking time to scroll through this post as I have greatly enjoyed my return to blogging.

For this week there is a discount code for the Cleverprints website that gives 10% off across the entire site including clearance section. The code is...

IWTENOFF

The customer needs to enter this into the voucher code box before checking out.


Back soon. 

Best wishes,

Shelagh
'The Making Lady'

#cleverprints
#janeroyston
#inthegarden
#createwithcleverprints


Friday, 21 January 2022

December 2021 Favourites


Not another post!!! Attempting to relearn the idiosyncrasies of blogging, it is taking time.


A selection from December 2021


Blended blue and yellow ink, overstamped with Leafy Swirl and sentiment stamped on the horizon. Mounted onto black and designer paper.

Claritystamp Leafy Swirl and 'God Bless You' stamps


Ginkgo stamp and stencil set stamped on a pigment powder background. Multiple stamping to create narrow border.

Claritystamp Barbara's Ginkgo Spray A5 & A6 stamp. mask and stencil

Heart and circle stamps from Journal Stamps repeatedly stamped to create flower heads and dragonfly. Sentiment from set added. Coloured with Polychromos.

Claritystamp Calendar and Journal Accessories Stamps

Thanks for tuning in. 

Back soon.

Best wishes,

Shelagh
'The Making Lady'