Thursday, 30 March 2023

Cleverprints Blog 9

 It's Not Unusual . . .

. . . to find many ways to use the 'Not a Weed' stamp set from Cleverprints. Here is one made at the weekend.  


Materials:-
  • Cleverprints - Not a Weed, Whatever You See stamp sets; Abstract Hearts dies
  • Watercolour Markers - Blue, Yellow, Red
  • Card - Smooth Watercolour; Yellow
  • Black Ink Pad
https://www.cleverprints.co.uk

Instructions:-

1. Cut card stock to measure 16cm x 16cm. Score and fold at 11cm.

2. Stamp large triple heart from 'Not a Weed' set on edge of inside of card. 

3. Repeat on narrower front of card. 

4. Mask off area surrounding one heart with sticky notes, stamp flower insider heart. Stamp flower again on sticky note, cut out, place on card over stamped flower and stamp flower again. Repeat until heart filled with blooms. 


5. Repeat on remaining two hearts. 


6. Trim away excess card around hearts.


7. Colour with watercolour markers. 

8. Die cut heart from 'Abstract Hearts' from toning blue and yellow card. Trim die cuts to suit and attach over design. Add sentiments. 


. . . And there we have today's 'make.' 

Thank you for viewing this page.

Best wishes and happy crafting!

Until next week!

Shelagh

'The Making Lady.'


Monday, 27 March 2023

Cleverprints Blog 8

 Cleverprints Blog 8

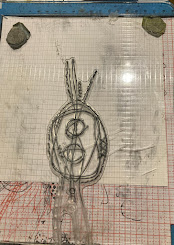
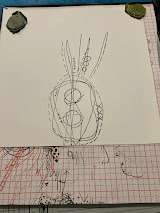
Hello - blog time again! Today's project - 'The Vase.' I very much wished to use the large stamp from the 'Whatever You See' set and this is the end result.


The Vase

Materials:-

  • Cleverprints Stamps - 'Whatever You See,' 'Not a Weed'
  • Watercolour Pens - Blue, Purple, Red, Pink, Green - Light and Dark, Yellow
  • Black Ink Pad
  • Self-adhesive Gems
Stamps from https://cleverprints.co.uk

Instructions:-


1. Ink large stamp from 'Whatever You See' and stamp onto cardstock, leaving the lower lines off the page. 


2. Ink upper lines only and over stamp image to create more stems.


3. Stamp flowers from 'Not a Weed' set at the end of each 'stem.' 


4. Scribble watercolour markers onto craft mat or stamp block and colour 'vase.'


5. Continue colouring stems and flowers. 

6. Stamp background with stamp from one of the sets. Colour to suit.


7. N.B. Here I stamped another vase to decoupage - but in the end decided against it. 


8. Stamp several flowers, trim and add to vase and stems. 

9. Add gems to flower centres.


10.   . . . And there we have it, ready for a sentiment. 

Thank you again for looking in. 

Best wishes and happy crafting!

Shelagh
'The Making Lady' 


Sunday, 26 March 2023

Clarity 2023 Blog 1

 Hi - it is blog time again and today the subject is a card created for the Clarity Create and Craft shows on Friday 24th May which rekindles a memory from our time spent in The Hague. 


Materials:-
  • Claritystamp - Holland Stamps
  • Brayer
  • Ink Pads - Green, Yellow, Red, Pink, Orange, Blue; Black
  • Colouring Pencils
  • Clarity Designer Paper
  • Card - White, Black
  • Kraft Card Blank
Instructions:-
(No pictorials as the card was sent before the idea of a blog was formulated.)

1. Lightly brayer blue and pink inks across white card. 
2. Stamp windmill toward left of brayered card. 
3. With masking tape, secure two strips of scrap card below windmill fence. 
4. Blend chosen colour between card strips, creating a darker shadow down one side of the uncovered area. 
5. Move the strips, tape in place as in 3 and blend with another colour. 
6. Repeat, changing colour each time to give the illusion of a bulb field. 
7. Shade windmill with grey colouring pencil. Add sun. 
8. Layer onto black card, Designer Paper, black card and finally onto card blank.


Thanks for looking at my blog.

Best wishes and happy crafting.

Shelagh
'The Making Lady' 

Claritystamps


Materials:-


Wednesday, 22 March 2023

Cleverprints Blog 7

 Hello and thank you for tuning in. 

For today's blog, I have chosen a stamp - 'Sarah' - from the Cleverprints Sales Section where there are many bargains to be had. Certainly worthwhile looking in!

First Journal Page!

Materials:-
  • Cleverprints 'Sarah' stamp (from 'Sales Section.')
  • Cleverprints 'Nautilus' (Journal Page Border)
  • Cleverprints 'Swirly Flower' (Hair Decoration)
  • Cleverprints Stencil - 'Mazes'
  • Watercolour Pencils
  • Watercolour Crayons
  • Alcohol Markers
  • Gems
Instructions:-
  1. Main image:- Stamp 'Sarah;' colour to suit with watercolour pencils. Blend out with waterbrush.


  2. Continue with toning colours. Blend colours as before.
   3. Stamp second image. (Ignore smudge as it will be covered in a later stage.)        Colour as before. 
    4. Trim out 'hair bubbles.'
 
    5. Trim first image and adhere 'hair bubbles' to form a dress front. (At this stage I 'cut off her head!!! as I wished for a more questioning image. The head was reattached further down the neck by means of foam tape.)
   6. Background:- Attach stencil to card and score through with watercolour crayons. 
    7. Add more colurs then blend out with waterbrush. 
    8. Stamp 'Swirly Flower' and colour with alcohol markers. Attach behind           image. Attach to stencilled background with foam tape. 
    9. Stamp border from Jane Royston's 'Nautilus' stamp set around border of journal, colour roughly with alcohol markers then adhere completed image centrally. (Wet glue a preference here as the substrate was firm watercolour paper.)
    10. Add gems to collar. 

     
   *The caption was added as hair and decoration were reminders of Marie Antoinette portraits, although not deliberate. 

My first journal page - let's not anticipate another one soon!

Meantime,

As ever - happy crafting!

Shelagh
'The Making Lady' 


Thursday, 16 March 2023

Cleverprints Blog 6


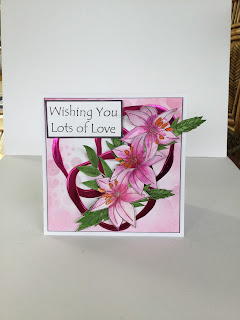
Hi and welcome to my blog. After last week's birthday card, this week's contribution was made with my mother-in-law in mind as she does love receiving flowers on Mother's Day with the essential stargazer lily ever present in the arrangement. 

. . . And on to  the step by step. . . 

Mother's Day

Star Lily Card


Materials:-

Stamps - Cleverprints Tropical Flowers - Lily, Large Leaf, Small Leaf

              Cleverprints Swirly Flower - Sentiment

Stencil - Cleverprints #42

Dies - Wiggle Circle Set

*All avalailable from https://www.cleverprints.co.uk

White Card Blank - 15cm x 15 cm

White Card Square - 14cm x 14cm

White Card

Mirror Card

Watercolour Markers - Two colours of Pink; Green; Orange

Ink Pads:- Lavinia Elements Confetti; Harmony Winter Rose; Versafine Clair - Nocturne

Sakura Sparkle Pen 


Instructions:-

  1. On 14cm x 14 cm square, blend pink ink through Stencil #42 bubbles, diluting the colour towards one of the edges. Blend a darker ink around the edges. Set aside.


2. Stamp 'Lily' stamp from 'Tropical Flowers' three times, stamp large leaf once and small leaf three times. 


3. Using chosen medium (watercolour markers used here) colour lilies in pink and leaves in green. Fussy cut all. (Colour added to stamped image then blended out with a waterbrush.)
 
4. Cut three 'Wiggle Circles' from pink mirror card. Reserve centres for future projects. 
5. Arrange Squiggle die-cuts on stecilled square, arrange lilies over - tucking coloured leaves in. Stamp sentiment from Swirly Flowers, edge with black Sharpie and add to top left hand corner. Attach to front of 15cm square card blank. 

Happy Mother's Day!

Thank you for looking in. 

'til next time. . . .
. . . Shelagh
'The Making Lady'


Wednesday, 8 March 2023

Cleverprints Blog 5


Hi there, 

Time for another blog post, the only difference this week is that I have actually met Jane Royston. It was a good excuse for us to have some time away, beginning at the SECC Craft Show where I spent some time chatting to Jane between her 'Make and Take' sessions. Cleverprints will also have a stand at the NEC next week so should you be there, be sure to pop in and sign up. 

There are a few family birthdays pending thus I have combined my blog with one of those. 

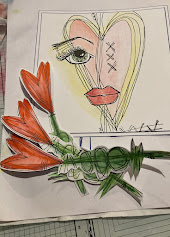
Abstract Birthday Card.


Materials:-

From Cleverprints

Misfits Stamps Collection:- Hearts and Flowers, Misfit

Jane Royston Designs:- Floral Twist - Sentiment

Other Items

Cardstock/Card Blank - 8" x 8"

Black Ink Pad - Versafine Clair Nocturne

Watercolour Markers - Vermillion, Scarlet, Leaf Green, Dark Green, Yellow

Ribbon

Instructions

  1. Stamp large heart from set three times.
2. Trim away 'stem' but retain for future use. Add two colours of red and yellow to craft mat and paint a light red wash on heart with water brush. 
3. Add depth to heart by adding colour directly from marker onto image. Blend colour with water brush. Repeat this process on remaining two hearts and set aside.
4. Using the two greens and a little yellow, colour in the reserved 'stems.' Set aside. 
5. Stamp 'Misfit' onto 7" x 7" white card. 
6. Using the same reds and yellow from craft mat, gradually add water colour to the face; choice is to colour within the all the lines or venture beyond - it's all up to you!

7. Attach each heart to each stem - wet glue used here. 
8. Arrange heart 'flowers' to suit and adhere in place. 
9. Add ribbon and sentiment. 

Et voila! Birthday card complete!

Hope this has inspired you to have a go.

Best wishes and happy crafting!

Until next time - 

Shelagh
'The Making Lady'