Wednesday, 31 May 2023

Cleverprints Blog 17

 Cleverprints

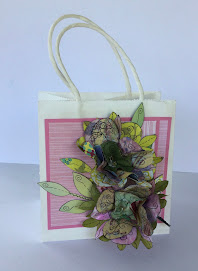
Hi and welcome to 'Shelagh's Crafty Concepts.' This week's blog details an unused but upcycled gift bag and this is the little story behind it. 

For years I made Christmas gifts for my mum's many carers - she had several visits per day, each with two carers - and one year each gift was presented in a seasonally decorated gift bag. Inevitably there were some left over that required a make-over; with the decoration removed, off-cuts of pink card replacing it and flowers added, the bag is fit to go again.   

Instructions and photographs to follow.  

Upcycled Gift Bag

Materials:-
Cleverprints:- 
  • Stamps - Patterned Flowers
Extras:-
  • Patterned paper off-cuts
  • Black Ink Pad
  • Fine Wire
  • Beads
  • Washi Tape
  • Gift Bag - front covered with toning card.
Instructions:-

1. Stamp chosen flower from Patterned Flowers set four times on patterned papers.

2. Trim stamped shapes as shown. 

3. Thread short lengths of wire with five small beads, create a loop at the top and twist both ends of wire together as in top left of photo. 

4. Spritz shapes with water. 

5. Thread a beaded wire through the trimmed shapes, beginning with the smallest. When all four shapes are threaded, scrunch them gently then carefully unfold. Allow to dry. Wrap washi tape around the stems.

6. Attach to front of bag. (I used both strong doubles sided tape and wet glue.)
NB - I also  added leaves from the Patterned Flower stamp sets for effect. 

*Some flowers added to a clean empty mustard pot. 

*Flowers made with other flowers from 'Patterned Flower' stamp sets.


*Napkin rings would make a lovely addition to a summer barbecue table. 

Thank you for looking in. 

Best wishes and happy crafting,

Shelagh Metselaar
'The Making Lady' 


Wednesday, 24 May 2023

Cleverprints Blog 16

 Cleverprints

Blog 16

Hello and welcome to this week's project. Initially it was to be a shaker card but then I had the the idea of covering the inky background with actetate or film to mimic water. Having found a box of Overhead Projector Film (OHP) in a recent workroom tidy, this offered the ideal solution. 

Happy crafting! 

'Through the Round Window!'


Materials:-
  • Cleverprints products - Under the Sea Stamp sets - Jellyfish; Nautilus - seaweed; Sea Urchin - seaweed; Starfish - seaweed; Seahorse - bubbles (for porthole)
Extras:- 
  • Ink:- Blue, Turquoise
  • Ink Pads:- Black
  • Watercolour Markers:- Greys - Warm, Cool; Blues:- Light Turquoise, Medium Turquoise; Greens:- Lime, Medium, Dark.
  • Sequins
  • Self Adhesive Gems 
  • Watercolour Paper
  •  Acetate  (OHP film from my stash)
Instructions:-

1. Cut watercolour paper to measure 5in x 5in. Lightly pencil in each diagonal.

2. Using a circular object - sticky tape inner, die etc - lightly draw a central circle.

3. Stamp bubbles from 'Seahorse' stamp set on first arc of circle. 

4. Continue to complete circle. Cut away excess paper to form a ring - the porthole. Colour with blue watercolour markers.
 
5. Create watery background by spritzing watercolour paper then dripping on dark blue and turquoise inks. Spritz again to move ink around. Dry - naturally or with a heat gun. 
Trim to square of side 5in.
Stamp jellyfish and colour with watercolour markers.

6. Decorate jellyfish with self-adhesive gems. 

7. Run narrow double sided sticky tape around reverse of 'porthole.' Attach acetate/film sheet over tape. Layers are 1) porthole, 2) double sided sticky tape, 3) acetate/film. The next layer will be the foam tape as in photo below.

8. Arrange foam tape on reverse of film.

9. Run double sided sticky tape along reverse edges of watercoloured background. Place this onto film, choosing where the porthole features over the jellyfish. Fold in film edges, attaching to the double sided sticky tape. 

10. Stamp sentiment on background trimmings. Add to card.

                                            
10. Decorate porthole with sequins.

11. Stamp seaweed and colour. Trim and add to card topper. Attach to 5.5in x 5.5in card blank. 

Et voila! This week's project. 

Thank you for reading this. 

Best wishes,

Shelagh
'The Making Lady' 


Wednesday, 17 May 2023

Cleverprints Blog 15

Hi and once again welcome. This week's blog consists of something we all need from time to time - a quick card! The initial thought was to add stamped images however the card and paper collection is rather delightful thus simplicity became the order of the day with a few glittery highlights for definition. Enjoy! 

 Cleverprints

Ten Minute Card. 


Materials:-
  • Cleverprints - 'Under the Sea' Card and Paper Collection - one sheet cut to measure 12cm x 12cm
Extras:-
  • 15cm x 15cm card blank
  • 13cm x 13cm cardstock - white
  • Glue Pen
  • Fine Glitter - Hint of  Copper
  • Foam Tape
Instructions:-

1. Select sheet from 'Under the Sea' collection. 

2. Trim to measure 12cm x 12cm. (I chose to use the seahorse as a feature.) Adhere to 13cm x 13cm square of white card with foam tape to add dimension. Edge white border with toning alcohol marker.

3, Cut two squares from off-cuts to measure 4cm x 4cm. Cut those along one diagonal to form four triangles. Attach three of these, one to each corner, omitting top right-hand side. 

4. Again from off-cuts trim out two sentiments and attach - with strips of foam tape - to two diagonally opposite corners at top left and bottom right. (I edged the sentiments with a black Sharpie before adhering.) 

5. Outline areas of the printed image with a glue pen then sprinkle over glitter.

Et voila - a ten minute card!

Best wishes and . . . 

Happy crafting.

Shelagh
'The Making Lady'


Claritystamp Blog - Design of the Week Word Chains

 Claritystamp

Hi and welcome. Some favourite examples from my archives to celebrate Claritystamp 'Design of the Week.' Word Chains are so versatile they fit perfectly with all Clarity products - Stamps, Fresh Cut Dies, Stencils and Groovi. Although I cannot provide step by step, I can atleast allude to the components. Enjoy!


1) Race Day

Materials:-
Claritystamps:-
  • Alphabet and Numbers Word Chain 
  • Barbara's Clarity Characters Collection
  • Wee Sports People Stamp Set - Cyclist (Jockey)
  • Union Jack Stamp Set - Flag Pole (Rails)
  • Horse - from an old 'Carriage and Horses' stamp set

2) Delft
(visited there again at the weekend!)

Materials:-
  • Word Chain Alphabet
  • Wee Shops
  • Village and Harbour Stamp Set
  • Wee Folk 1
  • Wee Farm Scene Set

3) Winter Blackbird

Materials:-
  • Bird Outline Stamp Set
  • Garden A5 Square Stamp Set
  • Word Chain 13 - Christmas
  • Word Chain 04 - Blessings
  • Clarity Miniatures Collection - Trees

4) Country Chums

Materials:-
  • Mini Word Chain 08 - Friendship
  • Country animals Montage Stencil
 
5) Lovely Allium

Materials:-
  • Word Chain 19 How Kind
  • Word Chain 17 Surprise
  • Alliums Stencil
  • Alliums Aperture Die
Components from https://claritycrafts.com

Happy crafting!

Shelagh
'The Making Lady'


Wednesday, 10 May 2023

Cleverprints Blog 14

 Cleverprints

Hi - and this week's 'make' is a simple card, comprising images from 'Build Me Up' stamp sets. The initial design evolved into something completely different. Enjoy!

Build Me Up Butterfly Card


Materials:-

Cleverprints Products

  • Stamps - Flower  Fragments, Bugs and Bits
  • Stencil - Dizzy Daisy
Extras
  • Ink Pads - Versafine Clair Nocturne; Distress Oxides - Ripe Persimmon, Dried Marigold, Crackling Campfire, Vintage Photo
  • Alcohol Markers 
  • Card - Whit, Black, Kraft
Instructions:-
1. Stamp small circle series stamp from 'Bugs and Bits' set with black on white card. Stamp this image onto a sticky note and trim. Reserve. (Please ignore the score lines throughout all photos - originally intended to include these but trimmed them off in the end.)

2. Stamp two large petals as 'wings' - one on either side of initial image. Stamp two more petals on a sticky note and trim. Add onto stamped image.

3. Add to stamped image.

4. Stamp two smaller petals for lower wings.
 
5. Stamp images from 'Flower Fragments' to form first flower, using sticky note masks to prevent areas from being over-stamped.'

6. Repeat for second flower.

7. Add stems and leaves, masking where required.

8. Colour. Add background stamps in a toning colour. Blend Dried Marigold, Ripe Persimmon and Crackling Campfire lightly over card maintaining darker tones around the perimeter. 

9. Mat onto black card. Set aside.  

9. Attach stencil to another white card. Blend Vintage Photo Oxide over. Remove stencil and apply more Vintage Photo to deepen colour around edges. 

10. Attach main image onto stencilled image, trim and mat onto black then Kraft card. 

Et voila! Build Me Up Butterfly card. 

Meantime, happy crafting!

Best wishes,
Shelagh,
'The Making Lady.' 


Wednesday, 3 May 2023

Cleverprints Blog 13

Cleverprints

Hello and welcome! 

This week's project is a slight deviation from the norm and something I wished to explore for some time. Details and photos below as usual. 

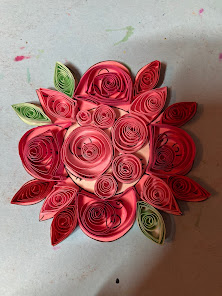
Quilling with Patterned Flower Stamps

Materials:-

Cleverprints Products 
  • Patterned Flowers - Swirly Flower
Extras
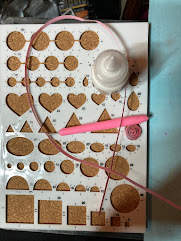
  • Quilling Tool - split needle; a needle lodged in a wine cork may be used at a push
  • Quilling Strips or coloured paper cut from long side of A4 paper to width 1/8th inch
  • Glue
  • Ink Pad
  • Alcohol Markers
*My quilling accoutrements - tool and strips - were from a well known book/craft store but I also have similar which were craft magazine free gifts. 

Instructions:-

1. Stamp large flower image and trim along black outside lines.

2. Colour stamped image with alcohol markers - colours to match quilling strips. 

3. Colour some outside petals green for (leaves.)

4. Select strip to complement circles in flower centre. Beginning with the largest, coil a strip and place into largest circle on board. Remove carefully without unwinding coil, place a spot of wet glue to adhere outside edge of strip thus forming a secure coil. 

5. Adhere coil to largest circle. Continue until all central circles are covered. 

6. Form coils in the same manner to fit the four largest outside shapes, this time pinching both ends once the end of strip has been adhered to the coil. (Almost an 'eye' shape.) Adhere to stamped image as before.
*Use shorter strips for the smaller petals. 

 
7. For leaves, cut strips into quarters and 'quill' as before. Attach. 

8. Continue until complete.

9. Adhere quilled flower to card and draw a pencil line stem. Quill a number of leaf shapes from short strips of green paper and adhere over pencil line to form stem. (Check main photo.)

10. Edge card with toning alcohol marker. 
*(I decided to leave the surrounding 'white' space unadorned.) 

Et voila! A 'swirly' quilled flower. 

Thanks for looking in. 

As always,

Happy crafting!

Shelagh
'The Making Lady.'