Thursday, 29 September 2016

Indigoblu 'Autumn Wildlife' Challenge - Stag Night!

Indigoblu Challenge September 2016
'Autumn Wildlife'

This was a difficult challenge and I almost did not attempt it as I have only one suitable stamp and here it is. I have also used a different technique and no! I haven't smudged the image - I deliberately over-stamped the first image with a darker colour - just to see if I could achieve a more dimensional effect. I did have to have to repeat the process a few times (well seven actually) until I got it to work. 
The composition was inspired by Royal Deeside as a few times each year, we drive along there to go 'deer chasing.' This is not literal - we try to spot them on the hills above Braemar! It can be quite tricky as the herds are very well camouflaged. I hope the tinges of purple convey the last remnants of this year's heather and the rusty brown the dying bracken. We still have a few of our summer migrants around, hence their inclusion around the top.

Materials:-

  • Cardstock:- white, gold pearlescent, bronze pearlescent
  • Stamps:- Indigblu - Looks Like Rain, Deer; Nature1, Mr Darcy
  • Inkpads:- Ranger - Archival Black; Distress - Wild Honey, Rusty Hinge, Vintage Photo, Hickory Smoke, Old Paper, Antique Linen, Black Soot, Milled Lavender, Shaded Lilac
  • Miscellaneous:- Charcoal pencils - light, white; Sharpie pen - black
Instructions:- 
  1. On white 7ins x 7ins card, stamp the large stag from 'Looks Like Rain Deer' set using Rusty Hinge. Overstamp again with Vintage Photo but slightly offset. 
  2. Using a damp paintbrush, pull in colour from the stamped lines towards the centre of the stag. 
  3. Stamp stag again onto sticky notes, cut out and use to mask image.
  4. Tear copy-paper into a mountainous landscape shape, place over the card and blend background using Old Paper, Antique Linen and Hickory Smoke.
  5. Repeat at base of card with Wild Honey and Rusty Hinge. 
  6. Cut a circle from a sticky note, apply to card and blend Milled Lavender and Shaded Lilac to create sky. 
  7. Lightly blend Lilac and Lavender onto hills. 
  8. Stamp trees using Archival Black, deer using Hickory Smoke and birds using second generation Archival Black. Stamp bushes around base using Archival Black, branch stamp from Nature 1 but Do Not use a stamp mount - apply by pressing with fingers to achieve a random effect. 
  9. Add shadows with Black Soot and charcoal pencil. Add white pencil to highlight areas.
  10. Cover hills and stag with paper, spritz water into air and pull card through. Blot with kitchen roll. Repeat until desired effect achieved.
  11. Drag a black Sharpie around all four edges then mount onto gold followed by bronze.

 . . . . And there we have my submission for the Indigoblu Challenge 'Autumn Wildlife.' 

Monday, 19 September 2016

Glowing Colours and Tiny Wings

Indigoblu Challenge August 2016
'All Things Bright and Beautiful'
Glowing Colours and Tiny Wings!


For the card I used a combination of Indigoblu stamps - Ledger Background (blots only), Rococo (sentiment), Nature 1 (grasses and butterfly), Mr Darcy (birds and lace), Discover Your Passion (dragonfly), Poppy Heart, Blazing Poppies. 

The ink pads were all from Ranger - Archival Black and Distress - Barn Door, Fired Brick, Picked Raspberry, Aged Mahogany,  Walnut Stain, Black Soot. 


The aperture was die-cut, coloured and the background stamped. The die-cut card was stamped with the lace strip, then images on each side stamped using either side from the 'blots' edge from the Ledger stamp. (In a previous life, I cut this area of the Ledger stamp off and it has made it easier to use independently.) Butterflies, poppies and dragonfly were stamped, inked and added, along with a lacquer glaze and a little bit of bling. 


. . . and here we have 'Glowing Colours and Tiny Wings!

Thursday, 15 September 2016

Le Jardin Japonais

Clarity Challenge 43 Mid-month
‘In the Garden’

Le Jardin Japonais

Materials: -
·         Clarity Stamps: - Asia/Oriental set
·         Clarity Stencil: - Sunshine Stencil
·         Clarity Groovi: - Octagon Nested Groovi
·         Cardstock: - Clarity Stencil Card 7x7ins; Gold Mirri, Black matte
·         Inkpads:- Distress Barn Door, Fired Brick, Spiced Marmalade, Carved Pumpkin, Squeezed Lemonade, Mustard Seed
·         Miscellaneous: - Versamark pen; Wow gold embossing powder; Polychromo Coloured Pencils; alcohol pens
Instructions: -
1.       On scrap pieces of parchment and using the Octagon plate, outline the largest and second largest octagons (two separate pieces.) Accurately cut out each and use these as templates – the largest for the black mount and the second largest for the card shape. Draw around each on the reverse side of card and cut out. Set the black octagon aside.
2.       Mask off areas on the clean side of the white card to create an angular pattern. Stamp a selection from the Asia set in each masked area. Stamp and cut out sticky note masks for lanterns, lady and water-lillies and apply over stamped images.
3.       Using sticky notes to mask complete areas at a time, blend/brush over yellow, orange then red Distress inks from the centre out. (I used the Sunshine stencil over the masked, stamped lanterns.)
4.       Remove masks and colour areas of the stamped images to suit.
5.       Cut out areas and over stamp chosen shapes with birds and bamboo.
6.       Edge each shape with a black alcohol pen. Now using the Versamark pen ,edge each shape with a fine line,  apply gold embossing powder and heat set.
7.       Glue each shape onto the black octagon mat.
8.       Mount onto gold mirri and trim.

9.       Lastly glue onto another black mat and trim to leave a 1cm border.

Thursday, 1 September 2016

Clarity Challenge 43 'In the Garden'

September 2016
‘Tom’s Midnight Garden’
Hello and welcome! 

We have a new month and also a 'new look' Clarity Challenge blog. Exciting times, indeed!

Thank you for looking at my Clarity Challenge 43 contribution. Alas it's not my usual step-by-step as I made 'Tom's Midnight Garden' before leaving on an around Britain trip to Ayrshire, Chester, Oxford, Bath, Royal Tunbridge Wells on a lead-up to my second Clarity Retreat. (And what a treat it was, too. Many thanks to Barbara, Paul, Dave, Jayne my 'buddy' Lynne and everyone else involved in making it such a lovely, messy, fun and informative experience.) 
I can however offer a number of photos of the stamps and stencils used throughout the blog.The daisies were stamped on old book pages and leaves on copy paper which was then coloured, you know how much I like my 3D additions!

I DID find this challenge lived up to its name and for this reason once again I turned word-play to decide the route I was going to take. I wonder which road you will follow? Looking forward to viewing your wonderful pieces of art-work on the Clarity Challenge; all details and guidelines are to be found at claritystampchallenge.blogspot.co.ukclaritystampchallenge.blogspot.co.uk and this includes how you can submit your post from your blog or send by email a photo of your work to claritystampchallenge@hotmail.com


Materials:-
·         Clarity Stamps: - Cat from ‘Lucky’ set; Leaves from ‘Poppy’ set; Meadow Grasses set; NDC 99 – Daisy outline stamp.
·         Clarity Stencils: - A5 Bird Table; Brick Wall.
·         Clarity Moon mask - Large
·         Cardstock: - Clarity Stencil Card 8.5x11ins
·         Inkpads: - Distress - Chipped Sapphire, Stormy Sky, Dusty Concord, Squeezed Lemonade, Mustard Seed, Fossilized Amber, Black Soot; Memento – London Fog, Tuxedo Black.
·         Miscellaneous: - Clarity Brushes; Old book pages; Micron pen; alcohol pens – rust/brown and yellow, Polychromo coloured pencils.


Instructions:-
For the embellishments: -

1.       Stamp the daisy 21 times onto old book pages using Tuxedo Black; cut each out and glue together in threes to form seven flowers. Using alcohol pens, colour the centres and on two flowers, trim away some petals. Set all seven flowers aside.

2.       Stamp 11 leaves from the ‘Poppy’ set; blend over Shaded Lilac, Wilted Violet and Chipped Sapphire and cut out. Set aside.
For the background: -
3.       Attach large moon mask to top right of the Clarity stencil card.

4.       Tape the Bird Table stencil over the card, having masked off the birds with tape or similar and gently brush over ‘London Fog,’ ensuring areas in the shade are slightly darker. To intensify colour around edges, use a make-up sponge to pick up residual ink from stencil and dab over. (Thank you, Barbara and Paul for this little tip!)  Remove stencil.

5.       Tape the Brick Wall stencil along the lower half of the inked bird house.
6.       Tape the bird table stencil over the inked image and gently brush over a medley of Stormy Sky, Chipped Sapphire and Dusty Concord (in that order) around the perimeter of the card, shading lighter tones towards the centre.
7.       Remove moon mask and replace with moon ‘outie.’ Brush over Squeezed Lemonade, Mustard Seed and Fossilized Amber, concentrating the darker colours at the edge of the moon. Remove mask.
8.       Brush London Fog over the Brick wall stencil. Remove stencils. Trim card to suit.

9.       Using Tuxedo Black, stamp a variety of Meadow Grasses at the base of the inked image. Repeat using Dusty Concord further up the card. Brush Black Soot along the foot of the card, over the existing colour.
10.   Outline top of wall and a selection of bricks with Micron pen.

11.   Stamp ‘Tom’ on top of the wall using Tuxedo Black.
12.   Glue on leaves and daisies.
13.   With Polychromos, add shade where needed.

Et voila – here we have ‘Tom’s Midnight Garden.’

Remember a £50 voucher to spend on goodies from the Clarity website could be winging its way to you, should your submission be selected at random. Then, there is chance of being selected as one of the Top Five. You know you can do it - Go on, go on, go on!!!
claritystampchallenge.blogspot.co.uk

Best wishes,

Shelagh
'The Making Lady'

Wednesday, 24 August 2016

August 2016
Fluttery Butterflies

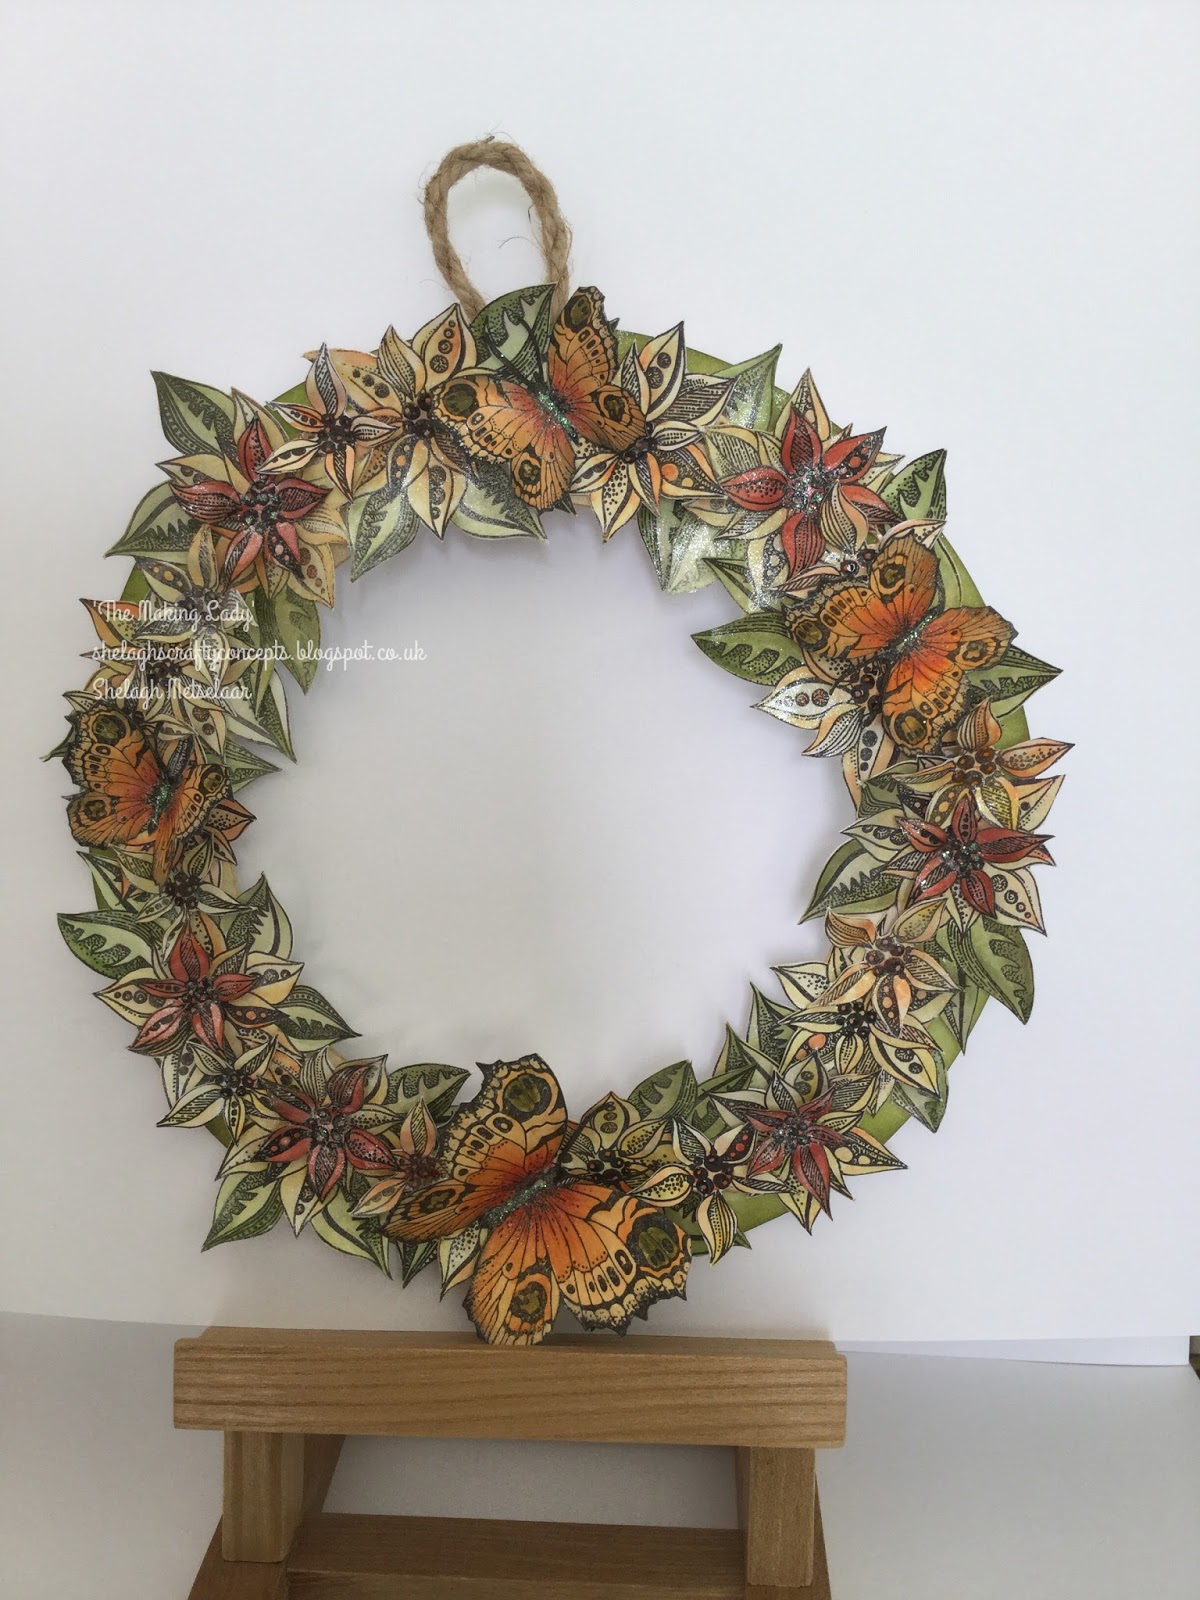
I've just returned from one of my favourite walks - along the Ythan Estuary, just north of Aberdeen - and was as amazed as ever by the wildlife - herons (at least nine,) curlews (dozens,) cormorants, buzzards but sadly no seals, eider ducks or sand martins. Despite recent reports, I saw more butterflies today than ever before including Orange-tips, Meadow Browns and Small Tortoiseshells where one of the latter was sharing a flower with a bee! These sightings were the inspiration behind my decorative wreath and fitted in so well with this month's CB challenge colours. 

Materials:- 
  • Stamps:- Chocolate Baroque - Joyful Christmas Clear Stamp set, A Year of Stamping - April small and large; 
  • Ink Pads:- Versafine - Onyx Black; Distress Inks:- Peeled Paint, Twisted Citron, Fossilized Amber, Wild Honey, Carved Pumpkin, Spiced Marmalade, Fired Brick, Barn Door, Rusty Hinge
  • Cardstock:- White
  • Miscellaneous:- Clear Detail Embossing Powder; Spectrum Noir Sparkle Pens - Solar Red, Clear; Cutting Machine; Fine Glitter; Glue Pen.

Instructions:- 
  1. Cut three rings using a large die or an electric cutting machine and glue together for stability. Blend over a mixture of Peeled Paint and Twisted Citron. Set aside.
  2. Using Onyx Black, stamp the poinsettia twenty four times in 1st and 2nd generation ink for contrast, large butterfly once and small butterfly three times. Heat emboss.
  3. Blend a mixture of the Distress inks to create 'rusty red,' green and yellow flowers and cut out.
  4. Blend yellows and oranges over butterflies and add definition with Rusty Hinge, Fired Brick, Carved Pumpkin, Barn Door and Twisted Citron using a fine paint brush. Cut out.
  5. Add Solar Red Sparkle to centre of butterflies and Clear Sparkle to flowers and leaves.
  6. Dot glue pen over berries and butterfly bodies and sprinkle with fine glitter.

  7. Glue flowers around rings to suit then add butterflies. 
  8. Gently bend petals and wings for a 3D effect.
Et voila! Fluttery Butterflies!

This is my entry for this month's Chocolate Baroque challenge.

Thank you for taking the time to read my blog. 

Shelagh ;~}


Monday, 15 August 2016

Clarity Challenge 42 Mid-month
‘Fussy Cutting’
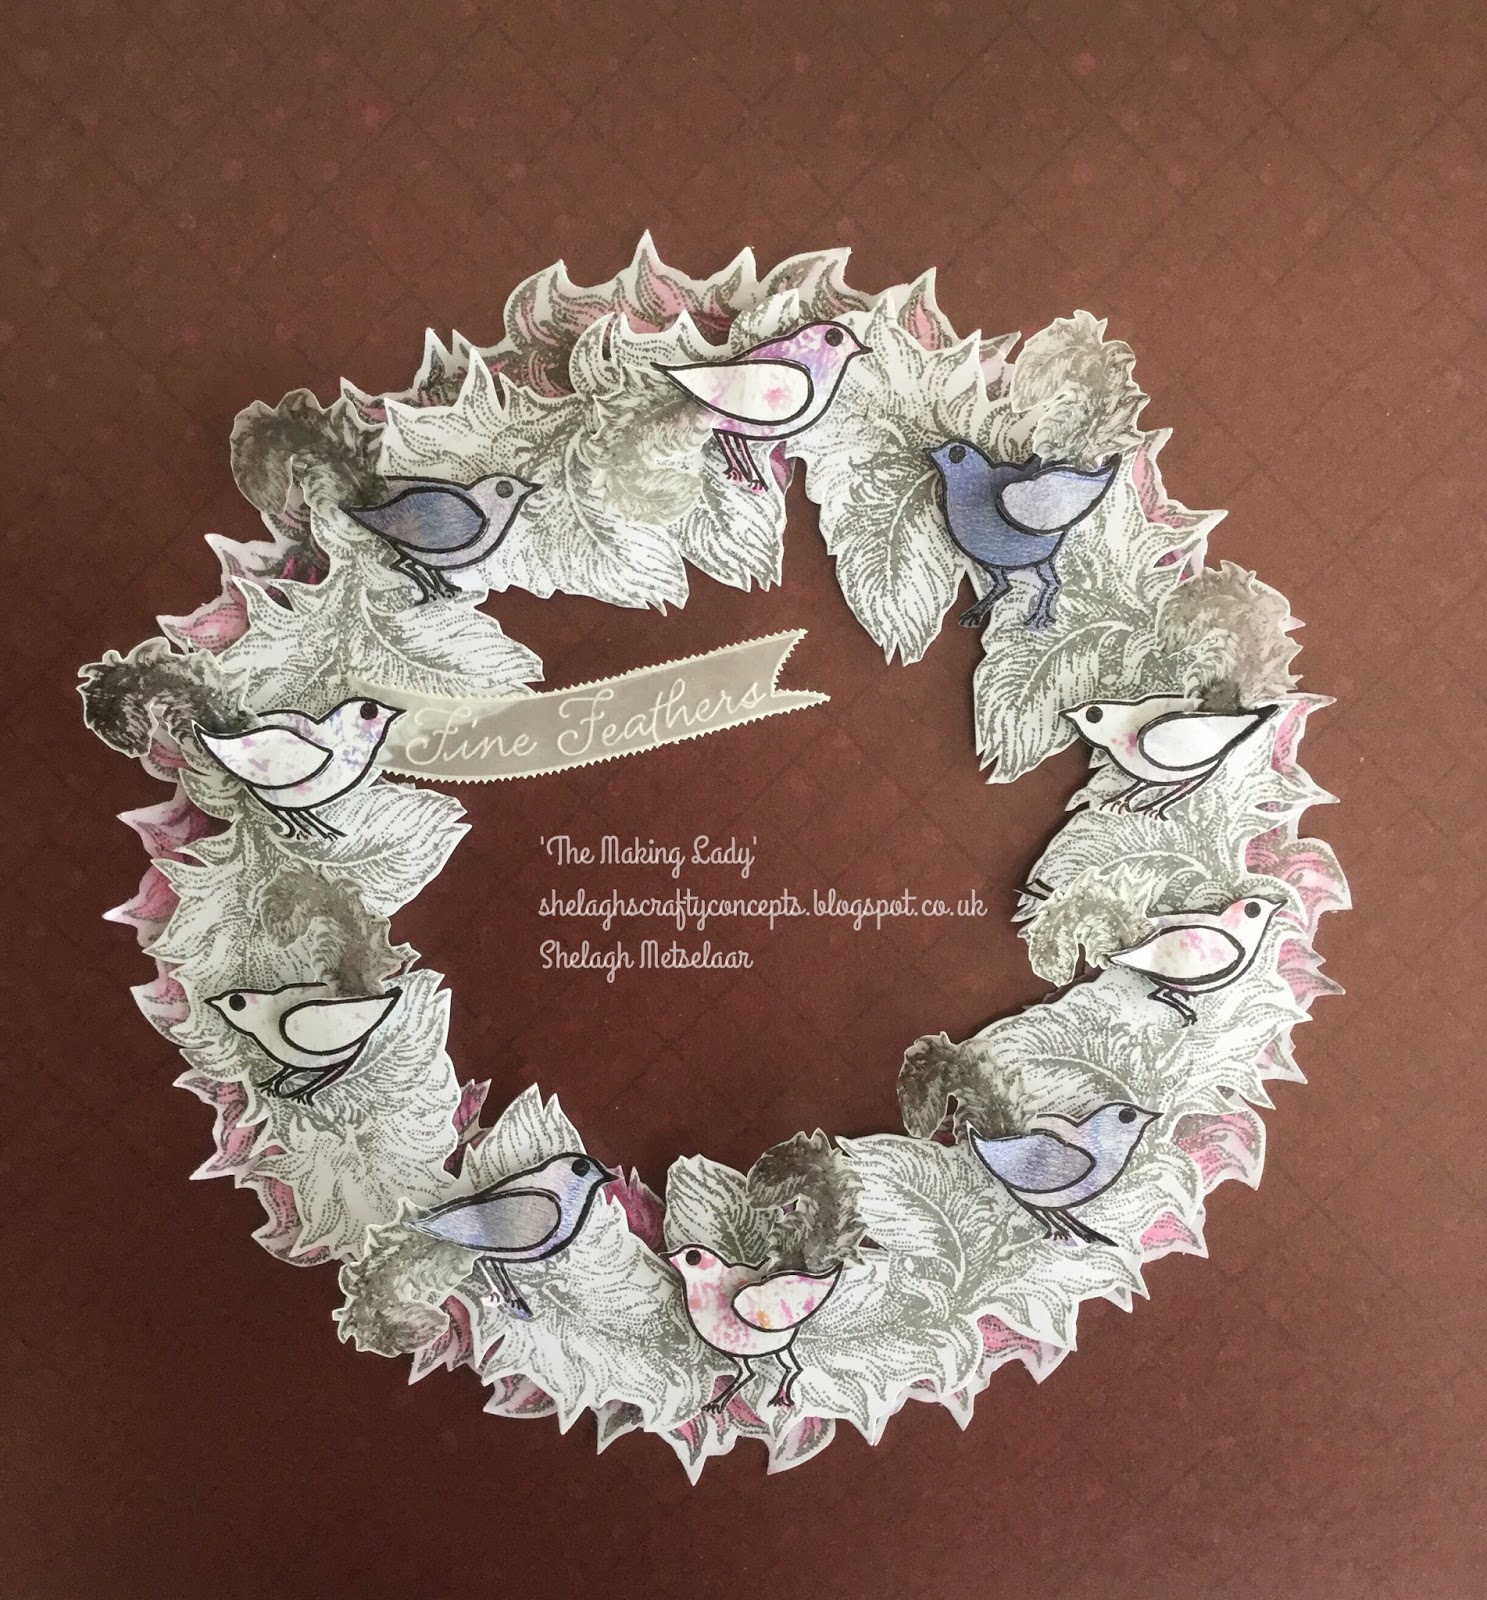
'Fine Feathers!'

Materials:-
·         Clarity Stamps:- Matrix Feathers large and small; Birds form ‘Bird and Flower Row’
·         Groovi :- Banners Border; Calendars, Relatives, Occasions Border plates
·         Inkpads:- Archival – Watering Can, Distress Worn Lipstick
·         Cardstock:- 12 x 12 white card
·         Scrap parchment
·         Fine Detail Embossing Powder


Instructions:-
1.       On a sheet of 12 x 12ins card, lightly draw a circle in pencil (I drew around a ‘salad’ plate – larger than a tea plate but smaller than a dinner plate.

2.       Using Watering Can, stamp the large feather firstly at ‘12o’clock’ then stamp onto post-it notes to form masks. Cut out a number of masks and use one of them to mask the first stamped image. Hover with your feather stamp and decide where your second stamped image will be best placed on your pencilled circle as this will form the pattern.
3.       Continue to mask and stamp until a grey circle has been formed. Fussy cut, leaving a border.
4.       Draw a slightly larger circle on another sheet of 12 x 12 (for this I used an upturned soup bowl) and repeat (3.) Stamp Worn Lipstick onto a Clarity Blending Mat, craft sheet, or glass mat and colour the feather circle with a watered down pink. Fussy cut and reserve.
5.       Stamp the Birds from ‘Birds in a Row’ onto a Gel Press print and cut out. Repeat and cut out the wings only. Attach the wings onto the bird images with foam pads. Reserve.
6.       Stamp the small feather onto scrap parchment, one for every bird image, add embossing powder and heat set. Fussy cut and add as a tail to each bird.
To assemble:-
1.       Place foam tape around the reverse of the grey feather circle and place over the pink feather circle.
2.       Add foam pads to birds and attach to suit.
3.       Using the Groovi Borders, emboss Fine Feathers, pierce with the twin tool then cut out. Add to circle to suit.

Et voila! Les Oiseaux!

Monday, 8 August 2016

Craft Stamper Take It, Make It August 2016

Hello and welcome to my blog. Above is my entry to the 'Take It, Make It challenge in Craft Stamper. Apologies to Rihanna but the title seemed to fit the bill; it was either that or a play on the name of a famous brand of raincoat! Below is a short explanation should you wish to 'have a go.'
Materials:-
·         Stencils:- Clarity Umbrellas, Umbrella Girls, Jo’s Bubbles
·         Stamps:- Clarity – ‘Joy’ set
·         Cardstock:- Clarity -  Stencil Card 7x7ins; Crafters’ Companion – Black A4; Papermania – 8x8 card blank
·         Inkpads:- Distress Inks – Pumpkin, Picked Raspberry, Salty Ocean, Twisted Citron, Fired Brick, Peacock Feathers, Old Paper, Tea Dye, Antique Linen, Black Soot;
·         Miscellaneous:- Faber Castell Polychromos; White Chalk marker; Fine black pen; Quickie Glue pen; Glamour Dust; Wink of Stella – Silver; Turquoise alcohol marker


Instructions:-
1.       Using a loop of low-tack tape, fasten Umbrella Girl ‘inner’ stencil to centre of a sheet of 7x7 card to act as a mask; tape Umbrella stencil over and blend a variety of bright Distress Inks over the stencils.
2.       Remove stencils and tape Umbrella Girl ‘outer' stencil over to protect surrounding colour. Colour image with Antique Linen, Old Paper and Tea Dye. Add definition with Polychromos. Remove stencil.
3.       Add highlights to umbrellas with white chalk pen. Scribble fine borders around coloured shapes and add dots to white areas.
4.       Mist with water spray and blot.

5.       Place Jo’s Bubbles stencil over and colour small circular apertures with white chalk pen. Repeat over main umbrella.
6.       Add Silver Wink of Stella, followed by glue pen and glitter over the white circles on main umbrella.

7.       Stamp music stave from Joy set randomly in 1st and 2nd generation ink.

8.       Add and colour wavy border; outline with turquoise pen then mount onto white, black then 8x8 card blank. 

Et voila - Umbrella Ella.
. . . . . Or it could be 'Femme avec Parapluie!'  ;~}

Wednesday, 3 August 2016

Chocolate Baroque Anniversary

Chocolate Baroque 
Second Anniversary Challenge 
 July 2016
Chocolate-covered Honeycomb!


‘Chocolate-covered Honeycomb!’


A special time for CB Challenge Blog and what a great way to celebrate - a ‘chocolate’ challenge. I must say it took a bit of thinking out as I don’t have a sweet tooth but on rare occasions, usually after a walk through a nearby RSPB nature reserve, I indulge in a ‘chocolate-covered honeycomb bar and therein lay my inspiration.


Stamps – all from Chocolate Baroque ‘Honey Bee’ set; variety of Distress inks; white card; Polychromos; clear Sparkle pen; hexagon dies.
·         A series of hexagons were die-cut, including a card blank, decorated using ‘Honey Bee’ stamps then layered up. I used StazOn Ganache – most appropriate for a chocolate challenge – and edged with a variety of Distress inks – Ground Espresso, Walnut Stain, Tea Dye and Wild Honey.
·         The skep scene was stamped with Ganache the coloured with Polychromos.
·         The tiled hexagons were coloured with a dark brown alcohol marker then over painted with a clear Sparkle pen and attached to the decorated frame. This was placed over the skep and glued down with foam tape.
·         Another hexagon was randomly stamped and masked with the flower – using 1st and 2nd generation Ganache, coloured with Polychromos and edged with Distress inks. Flower stamped on scrap card three times, coloured and added –one to base as a ‘stopper’ and a double to top right hand of topper.
·         Large bee stamped twice, coloured then decoupaged and added to topper.
·         Hexagon card top folded into an easel card, honeycomb topper. attached over. Adhere flowered hexagon to card base. Attach flower stopper to suit and add clear Sparkle pen.

·          Stamp, colour and add a few bees to flowers. 


Monday, 1 August 2016

Clarity Challenge 42

Clarity Challenge 42
‘Fussy Cutting’
Hi and welcome back. It's the 1st August and therefore time for another Clarity Challenge! Great excitement this month as the long-awaited Clarity Retreat is drawing close and I'm so looking forward to it and also to do a bit of catching-up. 
As I often - sorry, make that 'nearly always' - add 3D elements to my projects, I wanted to do something slightly different this month as I hope both projects reflect. (The second will be posted mid-month.) I tried different combinations of the Elephant and Savannah stencils once they'd been cut, eventually deciding to turn the latter upside down in the end. Not every stage has a corresponding photo but I hope you get the gist from the explanation. 

Materials:-
·         Clarity Stencils :- Elephant – NDC 14, Savannah
·         Card :-  Clarity Stencil Card 7x7 – 10 sheets; Black A4 x 2
·         Inkpads:- Versafine - Onyx Black; Distress Inks – Mermaid Lagoon, Fired Brick, Squeezed Lemonade, Wilted Violet, Picked Raspberry, Carved Pumpkin, Mowed Lawn, Mustard Seed
·         Micron Pens:- 01, 005
·         Clarity Double-sided Sticky Plastic

Instructions:-
1.     *   (I used my Grand Caliber and added two sheets of copy paper to achieve the expected depth of emboss.)
2.       Ink the elephant image with blending tool and variety of Distress inks so that one colour merges with the next. Using a 005 Micron pen, add a variety of zentangles; colour areas with the 01 pen. Add a tiny piece of sequin waste as an eye. Set elephant image aside.(Sorry, no photos for this part!)


3.       Ink the selected side of the elephant stencil with Onyx Black and place between two sheets of copy paper and onto a sheet of Stencil card before passing through the die-cutting machine. Pull another three or four images without re-inking.
Please ignore the cut areas - these were 'try-outs.'

4.       Select one of the grey prints from (3.) Apply a sheet of double-sided adhesive to the reverse of the coloured and zentangled elephant and proceed to cut out each individual part. Attach each piece as it is cut out allowing the un-inked lines to show. Set aside.
5.       Ink the Savannah stencil and repeat the process explained in (3,) pulling a number of prints onto Stencil card.
6.       Choose two prints – one lighter for the front image, a darker one for the shadow. Fussy cut around the printed images.


To assemble:-
1.       Add foam tape around the perimeter of each Savannah cut-out, peel off backing and apply some glue from a glue stick to allow for some ‘wiggle room.’ Place one over the other but slightly offset to create a shadow.
2.       Apply more foam tape as above and place over the coloured elephant.
3.       Glue to a black backing then make a frame to fit using another sheet of black card. (I used a trimmer to make the frame.)
Et voila! Here we have my 'Elephant Walk.' 
Stencils and stencil card are available from the Clarity website. 
Once again there were beautiful examples from all the participants this month, making Top 5 choices a very difficult task. I'm sure you'll be most inventive in this month's challenge and as always I very much look forward to viewing your projects. Please check out the Clarity Challenge guidelines and remember you could win yourself a voucher to the value of £50 to spend on Clarity goodies! 
Best wishes and happy crafting!
Shelagh. 


Sunday, 31 July 2016

Indigoblu Challenge Summer Florals July 2016

Summer Florals
Hi there and welcome to shelaghscraftyconcepts.blogspot.co.uk
This is my project for the Indigoblu 'Seasonal Flowers'  challenge. 
'Poppy and Holly'
Using the Indigoblu 'Poppy' Dinkie A7  and 'Holly' stamps, I have created this horseshoe as my great niece (soon to reach the grand age of three) is an attendant at her aunt's wedding at the end of the summer and this was the reason behind my project. I have already completed one for her but I very much wanted to make a horseshoe in vellum and when I found some sheets of the pearlescent type in my stash, I had to try it out. The Indigoblu Challenge remit was just the excuse to have a play. The images - two poppies and two holly leaves for each flower - were stamped in Distress 'Picket Fence' then heat embossed with a silvery white embossing powder. They were cut out and shaped before being glued onto a die-cut ring (in triplicate for strength). Fine ribbon and bows were added and to complete, I stamped, embossed and cut out fourteen extra leaves to conceal the reverse card base. 
'Poppy and Holly' - same horseshoe, different background!

My great niece now has a choice to make. Decisions! Decisions!