Thursday, 5 March 2015

Memory Book


Memory Book 
Hi, Shelagh here again. 
The memory book is a variation of my exhibit for the Clarity Challenge Design Team for March, I thought I'd try the New Design Club 'Tree of Life' as it reminds me of a banyan tree - still on the tropical theme. (The filigree leaves are parts of deconstructed earrings - I'm always on the lookout for such items when supermarkets have price reductions.)

Materials:-
  • Canvas x 2
  • Black Gesso
  • Kraft cards DL, Gold Mirri Card, white card, Clarity black coated card
  • Stencil - Clarity Tree of Life (New Design Club 3)
  • Grunge Paste
  • Stamps - Clarity Palm Leaf, Letterbox 
  • Inkpads - Versamark - Dazzle, Versafine Onyx Black; Ranger Distress Peacock Feathers, Mowed Lawn, Salty Ocean
  • Gold detail embossing powder
  • Micron pen
  • Mod Podge
Instructions:-


Canvas (Covers)

  1. Paint the canvas on both sides with black gesso. 
  2. Mask off the root portion of the stencil to only reveal the tree. Tape stencil over dry canvas and apply grunge paste.
  3. Once dry, paint with more black gesso. When dry, apply gold gilding wax. (I added some silver gilding (a misnomer!!) wax to tone down the gold. (You can see from my photo there is some grunge residue near the foot of the canvas; I was going to sand it away but decided to leave it to add some interest.)
  4. Front and back of canvas were painted with Mod Podge.
Pages:-
  1. The pages were made by cutting down Papermania DL Kraft cards, punching tabs from scraps, adding black panels to front and back and mirri board panels to inside pages.
  2. Clarity NDC palm leaf was stamped over white card to fill panel using Dazzle then heat embossed with gold detail powder. A mix of Peacock Feathers, Mowed Lawn and Salty Ocean were blended over each panel then edged with a black alcohol marker and mounted onto gold mirri. (I made two extra panels which were then cut down and edged with black as before to provide the mounts for the front page labels.)
  3. Pockets were made from scrap Kraft card and outlined with faux stitching using a micron pen.


I made a variety of pockets and a number appropriate labels, the latter using the Clarity Letterbox. 

I can't believe how little time this took to assemble compared to my first book, perhaps because I knew the path to follow!

Thank you for dropping in and hope to see you visiting my blog again.

Any queries and I'd be delighted to help.

Bye for now,

Shelagh  ;~}


Sunday, 1 March 2015

Anything But A Card

Shelagh Metselaar
Clarity Stamps Challenge 25 – Anything But a Card
A Passage Through India

Hi, Shelagh here.
My project for this month’s Clarity Challenge ‘Anything But a Card’ was only ever going one way although I have an alternative should time run out - but thankfully not! My friend from Brunei days - we first met over 35 years ago – has a birthday pending and is spending it visiting India. My idea - a Memory Book in which she can scrapbook her journey. The project has taken a few weeks to put together and as ever, my planning followed the old teaching path starting with:- a) what ? b) where ? c) how?
I selected a canvas - I wanted to trial some new techniques (for me) – and the rest took trial, error and plenty of mistakes and patience. (I'm sorry I don't have step-by-step this month but there is a photo for each 'chapter.')
(The tags and butterflies are purely to add interest and to hide the rings.)

Materials:-
·         Clarity Stamps:- Palm Leaf, Remountable Parakeets, Letterbox, Hot Air Balloon – medium and small; caravan, bird, small palm tree from Summer Shades Set, Speech Bubbles, Remountable Cheese Plant, Wild Flower Corner, Toucans, NDC Pocket, Ornate Church
·         Clarity Stencils:- Seed Heads
·         Cardstock:- Clarity- Theuva, Black Coated; Kraft card-card blanks
·         Canvas x 2
·         Pebeo:- Black Gesso, Gilding Wax - gold
·         Inkpads:-Distress Inks – variety; Versamark, Versafine Black Onyx
·         Embossing Powder – Gold Detail, Clear Detail
·         Grunge Paste
·         Mod Podge


I went ahead happily stamping, masking, blending until all areas chosen were covered. I used Kraft cards cut down to size for the pages and scrap pieces to create the tabs. The panels were stamped on Theuva card and mounted on Clarity Black Coated card. Pockets, frames, books were made as retainers for travel memorabilia.
Notes & Quotes 1
Stamps - Parakeets, Speech Bubbles from Remountable Elegant Ladies, Letterbox
Inkpads - Spiced Marmalade, Picked Raspberries, Seedless Preserves, Squeezed Lemonade
Notes & Quotes 2
Stamps - Palm Leaf
Inkpads - Mowed Lawn, Peacock Feathers, Salty Ocean
Notes & Quotes 2
This is a little notebook to record memorable conversations and quotes from the trip.
I cut some printable vellum, rounded the corners and made a note book with a pocket inside each of the back covers. The pages were stitched together, something I learnt to do at a SCEA summer school in Germany over 30 years ago and a technique I have had little opportunity to use since.
Notes & Quotes 3
Travel 1
Stamps - Small and Medium Hot Air Balloons, Remountable Christmas Banners (one of the blank ones)
Inkpads - Weathered Wood, Squeezed Lemonade, Mowed Lawn
Travel 2
These pockets are for ticket stubs and travel bits and pieces.
Accommodation 1
Stamps - Caravan from Summer Shades Set
Inkpads - Iced Spruce, Salty Ocean, Mowed Lawn, Squeezed Lemonade
Accommodation 2
These corners are doubled up to contain accommodation memorabilia.
Stamps - Wild Flower Corner
Inkpads - Picked Berries, Spiced Marmalade, Mowed Lawn, 
Distress Markers
Flora & Fauna 1
Stamps - Toucan, Cheese Plant
Inkpads - Weathered Wood, Mowed Lawn
Spectrum Noir Pens
Flora & Fauna 2
These little frames are for photographs.
Sights & Sounds 1
Stamps - Ornate Church, Small Palm Tree from Summer Shades
Inkpads - Squeezed Lemonade, Mowed Lawn,Pine Needles, Weathered Wood
As I don't have the Taj Mahal stamp and  wished to create a type of high edifice, I masked off part of the Ornate Church to create the towers.
                                                                  Sights & Sounds 2
These little pockets have extra room for USB sticks etc.
Stamps - NDC Pocket, Palm Tree as before, bird from Summer Shades
Inkpads - Spiced Marmalade

Front and back boards:-
Each canvas ‘Grunge Pasted’ over the ‘seed-head’ stencil. Once dry, black gesso was applied over all; and once this was dry, applied to the other side. Gilding wax was applied over the grunged area of each canvas, particularly around the edges. A Cropodile Big Bite was used to punch holes for the ring connectors.
                                                                      Outside Covers
Stencil, Grunge Paste, Black Gesso, Gilding Wax, Mod Podge
Inside Covers
Stencil, Black Gesso, Gilding Wax, Mod Podge
The seed-head stencil was then placed over this flat side of the canvas - front and back, then gold gilding wax sparingly applied. 
Finally, back and front of each canvas was painted with Mod Podge to offer some  resilience to wear and tear.
A few tags were cut, stamped, coloured and attached to the rings, along with butterflies from the Butterfly Tree set.
Et voila! Here we have one Indian Holiday Memory Book.


The Box
I had attempted to make a box using Kraft card but the A4 was too small to accommodate the book. Since I save all my gift boxes, I went on a search looking for one from a particular perfume brand which I thought would fit the bill; however instead I found a perfect match which had contained culinary spicy sauces.

Sorry - I omitted to photograph the before, but here we have the box top coated with black gesso, masked off equally on all four sides before being stencilled through with grunge paste.
The box was masked off then stenciled and grunge paste applied to four sides, painted with black gesso then gilding wax rubbed over the top. The base was painted with black gesso; when dry the stencil was placed over, first having masked off a border using very low tack masking tape then gilding wax applied through the stencil as before.
The final touch was to black gesso over the entire interior, gilding wax over the stencil (as before and above) on the inner lid, then Mod Podge applied to all areas inside and out.

This completes my memory book and matching box.
Thank you for visiting and I hope this gives you ideas to make your own Memory Book.
Cheers,
Shelagh  ;~}

Saturday, 21 February 2015

Spring Greens

 Spring Greens


Hi, Shelagh here. Last month I was lucky enough to win the IndigoBlu challenge and following this, I was invited to create a project for this month's challenge entitled 'Spring Greens,' so here we have it. I must admit I did find it a challenge and took some time to work out the direction I was to follow as I felt few of my IndigoBlu stamps fitted in with subject. 
Many thanks for visiting my blog and if you should have any queries, please ask and I will attempt to help.

Materials:-
·         Canvas
·         IndigoBlu Stamps:- Nature 1, Stylised Flowers
·         Inkpads:- Versafine Onyx Black, Versamark; Distress Inks – Pine Needles, Black Soot
·         Embossing Powder:- Wow Twinkling Green and Twinkling White; Clear Detail
·         Spectrum Noir Aquatints – Greens (from all sets)
·         Acetate:- Heatable
·         Pebeo:- Mixtion Relief Outliner, Mirror Gilding Sheets Green and Silver
·         Sakura:- White Pen
This project was quick to realise, once thoughts and materials were gathered (omitting drying time.)

Extras:-
·         Deep photo frame
·         Pebeo Fantasy Prisme Pale Green
·         Mod Podge Sparkle


Instructions:-
1.       I painted the canvas with water then dropped on the greens in areas allowing the variety of shades to fuse and keeping the blue-greens towards the top.
2.       Once dry, I stamped the ‘Stylised Flowers’ four times (‘off the page’) using Versamark Black and embossed with clear detail embossing powder. The butterfly was stamped three times using Versamark and heat-embossed using ‘Twinkling Green.’ The clouds were stamped twice, again with Versamark then heat-embossed using ‘Twinkling White.’


3.       At this point I blended Ranger Distress ‘Pine Needles’ and ‘Black Soot’ around the edges.
4.       The flower stems were out-lined on one side with a white pen; the seed-heads were outlined with the Mixtion and once dry but still tacky, silver leaf was applied. The same was applied to the centre of stems but once dry, green leaf was applied. P
NB The silver leaf looks white on the photo – oh! the joys of photography!
5.       I stamped the butterfly three times onto heat-proof acetate, embossed with the green powder as before and cut the images out.  I folded the wings back and attached them over the image on canvas with Cosmic Shimmer glue.


Extras:-
To finish the project, I painted the frame with pale green ‘Fantasy Prisme,’ the second coat stippling the paint to create the illusion of texture. Once dry, I applied Mod Podge ‘Sparkle’ to add more interest.  I removed the two peripheral acetate butterflies, placed the canvas inside the frame then glued butterflies over their stamped images but on the frame.
I hope you find the above useful and feel encouraged to ‘have a go.’
Thank you,
Shelagh.


Tuesday, 17 February 2015

Lady, partly in Red!

My latest offering!

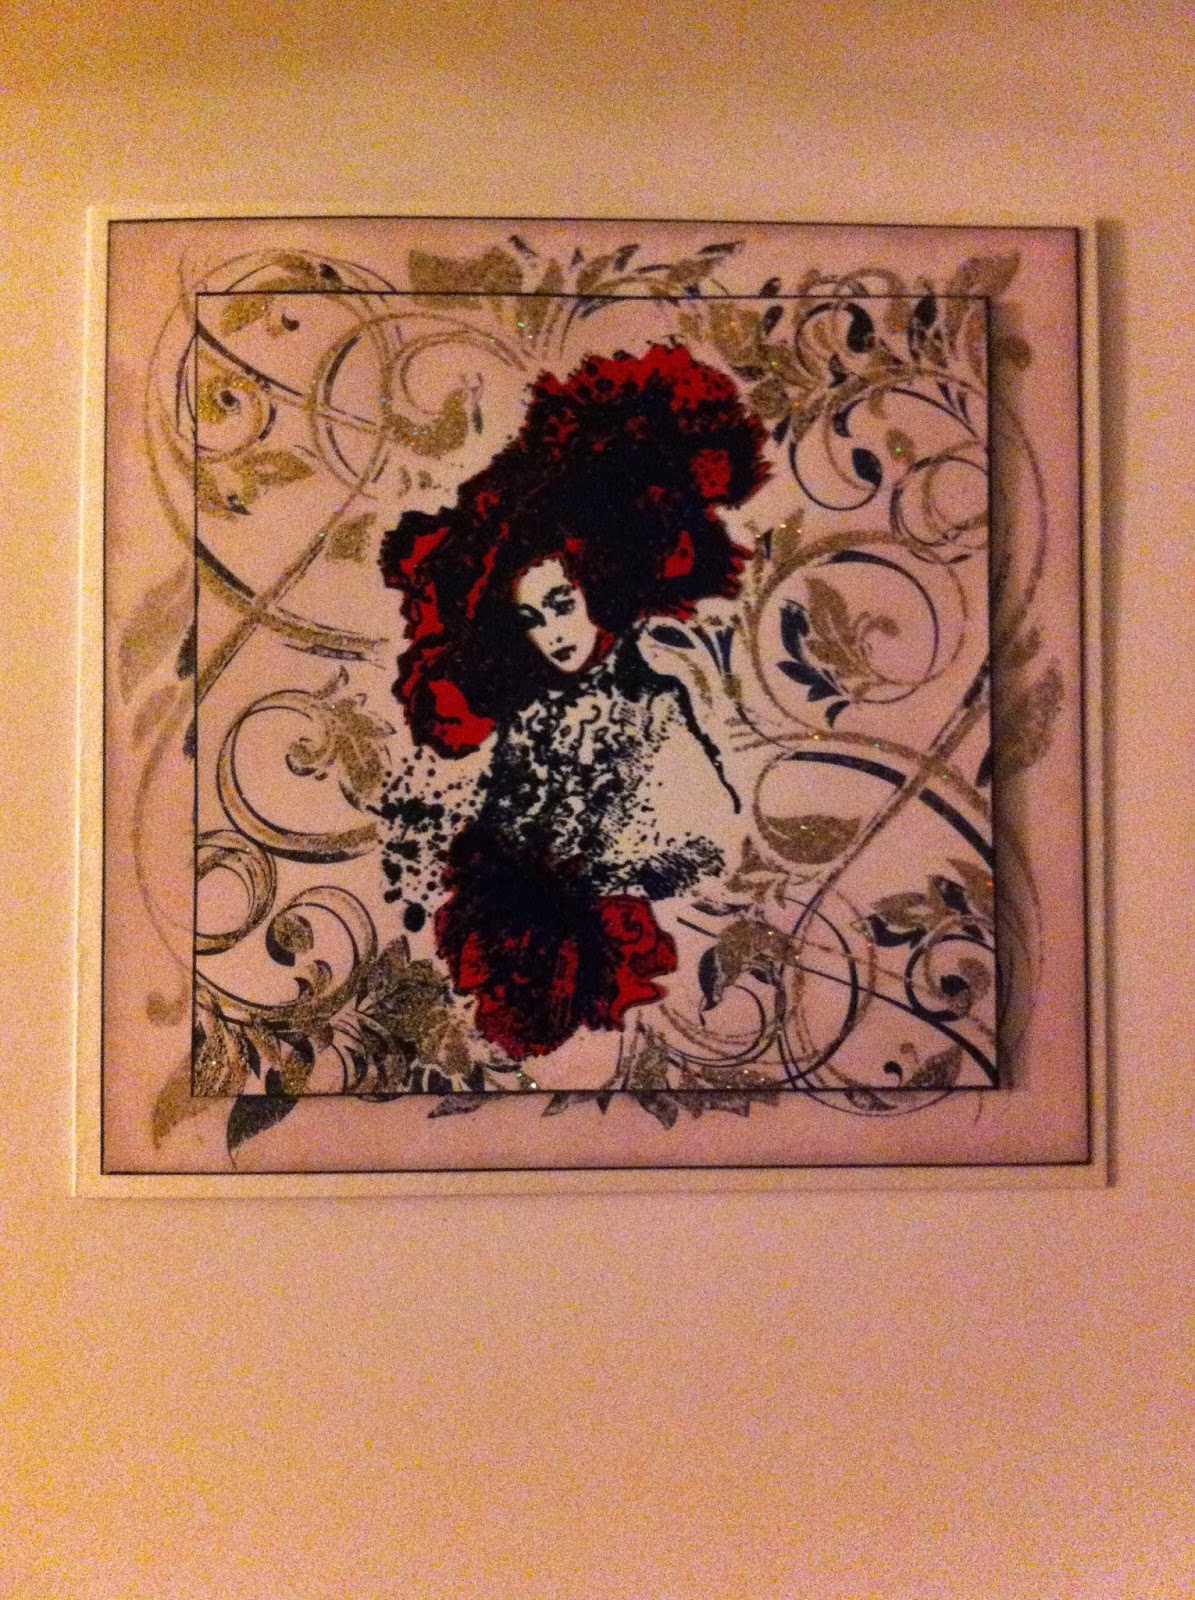
Here is my entry for the current IndigoBlu challenge 'A Touch of Red.' 

The title 'The Lady, Partly in Red' came to me once the design was complete and whilst the familiar, similarly named song is not entirely our anthem, it was frequently played all these years ago when we were on honeymoon - and yes I did have a couple of red outfits with me.


'The Lady, Partly in Red.'

Here is how I made the card.

Materials:- 
·         Cardstock:- Neenah Solar White, Crafter’s Companion Pearlescent White
·         Paper:- Red copy paper
·         Stamps:- IndigoBlu Floral Swirl, Music Hall
·         Inkpads:- Versmark, Versafine Onyx Black; Distress Milled Lavender
·         Embossing Powder:- Wow Sahara Sand, Clear Detail

Instructions:-

1.       Cut white card into a square 12cmx12cm and stamp the lady from the ‘Music Hall’ set in the centre using Versafine Onyx Black. Heat emboss with clear detail powder. Stamp another image on a sticky note, cut it out and mask the image in preparation for the next step.

2.       Stamp the ‘Floral Swirl’ twice with the corner at bottom right and top left using Versamark; heat emboss using Sahara Sand. Over-stamp but off-set these images again using Versafine Onyx Black.

3.       Blend Milled Lavender around all four edges.


4.       Stamp and heat-emboss the lady again onto a piece of scarlet copy paper using Versafine Onyx Black and clear detail powder. Cut out the hat and hand/glove areas omitting the face and body; adhere onto main image as in paper-piecing.

5.       Cut another sheet of card into a square 14cmx14cm. Repeat instructions at (2) and (3) on this larger square.

6.       Edge each square with a black alcohol marker.

7.       Mount the smaller square centrally onto the larger.

8.       Score and fold a piece of white pearlescent card. Cut the folded card into 14.5cmx14.5cm.

9.    Mount the completed image centrally onto this.


Et voila, here we have 'The Lady, Partly in Red!'

If you have any questions or quandaries about the above please don't hesitate to get in touch.

Thank you for visiting and hope to see you again.

Kind regards,

Shelagh.


Sunday, 1 February 2015

Floral


                                                 Clarity Stamps Challenge 24 Floral
February 2015
 Exterior

Interior

                                                                                                   
Materials:-

  •  Shaker Box with Lid
  • Gesso:- Black, White
  • Cardstock:- Clarity Theuva Card, Supersmooth Paper
  • Stamps:- Clarity Stamps ‘Happily Ever After,’ large and small Gerbera, repositionable ‘Funky Foliage,’ ‘Leafy Swirls’
  •  Inkpads:- Versafine Onyx Black, Versamark; Ranger Distress Picked Raspberries, Festive Berries, Squeezed Lemons, Evergreen Bough, Mowed Lawn, Peacock Feathers, Old Paper; Memento London Fog
  • Embossing Powder:- Clear Detail, Gold detail Embossing
  • Foam pads
  • Mod Podge
  • Cosmic Shimmer glue
  •  Gilding Wax

Instructions:-


Box:-

   
                                                                          Plain Box
                                                                       Second Coat
                                                          Dry brushed with black Gesso.


  • Coat box inside, out including side and base with White Gesso. Repeat on lid. When dry, give the box and lid another coat. Allow to dry.
  •  Dry brush with Black Gesso to create a ‘shabby’ finish. (The photograph is much darker than reality but should you need to, it can be lightened with a dry-brushing of white Gesso.)


  • When dry, and using the large ‘Leafy Swirl,’ apply Versamark and stamp around the side of box. Sprinkle over gold detail embossing powder and heat emboss. Repeat on lid. 
         *N.B. This takes some time; take care as the box can become hot.


  •   Stamp along the side of the lid using the small ‘Leafy Swirl’ and emboss as before.
                  (I also stamped the large ‘Leafy Swirl’ inside the lid to add interest.)

Interior:-

'Happily Ever After' stamp


  • Stamp the Happily Ever After castle eight times onto Theuva card using Onyx Black and emboss with clear fine detail powder. Brush ‘London Fog’ sparingly over extreme edges of stamped images and cut each out. Snip areas away and layer with 1mm foam pads to create a   decoupaged image. Set aside. (Please note the stamping shown here is on copy paper as this is a re-run for this post. The original in the completed box is on Theuva.) 


 Gerbera, Large and Small and Leaves from 'Funky Foliage'

  •  Stamp large Gerbera 9 times on Supersmooth paper using Onyx Black and emboss with clear detail powder. Using Festive Berries and Picked Raspberries, blend ink over each image. Trim and decoupage into three flower-heads.


  •  Stamp small gerbera three times following procedure at (3). Trim and add a small image to the centre of each flower-head. Set aside.


  •  Stamp 8 straight-edged leaves and one curved leaf from the Funky Foliage set onto Supersmooth using Onyx Black and emboss with clear detail powder. Blend Mowed Lawn, Evergreen Bough and Peacock Feathers over the images and cut out. Set aside.


  •  Draw around the circumference of the box onto a piece of Supersmooth paper. Cut out the circle, making fractionally smaller to fit the inside by cutting inside the pencil line. Check it fits snugly and adjust accordingly.


  • Use your castle image to decide where the sun mask is to be placed on the circle; Blend over Evergreen Bough for the sky and Mowed Lawn for the grass. Tear a copy-paper hillside and blend ink over to create light and shade. (I also blended in some London Fog to create the illusion of a path from the castle.) Remove mask and blend Squeezed Lemonade over.


  • Spritz the inked circle crumple it whilst damp. Dry then blend Old Paper over to create an aged look.


  • Paint the inside base of the box with Mod Podge and apply the inked circle. Apply more Mod   Podge over the entire circle.
  • Site the castle image to suit and attach using Cosmic Shimmer glue. 

  • Glue the edge of each cut-out leaf and apply to the inside rim of the box, allowing a small over-lap.


  • Decide where you wish to place the flower-heads and attach using Cosmic Shimmer Glue. Add remaining curved leaf to suit.
  • My last addition was a touch of gold gilding wax to the lid and around the side.


My original idea was to create a ‘Secret Garden’ visible only when the box lid was opened, however I could not find a box that fitted my design. I tried various other designs over the period of a week until I happened upon a set of ‘Shaker’ boxes in a cupboard. The idea blossomed and my thoughts changed from the original secret garden to something more akin to ‘The Sleeping Beauty’ or even ‘Rapunzel.’

Thank you for reading the post and visiting my blog; apologies for it is rather lengthy, however there were more than a few steps and techniques to cover. Should you have any questions or queries, please ask and I'd be delighted to help or look for an answer.

Hope to see you back again!
Shelagh  ;~}