Saturday, 1 August 2015

Clarity Challenge 1st August 2015 - Bingo!

Clarity Challenge 1st August 2015

 Bingo

(Full House - Stamps, Stencil, Grunge Paste, Gilding Flakes, Glitter, Die Cuts, Shrink Plastic, Flowers, Perfect Pearls.)

Medusa


Hi there and welcome again to Shelagh-land! 

August is upon us and we should be still be enjoying summer but this is Great Britain, I'm in the north east of Scotland so-o-o-o-o balmy days are not quite the norm! July passed in a flash as there was a lot for me to keep up with and in o-o-o-o-nly four days time I'll be down in Crowborough attending two fabulous days of Barbara and Clarity's workshops. Can't wait!!!!

We-e-e-l-l-l this challenge has gone in an opposite direction as intended - I had prepared a three piece wall plaque to decorate but whilst gathering all the paraphernalia together, masks kept getting in the way - I've only got two - and I hope you like the (literally) off-the-wall result.
This was great fun although the alchemy corner (Mike's term for my 'wet area') in the kitchen took a bit of a pasting. N.B. Must dissuade him from a new kitchen for the time being!!!!

However, when first introduced to the 'Bingo' theme, the old bonce was scratched more than a number of times - Two Little Ducks, Legs Eleven (my dear departed Dad's nick-name for me), Kelly's Eye No One, (can't believe it myself but I actually had composed something along these lines) - b-u-u -t -  how far off base was I!!!! Then all was revealed - choose a designated option from the grid - four corners, any vertical line, either diagonal or a full house and create a piece of art to include the designated products. At that point, the brain whirred into action!

Meantime enough of the preambles and down to business.

Let me introduce you to Medusa!

Medusa

Materials:-
·         Canvas :- One 8 ins x 8 ins canvas, one 12 ins x 12 ins canvas
·         Card :- 7 ins x 7 ins Gelli card, heavy duty watercolour card
·         Gesso – White, Black
·         Color Burst – Lemon Yellow, Phthalo Green, Ultramarine Blue
·         Stencil – Clarity :- Tree of Life (NDC), Leafy Swirl
·         Grunge Paste
·         Paint – Silver
·         Papier Mache mask
·         Acrylics – Fresco Finish Snowflake, Nougat
·         Stamps – Clarity :-  Remountable Spring Day set, Butterfly Montage
·         Inkpads :- Encore Silver, Archival Black
·         Embossing Powder :- Holographic Silver
·         Gilding Flakes :- Clarity Silvery Moon
·         Glitter :- Holographic Silver
·         Shrink Plastic - Clear
·         Perfect Pearls :- Forever Blue, Forever Green, Blue Smoke, Perfect Pearl
·         Dies :- Tattered Lace Flourishing Hearts
·         Glue: - Glossy Accents. Low-melt glue gun, Clarity Double sided sticky

Instructions :-
Cover work surface well – I taped a bin bag over the work top.
Canvas
1.       Spritz the 8 x 8 canvas lightly with a fine water mist then puff on Color Burst Lemon Yellow, Phthalo Green then Ultramarine Blue – SPARINGLY. Spray again across the canvas allowing the water mist to settle. Allow to dry then turn the canvas to resemble a diamond shape, deciding which corner you wish to be at the top.

2.       Select the ‘Tree of Life’ stencil and mask off all but the bare branches. Place stencil over coloured canvas and ‘pull’ grunge paste through. Allow to dry. Rotate canvas by one corner and repeat.  Do this once more.(At this point I added a little water and silver paint to Grunge before using. The dry results were still too ‘grainy’ for what I wanted so I re-applied the stencil and painted over with a thick concoction of white glue mixed with silver paint.)

Mask
3.       Paint the brown papier mache mask with gesso – I used three coats. Paint over with Snowflake when dry.  Too stark, so I painted it with Nougat.
4.       Sketch the eyes and mouth on in soft pencil and colour in with desired colour. Apply Glossy Accents to these areas.
5.       Apply silver paint to mask, painting carefully around eyes and mouth.

Mask embellishments :-
Hair and Wings
6.       On watercolour paper, draw around ‘Tree of Life’ three times and cut out. (I tried other papers but this proved to be the best to ‘manipulate’ into curls around a paintbrush handle.) Paint both sides of each with black gesso. When dry, roughly paint one side of each with silver paint. When dry, repeat on reverse. When dry, apply Mod Podge to first side and leave until tacky. Apply gilding flakes. Repeat on reverse. Glue to side of mask to suit.

7.       Stamp butterfly (I have mislaid mine in my nice and tidy craft room – NOT - so had to use the collage stamp!!!) a few times onto a scrap of card (I used lightweight black pearlescent) using Encore Silver, add silver embossing powder and heat to set. Cut out butterfly images. I have made six but decided to use only two.)
8.       Mix Perfect Pearls Forever Blue, Forever Green, Blue Smoke and Perfect Pearl to suit and paint butterflies. Cut wings from body (ouch!!) twice and further cut one pair of wings, following the lines,  to make a smaller set.
9.       Die-cut Tattered Lace ‘Flourishing Hearts’ a few times, cut to suit and paint with same Perfect Pearls mix. Attach a frond to the foot of each of the larger wings.
10.   Glue the wings top and bottom to one of the mask eyes using Glossy Accents. Attach each smaller wing over.

Flowers :-
11.   Attach ‘Leafy Swirl’ stencil to a piece of Gelli card. Spritz with water. Apply Color Burst as in (1) and pull a number of prints from this. (How about the impromptu drying line - cooking string tied between two door handles - wet prints placed above hob as the drips were easy to clean there, wouldn't do that in a new kitchen!!)
12.   When dry and using Encore Silver, stamp the Tulip circle from the Spring Day Remountable set six times onto a print. Apply silver embossing powder and heat emboss. Colour each tulip and vertical leaf to suit. (I used Spectrum Noir) Cut out. Colour reverse of each circle with chosen colour. Apply Quickie Glue Pen to each leaf around circumference and apply glitter of choice.
13.   Cut along edge of each vertical tulip leaf on each circle, shape. Off-set and attach a circle to the centre of another to form three flowers.
14.   Stamp the same as at 12) three times onto clear Shrink Plastic using Archival ink. Colour to suit on reverse of stamped side using permanent pens and cut out around perimeter. Shrink using either a heat gun or oven as per directions. Glue to centre of flowers.
15.   Place and glue in place onto mask to suit.
16.   Attach mask to canvas using low melt glue gun.

Background canvas:-
17.   Mask 12 x 12 canvas as in photo and apply a mixture of silver and gold gilding wax to create a frame.
18.   Using Clarity double sided sticky sheet, apply (as a diamond)to centre of background canvas. Place main canvas over.
Et voila! Medusa is in our midst!
This is my favourite project since joining the Challenge DT in January; my brain took me on the most enjoyable journey and I did want to add so much more, however exercised a modicum of restraint although it is probably not too apparent! Medusa certainly enticed me into her lair!
Many thanks for looking in and as always, any questions etc I will attempt to answer.

Once again looking forward to seeing all of your fascinating projects in this month's Clarity 'Bingo' Challenge; just have a look at the rules, decide which line, diagonal, four corners or full house you wish to use, have a play and submit your art work via your own blog or by email.

Best wishes,

Shelagh  ;~}


Sunday, 5 July 2015

Something from Nothing


Something from Nothing!


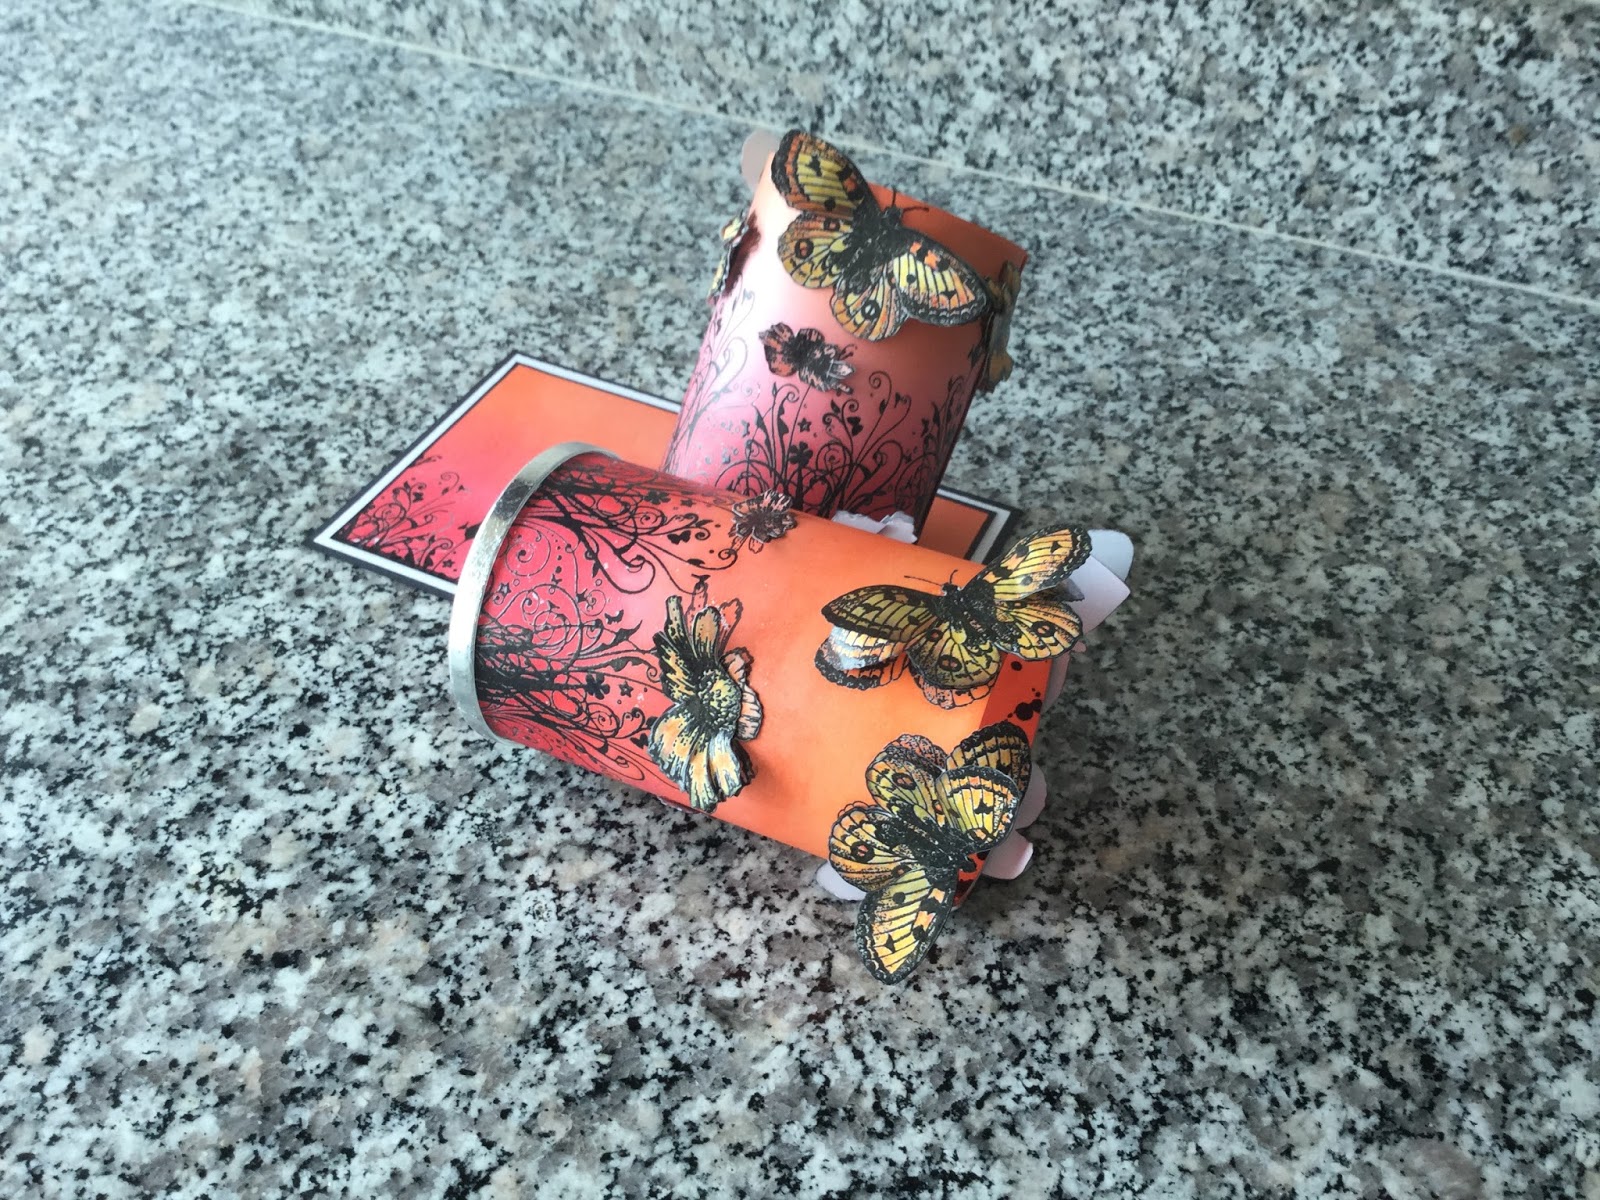
Hello again,from me in Shelagh-land. I was overseas for a spell earlier this year and set off with an extra suitcase filled with crafting goodies as I knew I would have some time to fill in. One afternoon I'd had my fill of cards etc so decided to go off on a tangent and make a pot for my brushes and pencils to sit on the desk. 
Cut a crisp carton in half and glue the lid to the open top so you now have two cylinders.
Stamp, heat emboss then blend Festive Berries, Worn Lipstick and Ripe Persimmon over a sheet of super smooth paper to wrap around each cylinder.
Stamp a number of flowers and butterflies, colour and cut them out, then use them to decorate the cylinders.
To hide the plastic lid rim, I ran a line of super sticky double sided tape around it then applied a sheet of gilding leaf. 
Stamp, heat emboss and ink another sheet for the base. To give it substance, I triple mounted it onto black, white the black card before attaching the cylinders to it. 
To finish, I stamped and inked another sheet to place inside the pots. 
Et voila! Something from nothing. 

Thanks again for your visit. I will be adding some other items I made whilst away over the next week or so, so please come and visit again soon. Meantime, happy summer crafting.
                                                            Best wishes,
                                                               Shelagh. 
                                                                   ;~}


Wednesday, 1 July 2015

Anything Goes Clarity Challenge July 2015

Clarity Challenge – Anything Goes

July 2015

Hats Off to Fascinators!


Hello once more from Shelagh-land. Where did June go - I blinked and missed it! This was probably due to travelling from one end of the country to the other visiting Mum and Mum-in-Law as Mike was, and is, back for a short break. July and August are going to be equally travel-intensive with a few trips lined up on the horizon.

As for this month's Clarity Challenge I knew months ago what I was going to do as it is garden party, racing, regatta, wedding season with lots of 'dressed up' events and what more topical than a fascinator -  I just did not have a clue of the 'how.' 
I brought back a couple of little hair decorations from Kuwait to use as bases but they proved difficult to adapt.

I fruitlessly searched charity shops, trawled major stores eventually finding my base on a reduced shelf of a well-known high street department store. The silk flower had seen better days and one of the beads was coming loose but that was of no consequence as it was to be stripped back to basic form anyway.
The colouring of the material threw up a few problems as an iron on Vilene stiffener showed, silk on its own was too flimsy and the starch spray made the black ink run. Solution - colour with alcohol inks first, starch, iron, stamp, iron again.
The rose done, now to put it all together.
Having tried and failed to get the right spider web ribbon shape as a base for the rose, I happened upon a brooch I'd removed from a jacket before it went into the wash. This was indeed a 'Eureka' moment!
Below I have written in detail how the project was achieved.
If the system allows me to add more photos, it will be done.


Materials:-
Stamps: - Filigraphy Petals Stamps
Inkpads: - Versacraft Real Black
Ranger Alcohol Ink: - Stream, Juniper, Lettuce, Meadow, Denim, Butterscotch, Sunshine Yellow
Spray starch
Reduced fascinator
Spider web ribbon, silk lining material:- all from craft stash
Instructions :-
1.       On a work-surface covered with plastic wrap then kitchen roll, I dripped a medley of alcohol inks onto a small piece of silk lining. (Mine was about 8ins x 6ins.)
2.       The material was then sprayed with starch and ironed between double sheets of kitchen roll.
3.       Using ‘Real Black’ Versacraft ink, I stamped the ‘Yin and Yang’ Filigraphy stamp as many times as possible onto the inked material. (I ironed the material on kitchen roll again to ensure the ink was dry.)
4.       The petals were cut out using a new pair of embroidery scissors to ensure a clean edge.
5.       I repeated 1-4 until I had enough petals – I think I cut out around 76.
The above photograph shows a number of trials I did before settling on my final method at (2).
1) and 1A) Coloured and stamped silk with the interfacing backing
3) Coloured silk petals/ leaves
To form the rose:-
6.       I cut a small circle approx. 3-4 cm from an inked remnant and using a low-melt glue gun, attached petals around the edge, slightly overlapping them and repeating with a second layer.
7.       More petals were folded and stitched to make the centre which was glued in place.
The fascinator:-
The original fascinator

1.       I stripped the original fascinator of all embellishments. I spent several days playing with the ribbon, trying to get the design to complement the rose but to no avail. All was salvaged however when I spied a brooch I'd taken from a jacket prior to washing it and hey presto! the design came together. 
The inspirational brooch!

2.       Grey spider web ribbon was folded and sewn into place on the straw (sinamay) base.

3.       The rose was attached to the side of the decorated base and various petals glued on fore and aft.
4.       Five faux feathers were stitched into the ‘web’ layers. These were made by sandwiching a piece of black florist’s wire between two petals.

 I used a few dots of Glossy Accents along both sides of the wire to attach the petals as this is almost invisible. A pair of diamante beads salvaged from the original fascinator were sewn on to each faux feather to create interest.

5.       To complete, more salvaged beads were sewn onto a few areas of the ‘web’ to add a bit of bling.
I designed the fascinator so it can be worn on either side, giving two different looks.

I hope you enjoyed reading this, as I thoroughly enjoyed the project. I have lots more photographs I wished to share but there seems to be an upload go-slow problem at the moment.

A variety of alcohol inks and of course the Clarity Filigraphy set are available from the Clarity website as well as the fantastic new Groovi plates I just had to play with (and used the results to decorate the box I made to house the fascinator.)


Very much looking forward to viewing your ingenious projects which reflect this month's Clarity Challenge brief  'Anything Goes.'
Thank you for your visit to my blog. Until next time - happy summer crafting!
Shelagh ;~}


Thursday, 4 June 2015

Wedding Card


Wedding Card
Materials:-
  • Crafters' Companion - Pearlescent card, Neenah Solar White, Silver Mirror Card
  • Tonic Dies - Love Life, circle
  • Tattered Lace Stepper die
  • Clarity Stamps - Wee Folk, Fuchsias, Wedding words
  • Distress Ink Pads - Stormy Sky, Squeezed Lemonade, Encore Silver, Versamark, Versafine Onyx Black
  • Hunkydory Snowfall acetate

Hi again, another post from Shelagh-land - twice in one week well, I have been a bit more productive - not so much in 'making' - but remembering to take photos! 
I have had a number of dies and new Clarity stamps resting in my craft room for a bit and when asked to make a wedding card at short notice, I decided it was a good time to play productively.

A Tonic die was used to cut out the aperture for the box lid and also for the card frame from white pearlescent card, the latter also in silver card. Waste heart cut outs were used to decorate the box, along with Clarity Stamps small fuchsias. 
Snowfall acetate was added to the back of the aperture as this reminded me of confetti.
The stepper was cut using Tattered Lace stepper die - gosh, how easy this makes steppers and all the layering, a big change from all the measuring I usually do for my signature card. 
The central circle was cut using a plain die on Neenah Solar White before the 'couple' from one of the latest Clarity Wee Folk' sets was stamped using Versafine Onyx Black and clear detail embossed.

On this, Stormy Sky was brushed over torn paper and moon mask to create a landscape then Squeezed Lemonade added sparingly.
Once the layers were added onto the stepper, more Clarity small fuchsias were stamped, embossed and added, along with two Clarity butterflies.

May I say what a joy it has been to put together something that reflects my favourite techniques - die-cutting, stamping, stepper cards. I have a few more things to do over the next few weeks and hope to share the outcomes with you, successful or otherwise. This is the lead up to one of my busiest times outwith you-know-what! what with anniversaries, birthday cards for four generations and having to think up at least four variations for each occasion as I make all the family cards. I may even resort to a few quick makes - and why not!

Please come back and watch this space! You are more than welcome anytime. Meantime, back to the down-sizing of my craft room - not really - only disposing of some or many of the items I have 'outgrown.'
My mum's reaction to this - 'You'll only buy some more to fill in the spaces.' Never a truer word!

Enjoy the weekend!

Shelagh.


Monday, 1 June 2015

Clarity Challenge 28 Boys, Boys, Boys


Clarity Challenge 28

 June 2015

Boys, Boys, Boys


Singing and Dancing in the Rain
Hello there and welcome again to Shelagh-land and thank you for taking the time to read my rambles and this month I do tend to, so be warned!

Here we are in what is supposed to be 'Flaming June' and in a few weeks we will have the longest day of the year. However as I write this it is flaming raining, I've already suffered a drenching three times this week, or 'drookit' as is how I described it to my mum but oh so appropriate for my Clarity Challenge submission 'Singing and Dancing in the Rain.'

However, if I may, I'm going to take you on my journey in completing my canvas as it is not at all as I planned. IT was a card!

Early on I had an idea using some stamps from the 'Sunny Shades' set, augmented with a few others. I was going to be out of the country for most of the planning and prepping time so off I went an extra suitcase in hand, filled a selection of crafty necessities - stamps, stencils, ink pads, pens, pencils, a shield-shaped die (big clue) and the rest.
Over a few weeks I managed to make both 'innie and outie' stencils in my make-shift craft room along with two types of texture paste - it's amazing what you can concoct with bicarb, PVA, Gesso and talc - and set to work experimenting.

I also continued to read Barbara's daily blog and this was where my great idea ended as I'd chosen the theme 'Route 66.' Ah well, the best laid schemes!

Now to my alternative:-

I must say it took over a week to come up with an idea as I kept thinking of things then rejecting them.
This canvas stemmed from a number of different paste products I found which contain different elements, it's just a pity that the glisten and gleam are not replicated in the photos.

Materials:-
·         Background: - Canvas, Theuva Clarity Card
·         White Gesso
·         Fresco Finish Paints – Little Black Dress, Baltic Blue, Southern Skies, Jade, Caribbean Sea, Honey Dew,
·         Stencil – Double Bubble – 9insx11ins
·         Texture Paste: - Windsor and Newton Black Lava Texture Paste, Glass Bead Paste, Iridescent Medium
·         Stamps: - Balloon (as seen on TV), Jazz Man, Umbrella from Remountable Clarity Characters Set, Word Chains
·         Tissue Paper
·         Inkpads: - Archival Black, Versamark Onyx Black
·         Spectrum Noir pencils – white, grey
·         Distress Marker – Broken China
·         Black Micron pen
·         Martha Stewart Glitter: - Blue, Silver
·         Mod Podge - Gloss

Method: -
1.       The canvas was coated with gesso and smoothed out with an old store card then left to dry. The large ‘Double Bubble’ stencil was placed over the top right hand corner and glass bead medium spread through with a palette knife. The stencil was washed to remove any paste residue and dried. The stencil was then placed on the lower left hand corner where the lava paste was spread over with the palette knife.
2.       At this point the canvas was left to dry overnight.

3.       Using Fresco Finish, I coated the textured canvas completely with Honey Dew, the blues were added from top right hand corner and blended diagonally, whist the Little Black Dress was added sparingly to lower left and blended upwards to blue area. Paint was removed using baby wipes to create light and shade. I also blobbed on some hand sanitizer gel to  areas between textured bubbles which also removed some paint.

4.       When dry, Iridescent Medium was added to the textured areas. At this point, I kept adding more glass bead medium over as the stencilled areas were too flat and also to areas in-between. I 'puddled' the areas with my fingers to create an uneven texture.


5.       The Jazz Man, Umbrella and two balloon images were stamped onto tissue paper using Onyx Black and then heat -set. (I tried Staz-On and Archival but the results were too patchy.) I cut out all images and coloured over the white areas on the reverse of the Jazz Man with Spectrum Noir White pencil. I also cut away the walking stick from the Jazz Man.  Two balloon strings were placed and glued on with Mod Podge before the Jazz Man and umbrella were added.

6.       I stamped the words using a compilation from Word Chains and Archival Black onto Theuva Card, scribbled lines to form borders, then coloured them using a Distress Marker Spritzer and Broken China marker. These were then Mod Podged onto the canvas.

7.       I added highlights and shading to various areas along with glitter and blue micro beads.

8.       I applied some Little Black Dress around the edges and in particular to both left hand corners but removed some with baby wipes.

 Saturday 30th May


I'm not happy with the overall appearance as my canvas needs a backing and the large card I have is too flimsy so please bear with me as I have a play in my 'alchemy' corner of the kitchen, I do have an idea. Whilst down at my mum's this week, I picked up a set of stretched canvasses so here goes.
I painted both sides with black gesso then a coat of matte Mod Podge before applying embossing paste through the Clarity Treescape stencil, having first masked off the trees.

This was then gilded first with silver gilding wax then with a number of other colours. I did NOT like it!

Sunday 31st May

Things are getting critical!

I slept on the idea but it still was not to my liking. 
However, I did like the sheen I'd achieved on the extreme border so this was masked off all round then white gesso applied several times followed by Fresco Snowflake. Once dry, another area was masked off all round to create a white border before iridescent paste mixed with Fresco Little Black Dress was applied using a spatula.
Masking tapes peeled off, canvas attached to the centre using gel medium . . . . . . .
Et voila!
My first big canvas!


This month's Clarity Challenge is 'Boys, Boys, Boys' and  I very much look forward to viewing all your submissions. Barbara's ingenuity never ceases to amaze me and this has encouraged me to look at Clarity products in other ways and judging by your clever and inventive monthly submissions you too also seek to stretch those boundaries.

 Once again, thanks for visiting, Should you have any questions or queries, please do not hesitate to get in touch and I'll do my best to answer them.

Shelagh.


Friday, 1 May 2015

Clarity Challenge 27 Clocks


Clarity Challenge April 2015 - Clocks

Rock Around the Clock


Hi from Shelagh-land again. Cannot believe it's time for the next Clarity challenge.Where have the first four months of this year gone? I do recall someone saying time passes so much more quickly when we are 'older' but I'm not THAT old YET! Pondered long and hard over this challenge, tried a few different things but kept coming back to the clock. In the end, the idea would not disappear and  I doggedly persevered. This was yet another departure for me as I was using Fresco Finish (now available from Clarity) and Spectrum Aqua pens. The clock was a reduced item I spotted and purchased from a local supermarket as I thought it had potential.
Many apologies for the lack of step-by-step photos this time but I had revised my write-up and added more when the server refused to play and I lost the lot. So, I'm afraid it's chalk and talk this month!


Materials:-
·         Wooden Heart Clock:- purchased from a supermarket for a couple of pounds
·         Gesso:- Pebeo White
·         Fresco Finish Acrylics:- Sherbet Opaque, Claret Translucent, Honey Dew, Crackle Glaze
·         Clarity Stencils:- Elegant Ladies
·         Grunge Paste
·         Clarity Stamps:-Remountable Music Clear Stamp Set, Remountable Birdsong Set
·         Ink Pads:- Ranger -Archival Black, Distress Inks – Old Paper, Black Soot
·         Spectrum Aqua Pens
·         2B pencil, eraser, paper stump
·          Black, white card (Clarity)
·         Cut’n’Dry sponge
Instructions:-
1.       Firstly I removed the ribbon from which the clock is suspended (I'm not a fan of ribbon on household items.) then taped over the hands with masking tape.
2.       White gesso was applied to front, back and sides mainly to cover the painted message on the front of the clock (for the life of me I cannot recall what it said, obviously meaningful!) – and also to cover the unreal colour of the wood as it was a grey/green/ yellow shade.
3.       This was where I made a bit of a mistake.  I painted the base of the clock in Sherbet; dried it; added Crackle Glaze then sponged on areas of Claret.  When it was dry, it was too sugary-pink. Back to the drawing board – or alchemy corner of the kitchen as Mike my husband calls it.
4.       I drew around the clock onto some canvas paper to create what I call mock-ups. I painted one of these with Sherbet and Crackle Glaze, allowed this to dry then sponged on Honey Dew. This created a much more eye-friendly cooler tone; I repeated this on the clock-face and the desired cracks reappeared. Phew!
5.       Old Paper and Black Soot Distress inks were gently blended onto the clock face and some areas removed using  baby wipes.
6.        I decided where I wished the right-hand figure to be placed, taped on the stencil and smoothed Grunge Paste through this. The clean, dry stencil was flipped over and placed at the other side of the clock and Grunge Paste dragged through again.
7.       Once the figures were dry, I sanded them gently before adding colour. Spectrum Aqua colours were scribbled onto a palette - Peach for skin, Yellow for hair, Slate for shirt and Scarlet for trousers and picked up using a fine, wet paintbrush, intensifying the colours in areas of shade. (I tried using the pens 'neat' on a 'mock up'  but could not achieve the intensity of colour to create shade, hence resorted to diluted colours. NOT the pens fault, I hasten to add, but mine.) 
8.       Three records were die-cut from black Clarity card and added to top, middle and foot of clock. The records at 6 and 12 o’clock were stuck to the clock by using a sheet of Clarity double sided sticky film. The middle record was slit from centre to outside, Glossy Accents applied to flip side and smoothed down around the hands.
9.       With black Archival, I stamped the musical staves from the Musical Birdsong to waft out from each record, two Treble Clefs, a number of notes and the single note repeatedly around the edge – all from the Remountable Music set.
10.   Armed with a 2B pencil and an eraser, I gently shaded around the figures, notes and records. (It took me two evenings to create the depth of shadow I wanted.)
12. The clock hands were coloured using a dark red alcohol marker.
11.   In my craft stash, I found tiny red seed and larger black glass beads. With a length of fine silver wire, I created a hanger for the clock, threaded it through the hole at either side, through the first black bead on either side, tied it off and clock complete!
Et maintenant, we have ‘Rock Around the Clock!’ 

Thank you for looking in and remember to have a go at the new Clarity Challenge, number 27. Each month I look forward to viewing the marvellous creative masterpieces you produce and I'm always quite blown away by the amount of talent you all display.
Bye for now,
Shelagh.

Wednesday, 1 April 2015

Clarity Challenge 26 April 2015
Wee Folk
Hello from Shelagh-land! Cannot believe it's April already, daylight longer and warmer weather should be showing its face soon to match all the beautiful blooms in the garden, not to mention all the little nesting birds. I was lucky enough to see my elusive wren this afternoon - I've been spending too much time upstairs in my craft room and the change in the great outdoors has eluded me. 

This month's challenge is the lovely little 'Wee Folk' stamps. I tried a number of things including canvasses and different scenes before settling on my finished project. It seems to help me to use a quote or similar to send me on my creative way. Please enjoy my step-by-step which I've have photographed using Spun Sugar and Stormy Sky and not Squeezed Lemonade, Stormy Sky, Salty Ocean, Cracked Pistachio and Shabby Shutters as in the completed example.

Materials:-
·         Cardstock:- Clarity Gelli Plate 7x7, black, silver mirri, Clarity Gelli Plate 8.5x11, Turquoise mirri
·         Stamps:- Clarity – Wee Folk Sets 3,4; Diamond Carriage; NDC Bubbles; Remountable Artist Clear Stamp
·         Stencils:- Clarity – Umbrellas
·         Inkpads:- Ranger Distress Squeezed Lemonade, Stormy Sky, Cracked Pistachio, Salty Ocean, Shabby Shutters; Archival Black; Versafine Onyx Black
·         Embossing Powder:- WOW Clear Hologram Sparkle
·         Micron Pen
·         Acetate
Instructions:-

·         Tape the Umbrellas stencil to a piece of 7x7 Gelli Plate card. Brush (Clarity Brushes) or blend       (Ranger mini blenders) selected Distress Ink from bottom right hand corner across to top left,         continue until desired intensity of colour is achieved.
·         Place moon mask to suit. Gradually introduce second Distress Ink and work from below centre diagonal, sweeping colour upwards. Remove stencil and continue brushing Spun Sugar until complete 7x7card is gently coloured.
·         Apply masking tape around all four sides to continue with the border created by the stencil.
·         Sweep a good covering of baby powder over entire card.

·         Ink up the elf stamp with Archival ink and stamp image in the lower middle of stenciled card; ink again and stamp towards bottom right of stenciled card. On a post-it note stamp elf image and cut out two masks.
·         Mask elf; ink carriage with Onyx Black and stamp to left of elf. Heat emboss using clear hologram sparkle. Stamp carriage onto a post-it and cut out; place over carriage image and with black Archival, stamp fairy through window. (Ensure the foot of carriage is masked with another post-it – the fairy has long legs!!!)


·    Stamp the fairy (same one as in the carriage) opposite with black Archival, masking off from just below her lower hand, to leave her torso.


·         Cover the larger ginkgo leaf with masking tape, then place the NDC Ginkgo stencil over the fairy torso to form a skirt. Tape down then apply chosen Distress inks to suit. Remove stencil. 

Outline the ‘skirt folds’ with a Micron pen. Blend in some more colour to achieve desired results.
·         Remove moon mask and right side masking tape. Stamp left-facing fairy at the top right corner.     Replace moon mask then stamp stars to form a pathway to the carriage.


·         Stamp (Black Archival) toadstool from the fairy set at the bottom left-hand corner; stamp again on a post-it and cut out two masks. Mask toadstool and stamp image again, slightly off-page (masking tape is still in place so it’s ok to do this); mask this image and stamp again. Remove masks.
·         Stamp seated fairy on one of the toadstool caps.
·         Create sentiment on computer and print. Place Umbrellas stencil over and ink as before. Using side and edge from the Artist’s Set, create a scroll. Trim and adhere to top left.
·         Apply Quickie glue pen to elves and fairies wings. Repeat on stars and diamond on carriage.
·         Scribble a border around card and mount onto black then silver mirri.
·         Cut white card to 21x21cm. Using Cracked Pistachio, stamp the top scroll from the carriage around the edge. (Stamp each corner, then middle which leaves enough room for another image in-between.) Trim a sliver from each edge and mount onto 21x21cm turquoise mirri.
·         Mount card onto this.
NB (I added a trimmed sheet of acetate as an overlay to create an illusion of depth.)

Et Voila – Cinderella shall go to the ball!

Stamps, white card, stencils and ink pads can all be purchased from Clarity Stamps. The turquoise and silver mirri along with black card and acetate all came from my stash.

Thank you for taking the time to visit my blog. I would love to see where your 'Elves and Fairies' crafting takes you, so please think about entering your project into this month's Clarity challenge.

Hope to see you returning soon.

For now, cheerio!

Shelagh.