Thursday 11 May 2017

Chocolate Baroque April 2017 'Fishin' Around!'

Chocolate Baroque
Challenge Blog
April 2017
'Fishin' Around!'


Hello and welcome to my CB blog for April/May. Not much detail this month due to a couple of sad and close family events. 
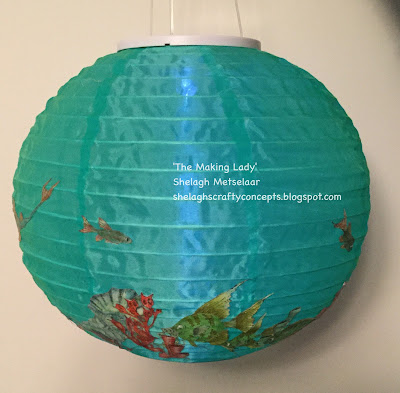
This project was inspired by a 'find' in a cupboard during a bit of an avalanche at which time a box tumbled out. This was the solar globe, purchased a couple of years ago in a sale for £2.50! Time to decorate!!!

Materials:-
  • Stamps:- A Year of Stamping:- July - Standard, Super; August - Standard, Super
  • Inkpads:- Ranger Archival Black Ranger Distress:- Cracked Pistachio, Fired Brick, Barn Door, Vintage Photo; Adirondack Butterscotch
  • Misc:- Tissue Paper; Double Sided Sticky Sheets; Solar Lantern; Coloured Pencils - Inktense, Polychromos, Derwent  Metallic; Spectrum Noir Sparkle Pens; Ranger Glossy Accents


Instructions:-


  1. Using each itemised stamp and Archival Black, stamp each four times. 
  2. Apply double sided sticky sheet, cut to size, to fit each image on the stamped side. 
  3. Turn over and colour elements with itemised ink-pads, pencils and Sparkle pens. 
  4. Cut out elements then add dimension through Glossy Accents.
  5. Peel off the protective backing and apply to suit onto the solar globe.
Et voila! The Global Reef is complete. 


Monday 1 May 2017

Clarity Challenge May 2017

Clarity Challenge
May 2017
Up in the Air
‘The Moon’s my Balloon’

Well, here we are again - well into Spring and Summer rapidly approaching. When I found out the nature of month’s theme, the trees in my garden – being so far north – were still devoid of both blossom and leaf and from there came the idea for my card.  Add into that the clear skies and the clear sighting of the moon - hey presto! A Card!!!


Materials:-
·         Stamps:- Wee Folk Set 2
·         Stencils:- Winter Tree, Small Framer Stencil
·         Ink Pads:- Distress Weathered Wood, Iced Spruce, Squeezed Lemonade
·         Cardstock:- 1 x 8ins x 8ins card, 1 x A4 white card trimmed to 7ins x 7ins
·         Miscellaneous:- 01, 03 Micron pens, charcoal pencil, sticky note pad


Instructions:-
1.       Place circle from Framer stencil onto 7 x 7 card and tape down. Place Winter Tree stencil over. Tear a landscape from copy paper and blend over Weathered Wood and Iced Spruce. Move the landscape paper from time to time to create hills etc.
2.       Lift the tree stencil carefully and remove the circle blank. Place the Framer ‘outie’ over the white circular area and also the Tree stencil and carefully blend over Squeezed Lemonade.
3.       Remove the Framer, replace the Tree and draw around outline with fine Micron pen.
4.       Remove stencil completely.
5.       Doodle and colour inside the tree outline with black Micron pen. Add the balloon neck and string with same fine pen.
6.       Stamp the little boy from the Wee Folk 2 set.
7.       Doodle a frame around image.
8.       Outline card with a black Sharpie and mount onto 8 x 8 card.

This is my first attempt

Et voila – The Moon’s My Balloon!

Time now for your project.

Bye for now and happy crafting!

Shelagh ‘The Making Lady’

http//:shelaghscraftyconcepts.blogspot.com


Clarity Challenge May 2017

Clarity Challenge
May 2017
Up in the Air
‘Winging It!’


Materials:-
·         Groovi:- Tina’s Flower plate; Feathered Friends
·         Stamps:- Clarity Miniature – Stag Outline moon, tree-scape and eagle; Bird Outline – birds; Word Chain Alphabet
·         Stencils:- Net Pattern, Jo’s Bubbles
·         Ink Pads:- Archival Black; Distress Salty Ocean, Peacock Feathers, Twisted Citron; Distress Oxides Fossilised Amber, Cracked Pistachio, Vintage Photo; Encore Silver
·         Cardstock:- 1 x A4 white – halved centrally down portrait format; white parchment scraps,
·         Miscellaneous:- Glue pen, glitter, holographic mirri card, black card, white card.


Instructions:-
Background:
1.       Dab Salty Ocean, Twisted Citron and Peacock Feathers onto craft sheet. Spritz with water. Drag long rectangle of card as described in ‘Materials’ through ink and repeat until card is covered. Dry with heat gun.
2.       Place Jo’s Bubbles over inked card and dab Oxide Fossilised Amber randomly over. Spritz card as before then dry. Repeat to suit. Remove stencil.
3.        Place over Net stencil and dab over Oxide Vintage Photo. Spritz then dry. Remove stencil.
4.       Dab Oxide Cracked Pistachio onto craft sheet. Spritz with water then drag inked card over in a random fashion. Dry.
5.       Divide and cut card into three. Stamp moon, trees and birds on each of the three inked rectangles.
6.        Stamp sentiment in black Archival then over-stamp with Encore silver. Sprinkle over glitter before the ink dries completely.
7.       Mount each onto holographic mirri then black. Attach side by side to white card background.

Groovi Creatures
1.       Emboss two sizes of dragonfly from Tina’s Flower plate three times each onto parchment. Colour, pierce and cut. Glue smaller onto large. Add small dots of glue from a glue pen and sprinkle over glitter. Attach on to one of the backgrounds.
2.       Emboss two sizes of butterfly from Tina’s Flower plate twice each, colour. Pierce each and attach smaller onto larger. Add glitter as in 1) and attach to second background.
3.       Emboss chosen image from[MM1]  Feathered Friends plate and further emboss isolated areas of same image to create decoupage components. [MM2] Pierce and cut. Layer to form 3D image.
4.       Attach to third background rectangle.

And there we have it – an inky, stencilled, stamped project with Groovi additions – my new favourite  multi-media technique!!!

Over to you to join in the Clarity Challenge!
Happy crafting!
Shelagh ‘The Making Lady’