Clarity Stamps
Tina's Flower Doodles
Hochanda - June 13 2018
Maria Moorhouse
Hello - to you as a visitor and to another fab Clarity product - wonderful fine line stamps designed by Tina Cox. Below are my examples using these stamps and you will see different techniques displaying them - plain, glazed, coloured and fussy cut. To date I do not have a signature technique or indeed format hence my attempt to treat each new set of stamps and stencils as they suggest to me at first sighting. A variety of notebooks are always within my grasp, although often the sketches are forgotten. Enjoy!
Clarity products
used:-
·
Stamps:-
Tina’s Doodle
Flowers – STA-FL-10620-A4;
Base Circle and
Friends - CLA-FL-20051-A4
A Million Thank Yous –
STA-WO-10044-A5
Happy Birthday
Sentiments-STA-WO-10557-A5
·
Clarity
Fresh Cut Dies:-
Nested Squares – ACC-DI-30603-66
·
Ink
Pads:-
Archival Black- INK-AR-50030-XX
Archival Coffee
·
Card/Paper:-
Stencil – ACC-CA-30095-77
Theuva-ACC-CA-30371-A5
·
Designer
Paper/Parchment/Card:-
Rainbow River – ACC-CA-30550-88
Shenandoah – ACC-CA-30549-88
New England Fall - ACC-CA-30441-88
Groovi Parchment remnants
·
Miscellany:-
Pergamano
Glitter – Hint of Gold, Hint of Green, Hint of Blue, Hint of Pink –
PER-AC-70252-XX
·
Extras:-
Gems, Twine, Beads
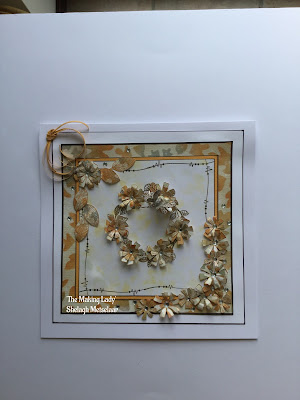
Example 1

Materials:-
·
Tina’s Flower Doodles stamps; Base Circle and
Friends stamps
·
New England Fall Paper
·
Archival Coffee Ink Pad
Instructions:-
1.
On paler side of chosen New England Fall paper,
stamp circle using Archival Coffee. Continue stamping with Archival Coffee and
a trio of leaves stamp to form a wreath.
2.
Stamp an ‘off the page’ border using largest ‘stem.’
Trim. Layer onto paper and card. Add to card blank.
3.
Stamp outline flowers onto paper remnants but on
the vibrant side; cut out. Repeat with single leaves. Attach to wreath and
corners.
4.
Decorate with gems.
5.
Stamp dragonfly as before, trim and add to suit.

·
Tina’s Flower Doodles; A Million Thank Yous
·
New England Fall Paper
·
Archival Coffee Ink Pad; Artistry Fancy Fuchsia,
Rich Mocha, Golden Turmeric
·
Theuva Cardstock
·
Shrink Plastic
·
Black Card blank
·
Clear detail Embossing Powder
*During the ongoing clear up of my workroom I have uncovered
a number of punches I brought from the USA ten years ago, two of which have
been used in two examples.
Instructions:-
1.
Stamp a variety of images from Tina’s Flower
Doodles around a rectangle of Theuva card using Archival Coffee. Trim.
2.
Stamp
chosen leaves on New England Fall paper with same ink. Blend Fancy Fuchsia
lightly around perimeter. Attach to rectangle of Theuva card which has had a
light blending of Fancy Fuchsia over the edges. Edge with black pen. Attach to
rectangle from 1).
3.
Stamp large flower heads once each onto the
Theuva card, punch out with circle punch then blend over Golden Turmeric and
Fancy Fuchsia. Highlight areas with white pen.
4.
Coat each circle with Versamark, add Clear
Detail then heat set. Whilst still hot, add more Clear Detail and heat set.
Repeat. (I gave this four coats.)
5.
Punch out four larger circles from same New
England Fall sheet, blend over Fancy Fuchsia then add Rich Mocha to tone down. Add
glazed circles centrally.
6.
Glue circles and glazed circles in place.
7.
Stamp dragonflies onto parchment scraps, add
glitter and attach. Stamp dragonflies onto shrink plastic, colour, heat-shrink
and add to card.
8.
Stamp chosen sentiment to foot of card.
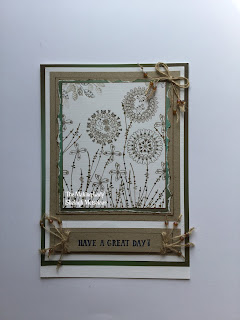
Example 3

Materials:-
·
Tina’s Flower Doodles stamps, Happy Birthday
Sentiments STA-WO-10557-A5
·
Linen Card
·
Kraft Card
·
Designer Paper – Shenandoah
·
Archival Coffee
Instructions:-
1.
Cut A4 linen card to A6 size.
1.
Stamp selection of Tina’s Flower Doodles around
mid-point of card. Stamp centres to suit.
2.
Colour using fine pens – I used pale grey and
grey brown Pitt Pens from my stash.
3.
Add stems. Add leaves.
4.
Attach to Shenandoah paper, then distress edges
by gently tearing. Ink distressed edges.
5.
Attach to layers of Kraft, linen card and finally
Designer paper before attaching to card blank.
6.
Stamp sentiment to scrap kraft card, embellish.
Attach.

Materials:-
·
Tina’s Flower Doodles
·
Archival Black
·
Theuva Card
·
Black Card
·
Designer Parchment- Rainbow River
·
Smooth Black Paper (Unknown source-bought in
Kuwait!)
·
Colouring Pencils
·
Gems
Instructions:-
2.
Stamp each large flower three times, similarly
with decorative circle so there are nine different images.
3.
Colour each with chosen colours (I used three.)
4.
Cut with
second smallest Fresh Cuts Nested Squares. Add to punched, scalloped black
squares. Attach stamped and coloured images onto scalloped black squares.
5.
Glue into place on parchment square.
6.
Add gems.
Many thanks for taking the time to look at my blog. Happy stamping!
Best wishes,
Shelagh
'The Making Lady'
Many thanks for taking the time to look at my blog. Happy stamping!
Best wishes,
Shelagh
'The Making Lady'


