Sunday 31 July 2016

Indigoblu Challenge Summer Florals July 2016

Summer Florals
Hi there and welcome to shelaghscraftyconcepts.blogspot.co.uk
This is my project for the Indigoblu 'Seasonal Flowers'  challenge. 
'Poppy and Holly'
Using the Indigoblu 'Poppy' Dinkie A7  and 'Holly' stamps, I have created this horseshoe as my great niece (soon to reach the grand age of three) is an attendant at her aunt's wedding at the end of the summer and this was the reason behind my project. I have already completed one for her but I very much wanted to make a horseshoe in vellum and when I found some sheets of the pearlescent type in my stash, I had to try it out. The Indigoblu Challenge remit was just the excuse to have a play. The images - two poppies and two holly leaves for each flower - were stamped in Distress 'Picket Fence' then heat embossed with a silvery white embossing powder. They were cut out and shaped before being glued onto a die-cut ring (in triplicate for strength). Fine ribbon and bows were added and to complete, I stamped, embossed and cut out fourteen extra leaves to conceal the reverse card base. 
'Poppy and Holly' - same horseshoe, different background!

My great niece now has a choice to make. Decisions! Decisions!


Saturday 23 July 2016

Daisy, Daisy!


Here is my entry for the Craft Stamper 'Take It, Make It' Challenge July 2016. It is my first ever for this challenge and I'm pleased I read the Craft Stamper blog earlier this week! below is a quick 'how to,' to explain the resources and techniques used. 

As this is 'Take a Stamp' month along with 'Anything Goes,' I have made a canvas and decorated it with a Julie Nutting Prima Doll stamp, Clarity Daisy stamp and  Clarity 'Petal' stencil. 
The background canvas was coloured with a combination of Bursts and Liquid Metals. The 'Petal' stencil was overlaid and Translucent Texture paste coloured with Fresco Finish 'Orchid' spread over. With the stencil removed, the coloured paste was dusted with Nuvo 'Hot Pink' and 'Diamond' glitter. The petals were outlined with a variety of Pitt pens of nib width XS, M and B.
The Doll and Daisy stamps were stamped onto turquoise and purple 'Burst' papers and also a dictionary page, prior to being coloured and cut out. They were added to background using Cosmic Shimmer glue. Shadows and highlights were added using Polychromos. 
The canvas was edged with Black Soot, some additions from Sakura glitter pens then mounted onto Hunkydory Centura Pearl Deep Purple and Yellow Gold.


Another departure from my usual craft work, but oh! how I enjoyed the freedom to mix and match resources!
Craft Stamper 'Take It, Make It' Challenge July 2016

Saturday 16 July 2016

Clarity Challenge 41 Mid-month

A Day Out

A Card from Delft
Materials:-

·         Cardstock:- Clarity Stencil card 7 x 7 ins – two pieces; card blank 16.5 x 7.5 ins – scored at 2ins, 4ins, 10.25ins
·         Clarity Stamps:- Large Harbour Scene, Windmill from Wee Farm Scene, Girl on Bicycle from Wee Folk1, Wee Houses, Wee Shops, Ornate Lamp Posts – second smallest, Word Chain Alphabet
·         Clarity Stencil:- Cracked Box Frame Stencil, Pond Fish Stencil
·         Inkpads:- Archival Cobalt Blue; Distress Tumbled Glass, Stormy Sky
·         Fine Micron Pen
·         Faber Castell Polychromos
·         Blue Alcohol Marker

Instructions:-

1.       With Cobalt Blue, stamp the Girl on Bike and Lamp Posts on main card and on post-its. Cut the latter out and mask the images on the main card.
2.       Mask a horizontal line slightly above half way.
3.       Using the top of the masking tape as a guide, stamp the houses and shops along this line.

4.       Using the foot of the tape as a guide, place the stencil over and blend over Tumbled Glass. Remove this stencil and place the Pond Fish stencil where the previous one ended. Blend over more Tumbled Glass. Outline the ‘rocks’ with a fine Micron pen and doodle a waterline to demarcate the area between the ‘wall and the water.


5.       Stamp each boat from the Harbour Set and join with a Micron line. Add an anchor line from the larger boat and a few ripples around.
6.       With 3rd and 4th generation ink, add the small fish to give an underwater illusion.
7.       Shade areas with pale blue and grey Polychromos. Add shadows in a similar fashion.
8.       Mask the shops and houses and blend over Stormy Sky.
This is my original and not the actual card. 

9.       Outline main card with blue alcohol marker and repeat on mat.

10.   On a strip of card, cut to fit mountain fold, stamp windmill and sentiment. Outline with blue marker and add shadows. Adhere to front of card. 

Friday 15 July 2016

Polkadoodles Horse-shoe


Summertime Wedding Horse-shoe

My two year old great niece is an attendant at her aunt's wedding this summer and with this in mind, I made her this horse-shoe.I had thought about stamping onto vellum or parchment but the selection of flowers from Polkadoodles 'Winnie Fruit Punch fitted perfectly. To make it, die-cut three rings, cut a sliver out from the circumference and glued them together. I printed a couple of sheets of the flower with a trio of leaves and the same of daisies, cut them out then added them to the base. I cut out the daisies, curled the petal round a fine paintbrush, then added them either singly or in pairs over these. A couple of butterflies were added plus self-adhesive pearls and a ribbon plait. 
Et voila! A delicate horse-shoe! 


Wednesday 13 July 2016

Two Tees, Please!


Indigoblu Challenge June 2016 

Teal and Brown


My submission for this month's Indigoblu Challenge 'Brown and Teal/Teal and Brown' has taken me down a different route as the British Open Golf is to be played in Troon soon, and Troon is a town I know well as I went to school, Marr College, there. As a student many moons ago, I also worked in the Marine Hotel during an Open Golf Tournament so this is also a reflective creation. I used Fairway to Heaven, Ledger Background, Boadicea, Holly A6 and Bubbles Background and stamped with StazOn Teal Blue and Ganache as well as  Distress Inks Tea Dye, Vintage Photo, Walnut Stain, Peacock Feathers and Mermaid Lagoon. The varnished tees were sanded then Tea Dye (very appropriate!!!) and Teal Blue blended lightly over; the pencil was also coloured with the StazOn inks to complete. 

This was great fun to make and I hope it has given you some ideas. 

Thanks for visiting,

Shelagh
'The Making Lady'

Sunday 10 July 2016

Chocolate Baroque Challenge June 2016

Materials:-
·         Stamps:- Chocolate Baroque Butterfly Dress
·         Inkpads:- StazOn Royal Purple, Pumpkin; Distress Black Soot, Wilted Violet
·         Canvas:- 5ins x 7ins
·         Bursts:- Yellow, Lemon, Orange, Violet, Purple
·         Polychromos
·         Charcoal Pencils
·         Acetate
·         Mod Podge matte
I
To make:- 
Spritz the canvas lightly with water then gently tap on lemon, yellow, violet, orange and purple Bursts. Spritz again then after a minute or so, mop with kitchen roll. Accentuate the background with Distress ink followed by a light charcoal pencil. Lighten areas by patting with damp kitchen roll. Create a moon by applying a damp mini blender sponge to desired area then mopping with kitchen roll; repeat until you get the required effect. On good quality paper, stamp the Butterfly Dress twice using Royal Purple and colour the images with Polychromos. Re-ink the stamp and stamp again onto acetate twice and set aside to dry. Clean stamp then apply Pumpkin ink and stamp again onto acetate sheet.
To assemble:-
Cut out one coloured image and add to canvas using Mod Podge matte. Cut out the acetate image leaving a small outside margin and glue over coloured image to give a 3D illusion. (I used glue dots which I then covered with a stamped flower image.) Cut out a variety of flowers and butterflies from the second image and attach over acetate using mini glue dots.(The acetate adds an outline intensity to the stamped image and suggests a3D effect.) Cut out butterflies from acetate and adhere to suit. Mat and layer onto complementary colour card.
Et Voila! La Mia Bella Donna.  (Not to be confused with ‘Belladonna’ which is another name for Deadly Nightshade and highly poisonous!!!)
 This was a fun project and I very much enjoyed making it. It is my entry for this month's Chocolate Baroque challenge. 

Thanks for looking at my blog.

Shelagh
The Making Lady.


Friday 8 July 2016

Shoes and More Shoes!


I Wish, I Wish!


Hello and hi!

This is a bit of a departure from my usual crafted cards. I used Polkadoodles digi images,
chosen primarily due to my lifelong and well-known love of shoes. I used a background paper from the ‘Winston’ collection, copied the sentiment ‘bags, shoes,’ to create a second background paper which was inked with Distress Worn Lipstick and Tea Dye then curled around a paintbrush handle on diagonally opposite corners. A Polkadoodles character was added along with shoes and boxes. The sentiment was outlined with a fine liner, dotted with a glue pen then glittered. An outline was scribbled around the perimeter of the base paper. A couple of presents with decoupaged bows from the collection were added to the base. More glue pen and glitter added to characters flowers and shoes and twine (customised by colouring with alcohol markers) attached to top right corner.
Et voila! Here we have ‘I Wish, I Wish!’

Components:-
·         Polkadoodles Winnie Sugar Sprinkles Fruit Punch; Winston Kraft Paper
·         Glitter
·         Glue Pen
·         Fine Micron Pen
·         Alcohol Marker Pens – Pink, Brown
·         White Twine

Thank you for visiting and hope to see you again very soon.
Best wishes,
Shelagh  ;~}


Monday 4 July 2016

Indigoblu Challenge Mid-month Inspiration

'Brown and Teal'


Materials:-
·         Canvas board 5ins x 7 ins
·         Acrylic Paint – Opaque Teal, Translucent Teal, Semi-opaque Brown
·         Brayer
·         Sepia Burst
·         Indigoblu Stamps – Ledger Background, Looks Like Rain Deer set, Nature 1 set, Discover Your Passion set, Wild Flowers
·         Inkpads:- Archival Potting Shed, Sepia; StazOn Ganache, Teal Blue
·         Mod Podge – Matte
·         Versamark Pen
·         Teal Embossing Powder
S     Self- adhesive gems
·         Alcohol Markers – Light Brown, Medium Brown, Dark Brown, Teal, Blender Pen
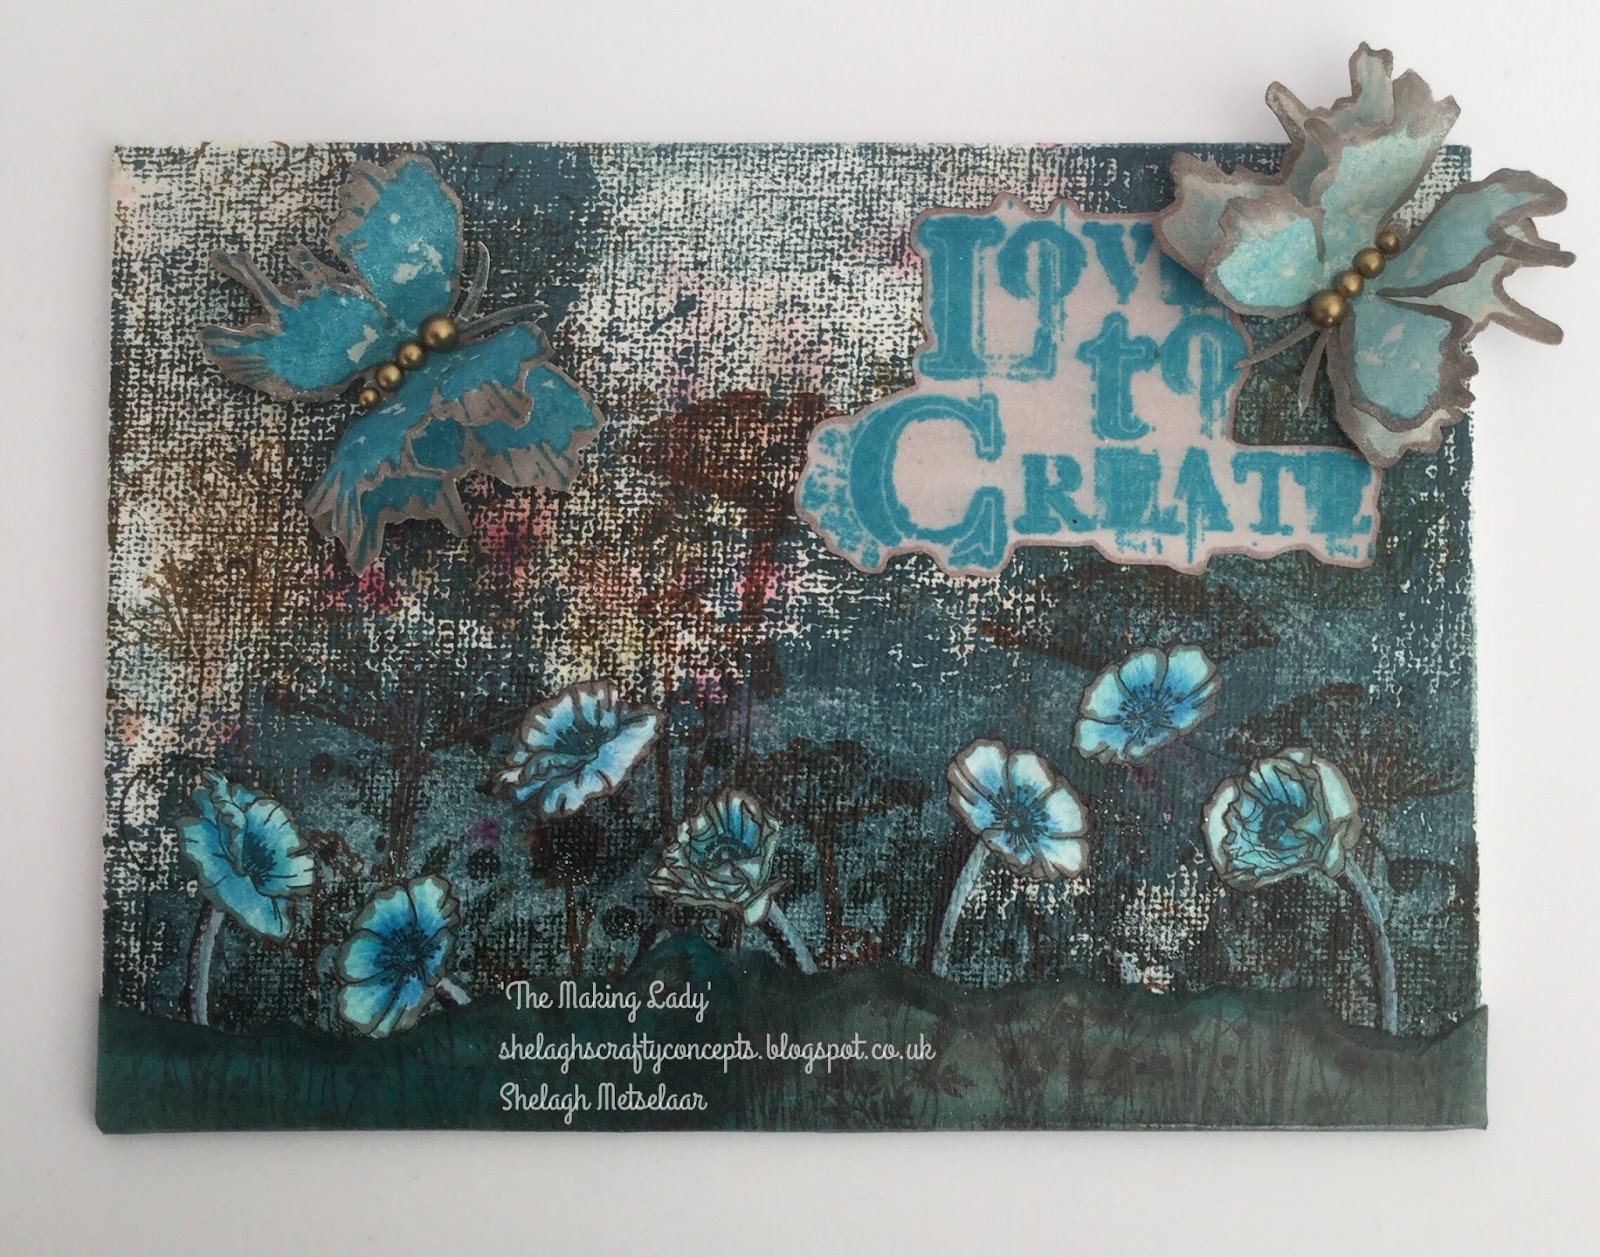
·         Sparkle pen - clear


Instructions:-
1.       Load brayer with Opaque Teal paint and lightly roll over canvas. Repeat with Semi-opaque Brown then Translucent Teal, ensuring the covering is patchy in all three applications. Alow to dry.
2.       Squeeze a few puffs of Sepia ‘Burst’ and activate with a fine water spray. Roll a few sheets of  kitchen paper over the canvas to mop the excess water and pigment
3.       Ink up the pair of small trees from ‘Looks Like Rain Deer’ with Potting Soil and stamp over in the far background. To achieve a random effect, press stamp with fingers as opposed to mounting on a block.


4.       As in 3) with Potting Soil, stamp the partial tree on the mid-left hand side of the canvas.
5.       Repeat with Large Cow Parsley stamp and Sepia ink on the middle and repeat with Ganache near fore-ground of the canvas.
6.       Ink the blots from the Ledger stamp with Ganache and as in 3) randomly stamp along the lower quarter of canvas.
N.B. In an earlier life, I think I cut the blots off the main stamp and this made it easier to manipulate, giving a vintage effect.
7.       Draw Versamark stems along the foot of the canvas, add Teal embossing powder and heat set. Draw a line with dark brown marker on the inside of each stem, then soften with blender pen.
8.       On paper, stamp a double consecutive image of Wild Flowers. Colour the flower heads with Polychromos, edge with brown alcohol markers, fussy cut and set aside. At the top, rip along the length of the remaining stamped image, colour over with a teal alcohol pen, followed by a light brown. Apply to foot of canvas using Mod Podge.
9.       Add coloured flower heads to stems using Mod Podge.

10.   Stamp ‘Love to Create’ using StazOn Teal Blue onto paper. Heat set then colour over with light brown alcohol pen. Cut out then outline with medium brown marker. Apply to canvas using Mod Podge.
11.   Stamp out butterfly from Nature 1 twice in Teal Blue, 1st and 2nd generation. Cut out all four images, outline with medium brown. Apply sparkle from Sparkle pens.  Attach to corner of sentiment. 

This project was a joy to complete and I must admit, I'm quite taken with the 'look' of the finished canvas although it's wildly different from my usual crafting. 

Stamps can be found via the Indigoblu website.
Thanks for visiting and happy crafting.
Shelagh ;~}

Friday 1 July 2016

Clarity Challenge 41 July 2016

‘A Day Out’


Hello and welcome! It's the 1st of July and therefore must be the start of a new Clarity Challenge and boy, what a challenge we have for you this month - namely 'A Day Out.' I had quite a few ideas but finally settled on 'A Day at the Races'  as with all the publicity surrounding Ascot and Glorious Goodwood, it seemed like a good idea and we once had the delightful experience of attending. But . . . then I had to find the horse and the jockey, the first was easy, the second took a bit of crafty craftiness! 

My second project - posted mid-month - reflects somewhere not far from where we once lived and also 'A Day Out' for us with a bit of lunch thrown in. Now, I wonder where that can be?

Materials:-

·         Clarity Stamps:- Horse from Horse and Carriage set; Jockey – modified skier from Sports set; Flagpole from Union Jack set; Lily, Annabel, Rosie, Douglas; Alphabet Word Chains; Small Rose; NDC Edelweiss, Carnation
·         Cardstock:- Clarity Stencil card 7x7 – two pieces; 8x8 card blank
·         Inkpads:- Distress – Iced Spruce, Tumbled Glass, Peeled Paint, Squeezed Lemonade, Mustard Seed, Tea Dye; Archival Black; Versafine – Onyx Black
·         Pencils:- Faber Castell Polychromos
·         Miscellaneous:- Self-Adhesive gems, large white sticky labels, Micron pen, Black alcohol marker

Instructions:-

1.       Trim one piece of stencil card to 6.75 x 6.75 ins.
2.       Using black Archival, stamp Lily onto stencil card. Stamp again onto a large white sticky label and also a post-it and cut the latter out. Mask main image with this and set aside the image on the label.

3.       As in 1), stamp Annabel on main card, sticky label and mask; repeat with Douglas and Rosie.
4.       Stamp flagpole onto card to create rails, onto post-it for masks and onto sticky labels. Mask rails.
5.       With all masks still in place, stamp horse images in first and second generation Onyx Black ink between the rails. Stamp corresponding images of horses onto white sticky labels and set aside.
6.       Ink the skier but remove the inked skis and ski-poles with a wet wipe. Over-stamp the horse images in first and second generation with the ‘altered’ skier on main card and repeat to fit.
7.       Again with all masks still in place and having added a ‘sun’ mask, sweep over the Distress inks to create a suitable background.
8.       Remove the masks and colour the main images around the edges. (They will be covered by the sticky label images.) Colour the main sticky label images to match. Cut out images and attach onto main card.
9.       Cut out rails from white labels and adhere over stamped rails on main card. Cut out the horse images from the labels and attach over the corresponding horses.
10.   On a scrap of white card (mine was pearlescent) stamp and colour the Eidelweiss, Carnation and Rose and add to Lily, Annabel and Rosie as 'headgear.' Form a small rose from scrap of card and add to the Douglas image as a buttonhole.
This was my first attempt and although I prefer the background on this one, the horses were too black for my liking. 
11.   Stamp the sentiment in Black Archival.
12.   Add shadows to suit with Polychromos.
13.   Add a few bird images and grass tufts with a fine Micron pen.
14.   Draw a border around card using a black alcohol marker.
15.   Add the white 7x7 ins mat then adhere to the 8x8 card blank.

Et voila! A Day at the Races.

Looking forward to your ideas and projects, can't wait to see what your inventive minds come up with! The Clarity Challenge is open for anyone to enter but please have a look at the guidelines; details to be found at claritystampchallenge.blogspot.co.uk and products from claritystamp.co.uk. The winner is rewarded with a £50 voucher to spend on Clarity products. Go on, go on, go on - you know you want to! 
Best wishes,
Shelagh
The Making Lady