Tuesday 27 June 2017

Groovi Favour Box by Shelagh Metselaar

Groovi Favour Box
by
Shelagh Metselaar

As promised - my latest discovery! Enjoy yours!


Materials:-
·         Groovi Plates:- Nested Squares GRO-PA-40037-03, NDGC16 GRO-MU-40577-01, Border Henna GRO-PA-40187-09, Jayne’s Roses x2  GRO-FL-40395-03, GRO-FL-40396-03
·         White Parchment – A4
·         Pergamano Markers – light green, medium green; Faber Castel Polychromos - lilac, purple;  Faber Castell Albrecht Durer Water Colour Pencils – lilac, purple

Instructions:-
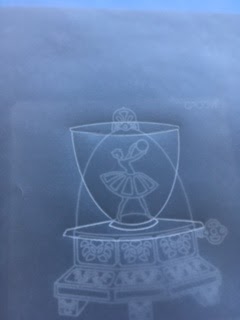
1.       Emboss dome as shown.

2.       Emboss horizontal and right hand vertical lines using square 5 from centre of Nested Squares.
3.       Move parchment fractionally along to right to ensure correct length of bottom line and also to add the left hand vertical line.

4.       Align the dome to the completed corner of square and emboss; repeat on third side.           NB – Don’t do what I did and embossed the dome from the incomplete side!!!! Photo tells all.
5.       Extend the lines to complete; join to form final side of square and emboss final dome.
6.       Emboss scallops inside perimeter of square and also inside dome, moving the border plate to suit base lines. Leave a short gap where each dome and square meet to assist folding. NB I found the scallops are not all the same size and to this end marked, on the reverse side of the plate with a Sharpie dot, the one I used (for uniformity.)

7.       Decorate and colour inside of domes and base to suit. (Leaves coloured with green Pergamano markets; flowers first with water colour pencils and barely damp brush then depth of colour added with Polychromos. Pierce with a bold  double needle then pierce each single hole again prior to cutting to form a picot edge.


To complete, punch a hole using a Cropodile, one in each top tab. Thread ribbon through two opposite holes, followed by the other two. Tie a small bow and top with flowers made from Tina’s flower plate. 
Happy crafting!

Saturday 3 June 2017

Tea for 2!


Groovi ‘Tea for 2’

June 2nd 2017


Materials:-
·         Groovi Plates:- New Design Groovi Club 16 (Dancing Girl inside Cloche), Nested Squares, Nested Squares Extension and Small Alphabet, Willowy Wreath, Tina’s Flower Plate
·         Clarity Parchment:- 1 x A4 White
·         Clarity Papers:- New England Fall – Brown Salt Speckle
·         Card:- Black, White, Dull Bronze
·         Colours:- Faber Castel Albrecht Durer Water Colour Pencils used with an almost dry brush

Instructions:-

For the frame

1.       Emboss Willowy Wreath centrally on A4 parchment.
2.       Add outline from Nested Square. Emboss cup as per photo sequence below. 


Tea Cup
1.       Emboss as in photos using NDGC 16
*The bold white lines are the actual embossed lines.

Photo A 
Photo B
Photo C
Photo D
Photo E

Photo F
Photo G
Photo H
Photo I
Photo J
Photo K

  • Use different areas of NDGC 16 to decorate cup and saucer. 
  • Using Nested Squares create a  chequered tablecloth.
  • Add an inner square from the Nested Squares to accommodate the Tea for " font from Nested Squares Small Alphabet plate.
  • Add 'Tea for 2.'
  • Colour to suit. (I used Faber Castel Albrecht Durer Watercolour pencils and an almost dry paint brush.)
  • Pierce with a twin needle tool and picot cut both inner and outer. (This was the initial thought behind this card as my picot cutting is still somewhat erratic.)
  • Make a second cup and saucer and picot cut. Colour as before. 
  •  Mount cup and saucer frame onto 'Salt Crackle' paper from New England Fall pad. Further mount onto black, white, black, dull bronze card, in that order.
  • Attach separate cup and saucer. 
  • Emboss, colour and cut out two flower sprays from Tina's flower plate. Add brads to connect flowers then attach to sides of card.
. . . . And here we have my 'Tea for 2.'

Here's hoping the photos are clear instructions and help, as trying to put these into words started to run into pages!!! 

Keep on grooviing!

Shelagh ;~}

P.S. May was a hard month for my family and whilst I have been able to detail and scribe the above as it was only replicating something made on 28 April, Groovi inspiration is proving most elusive at the moment. I hope to see you all soon. 
                                                                                              S.


Thursday 1 June 2017

Chocolate Baroque Challenge May 2017

Chocolate Baroque Challenge

May 2017

Serenity


Hello - here is my CB Challenge swansong and I am sad that this is indeed the end of an era. The month of May has been very traumatic for me and my family and I'm currently finding difficulty in putting ink and colour onto paper. However, as a long term contributor to the challenge, I could not let this event go unmarked. 
Hope you like my effort!

Materials:-
·         Stamps:- Chocolate Baroque – Serena, Birdcage Collage, Flora Musica.
·         Inkpads:- Ranger Archival
·         Cardstock:- white
·         Canvas:- Pebeo 20cm x 20cm
·         Colour:- Pebeo paint – green pearlescent; Paper Artsy Fresco Acrylic Paint – Jade, Bora Bora, Beach Hut, Limelight; Derwent Inktense Pencils; Spectrum Noir Sparkle pens – Clear, Purple
·         Miscellaneous:- White Texture Paste; Cosmic Shimmer Sparkle Texture Paste and Metallic Gilding Paste - Lime Burst; Sequins – Purple; Self-adhesive gems
Instructions:-
1.       Spoon white texture paste onto canvas and spread over in different directions with a brayer. Allow to dry.
2.       Paint areas in the named Fresco Finish paints, stippling into uneven areas. Allow to dry.
3.       Sponge small areas with Lime Burst Sparkle Texture Paste.
4.       Add some Lime Burst Gilding Paste to chosen areas.
5.       Stamp Serena three times onto white card using Archival Black. Colour all three with Inktense Pigment pencils and decoupage. Glue onto coloured base canvas.
6.       Stamp Birdcage Collage nine times onto white card. Colour feathers, leaves and flowers to suit and cut out.
7.       Glue separate leaves into place. Add tail feathers as a headdress and embellish with gems.
8.       Construct flowers from the birdcage images and add leaves. Glue onto the canvas to suit. Add beads to the centres.
9.       Decorate corner with feather images. Add flower constructed from a flower from Flora Musica image. Add gem to centre.

10.   Scatter sequins and glue. 

Et voila. . . . . Serenity!
Clarity Challenge
June 2017
Party Time
‘It’s My Party!’


Materials:-
·         Groovi:- Border Plates - Banner, Birthday and Darling, Border 2, Cake Decorations, Christmas Squares Pudding, Lily, Ribbon and Hearts,  A5 Square – Thank You (ribbons,) Swing on a Star (stars,)Large - Word Chain Alphabet, Calligraphy Alphabet, Oooh La La Knickers (smallest bow,) Large Nested Squares
·         Parchment:- white
·         Miscellaneous:- Faber Castel Polychromos, Glue pen, fine glitter, 4 toning brads, blue mirri, white card

Instructions:-
1.       Place parchment landscape and emboss Lily centrally about 2cm up from foot of sheet.
2.       Emboss a number of baubles i.e. balloons from the ‘Christmas Squares Border’ on one side and a single on the other so they are positioned ‘off the page.’
3.       Emboss an outer and inner frame using Large Nested Squares. Emboss ribbon border between these squares.
4.       Emboss borders of stitching using the Ribbon and Hearts border.
5.       Add Banner, wide enough to encapsulate chosen sentiment and extending it to fill the width.
6.       Add swags from Cake Decorations above banner and frills from the same plate to create a ‘closed curtain’ effect to the foot.
7.       Add ribbon swirls and confetti from Thank You plate.
8.       Emboss balloons and Lily’s dress.
9.       Add stars from Swing on a Star and sentiment from a mixture of Birthday and Word Chain Alphabet.
10.   Add some white work and colour to suit.
11.   Pierce and cut edge of outer square and attach onto another sheet of white parchment with brads. Mount onto blue mirri then onto white card.
12.   On scrap parchment, emboss small bow five times from Oooh La La Knickers set and add trailing ribbons using the Calligraphy Alphabet plate. Pierce and cut. Apply glue from glue pen to bows and ribbons and sprinkle over glitter.
13.   Attach to balloons. (I used mini glue dots.)
14.   Add sparkle to project using a glue pen and fine glitter to suit. Dot sentiment with glue and add glitter.
Extra sparkle was added with a Spectrum Noir clear Sparkle

Clarity Challenge June 2017

Clarity Challenge
June 2017
‘Jitterbug Boogie’

Materials:-
·         Stencils:- Elegant Ladies 4, Jive Dancers
·         Cardstock:- Clarity Stencil card - 2 x 7ins x 7ins;  I x silver mirri; 1 x black
·         Canvas:- 1 x 8ins x 8ins
·         Colour:- watercolour pigment; Fresco Paint – Little Black Dress
·         Texture Paste:- Transparent
·         Miscellaneous:- Silver glitter

Instructions:-
1.       Cut one sheet of stencil card to measure 6ins x 6ins.
2.       Puff a selection of bright pigment colour powder over the card. Spritz with a fine water spray, dry with a heat gun then spray with a more heavy duty spray. (My second spray bottle was a recycled (but cleaned) eco-friendly shower spray and much more powerful.) Dry.
3.        Tape the Elegant Ladies stencil over and sponge through Little Black Dress paint. Clean stencil. Repeat a few times to suit. Dry.
4.       Tape the Jive Dancers stencil over and apply translucent paste.
5.       Remove stencil and rinse the remaining paste away.
6.       Immediately cover paste with a deep coating of dark silver glitter. Allow to firm for only a minutes then pat down gently with fingertips to ensure all areas are covered. Pour off excess.

7.       Leave to dry then mount onto  silver, black, white card then finally onto a canvas which has been edged with silver gilding paste.