
The idea for this card came from a clip about
Lapwings where one was flying around reed beds. As an extra note of
interest, we were out in the Jeep heading for a brisk winter’s walk in the
country this afternoon when I spotted three lapwings scrabbling about in a
field; this is not a sight I’ve seen since I was a child!
Materials:-
· Cardstock:- Theuva Card x 3, Black Pearlescent
Card, Silver Mirri Card, White Pearlescent Card
· Clarity Stamps:- Lapwing Set, Reed stamp
· Inkpads:- Ranger - Archival Black; Distress Frayed
Burlap, Old Paper, Antique Linen, Mowed Lawn, Weathered Wood, Stormy Sky;
Versafine Onyx Black
· Clear Detail Embossing Powder
· Micron pen
· Spectrum Noir Pencils
Instructions:-
Stamps used

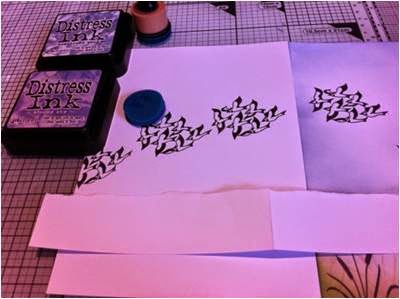
- On a piece of Theuva card, positioned 'portrait' - short sides top and bottom - and using Versafine Onyx Black, stamp the smaller 'Standing Lapwing' towards the foot of the right hand side. Dust with embossing powder and heat set.

- Stamp this again on a sticky note and cut out.
- Using the same process, stamp the 'Lapwing in Flight' in the centre of the card and the 'Flight of Lapwings' at the top left hand corner

- On a second sheet of Theuva card, stamp three sets of the 'Flight of Lapwings' in a downward motion and heat emboss.
- Stamp some masks on 'sticky notes' and cut out.
- On a third sheet, stamp two sets of the same almost parallel to echo the horizon.
- Using distress ink 'Old Paper' stamp the 'Reed' stamp randomly along the foot of each of the three cards. Over stamp these to suit with the same stamp and Black Archival.
- Cut a large circle mash (the sun) from a 'sticky note' and place over part of the stamped 'Lapwing in Flight'. Place a lapwing mask over the stamped image and also over the 'Standing Lapwing' and the 'Lapwings in Flight'

- Tear a sheet of copy paper across to create a rough horizon. Place this over the first card about one third of the way from the foot. Using a blending tool and Weathered Wood, gently colour the area above the horizon mask and on to the top of the card.
- Move the horizon mask onto the second then third stamped sheets and repeat.

- Using a blending tool and Old Paper, add colour over the stamped reeds at the foot of each sheet. Build this up to a small mound at the right of sheet 1 so the ‘Standing Lapwing’ appears to do just that. Add depth of colour to this area by blending in Frayed Burlap and blend in some Mowed Lawn along the reeds.

- Remove the sun mask and blend some ‘Squeezed Lemonade’ to form a reflection on the water. Shade the sun using some yellow Spectrum Noir pencils and blend into paper. (I used my fingers).
- Blend Stormy Sky and Weathered Wood to create the darker sea. (I originally coloured the sea lighter and sky darker but on looking out from my craft room on a beautifully sunny winter’s day out towards Aberdeen harbour and the horizon, I noticed the opposite was true thus all change)!
- From here, using Spectrum Noir grey pencils, add some shading to the birds.
- Trim, mount onto silver, black then white.
Thank you for visiting my blog
Shelagh ;-}
Fab card, great techniques and truly inspirational. I love your step by step too!
ReplyDeleteWelcome to the team xx
Congratulations on joining the team Shelagh. Beautiful scene and I love how you've split it into panels. x
ReplyDeleteBeautiful card Shelagh, really like the panelling effect. Lucky you to see thee Lapwings the other day! x
ReplyDeleteHappy New Year Shelagh and welcome to the Clarity Stamp Challenge Design Team. A beautiful card and wonderful soft blending. The stamping of the lapwings across the panel gives a wonderful effect to the card. Thanks for the inspiration.
ReplyDeleteHappy new year Shelagh, what a fab card this is. I so love the spread of it. Best of luck in 2015 and very much look forward to working with you. x
ReplyDeleteHi Shelagh and welcome to the team . You have created a great scene here and I love how you decided to do a panel card it seems to make it more panoramic. It reminds me of the seaside xx
ReplyDeleteWelcome to the team Shelagh, fantastic first project I love the lapwing stamps. Xx
ReplyDeleteBeautiful card and design I can not wait to see more of your art work. Xx
ReplyDeleteShelagh, this is such a great card. I love how the artwork is spread out over the panels. The step by step is fab; I love seeing how a piece of artwork is achieved from start to finish. Looking forward to working with you and seeing more of your work. Xxx
ReplyDeleteHi Shelagh, a truly serene card and the how-to is very easy to follow. I am looking forward to working with you and the rest of the team this year. x x
ReplyDeleteHi Shelagh, I love your style in this card, it's really elegant. Your blog is so good too, I love the step by step for the project. I'm new to blogging and it's great seeing how you all do it. Xxx
ReplyDeleteHi Shelagh Congratulations and welcome to our Challenge DT. I love your first entry and look forward to seeing more. xx Sam Crowe
ReplyDeleteThank you for your kind comments, everyone. Just back from visiting my mum in Ayrshire who is 88 today! What a thrill it is, being part of the design team. Congratulations to one and all! ;~}
ReplyDelete