Clarity Challenge 35
'Say It With Flowers' Mid-Month Reminder
'Flower Boa'
Hi there and thanks for looking in.
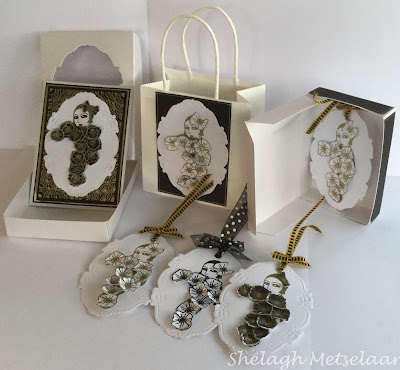
A mid-month offering for the January Clarity Challenge from Shelagh-land and something which will probably end up as birthday cards as I have a number to do and time is rapidly disappearing. (May even need to use the tags for this purpose, too!!!
I hope it encourages you to dust off your stamps, stencils or Groovi plates or a combination of any of these and join in. It's free, it's fun and with a £50 Clarity voucher up for grabs - awarded to a randomly chosen submission - it is a Win, Win situation for one lucky entrant. You can enter through your blog or by sending a photo by email to claritystampchallenge@hotmail.com and have until 8pm on 31st January. Just remember to check the rules of entry on the Clarity Challenge blog.
Good luck!
Good luck!
Materials:-
- Card :- White, Black, Pearlescent, Gold Mirri
- Stamps:- Feather Boa - large; Birds & Flower Rows set, Fairy Silhouette
- Inkpads:- Versamark, Black Archival, Versafine Jet Black
- Embossing Powder:- Gold Detail, Clear Detail
- Oval die from stash
- Ribbon from stash
- Pens:- Black Alcohol Marker, Gold Sakura
Instructions:-
Using white card, die-cut and emboss a number of ovals as this will save time.
Card
Oval Topper
- Stamp 'Feather Boa' centrally onto the oval using black Archival.
- Faintly colour the ladies face with pencils.
- On a scrap of white card using Versamark, stamp the lady's head again and heat emboss using gold embossing powder. Over-stamp the hat using swirly edges of the 'Fairy Silhouette' and black archival then heat emboss once clear embossing powder has been applied. Cut out the hat and glue onto main image.
- Using Versamark and gold embossing powder, stamp a number of medium and small outline flowers from the Bird and Flower Rows set, colour using a black alcohol pen and cut out. Attach over boa to create a flower scarf.
- For the hat bow, I cut a into a medium flower then attached it to the side.
Background
- Cut a rectangle of black card. (At this point and as a guide, I drew around the inside perimeter of the oval die with a gold pencil.)
- Starting at one corner I drew repeated Zentangle-type shell shapes using the gold pencil, then lightly drew over these with the gold Sakura pen until reaching the mid-point of both adjoining sides. Repeat until the background is filled in.
- Mount onto black, then gold Mirri then black.
- Adhere to a card blank.
Bag and Tags
Gold on White
- Repeat as for topper, only exchange the black Archival for Versamark.
- Punch a hole near the top edge and thread through matching ribbon.
Black on White
- As above but use black Archival and clear embossing powder.
- As in (2) above
To complete, I made and decorated a box each for the card and tags then decorated a plain white gift bag.
Thank you again and best wishes.
Shelagh ;~}
Thank you again and best wishes.
Shelagh ;~}

What a beautiful elegant set Shelagh. It has a real 1920's, Art Deco style and would make a fabulous gift in its own right. Xxx
ReplyDeleteThanks, Barbara. This was a bit of fun and a bit of an experiment to use the zentangle-type approach but using a gold Sakura instead of black or white. S xx ;~}
ReplyDeleteA lovely idea to make a gift set, it is so beautiful. Xxx
ReplyDeleteLoving the art deco feel to this and what a lovely set you have produced xx
ReplyDeleteFeeling inspired. I love the Feather Boa stamp but mine is still pristine in its wrapper. Love how you have used her Shelagh. I had to zoom in to fully appreciate your zentangle background, it has worked very well in gold x
ReplyDeleteThank you, Ladies! I just wanted to give the stamp an airing and had to find a way to incorporate the floral touch! ;~}
ReplyDelete