Cleverprints
Zigzag Flower Stamp Set
Here, I use one stamp and one stencil along with some watercolour pencils and Prism Pearlescent Powders and a good spritz of water.
Original example using Swirly Flower Stamp Set
Main materials used:-
Zigzag flower Stamp Set designed by Jane Royston for Cleverprints.
Cleverprints Flower Fall Stencil
Ink Pad - Black
Prism Pearlescent Powders
Watercolour Pencils
Cardstock - White
Brad
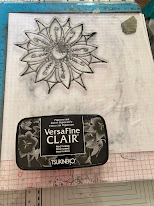
1)Stamp main image twice. (Having used a brand new and very juicy ink pad, one of the images is smudged, but no worries - it is all going to be trimmed out.)
2)For this project, I'm using watercolour pencils in three colours - Scarlet Red, Magenta and Dark Cadmium Orange. The image is randomly scribbled with the Orange in all areas, followed by Red to aimost halfway up from centre and finally Magenta around the central circle and a short way up each petal/segment.
3)Out with the old water brush to blend in the scribbles. Easy! That's why I love these pencils so much.
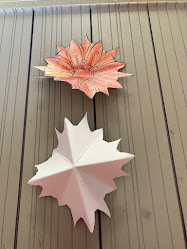
4)Trim out both coloured images - and be prepared to score!
Align a petal top and bottom on the same line of scoreboard as shown and score. Rotate by 90 degrees and score again: repeat twice more.
Repeat on second image.
Mountain fold, valley fold. Repeat around flower.
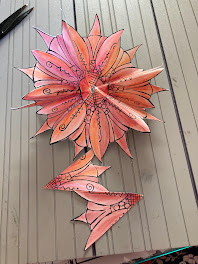
5)Cut away one eighth from each flower. Adhere each petal piece to each other to create a 3D flower. Ensure each half petal matches up. Add brad to centre. (Original card had a button as a centrepiece.)
Background:-
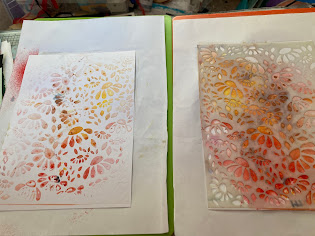
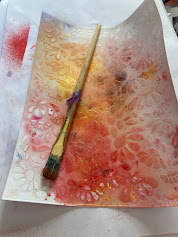
For the background, I selected three Prism Pearlescent Powders - Sunshine shimmer, Radiant Rose and Burnished Bronze. These were sprinkled sparingly over a damp sheet of card, spritzed gently with water, allowed to settle then spritzed again. TOO LATE! - mopped the watery liquid up with kitchen paper when it ought to have been pressed into service by another sheet of card, however another print achieved - process pictured below.
Stencil placed on top. Second card sheet placed on top then run through the die-cutting machine. Et voila, two for one! (machine of choice presently, the Tangerine and the sandwich was from base - Orange plate, copypaper, inky card, stencil, blank card, copy paper, green plate. *Other machines I have not tried and indeed this was trial and error for me.)
As there were areas of powder still evident on the card, I brushed off the residue then trimmed to square.
Completed example with added sentiment.
Background layered onto mats of silver, pink, silver and white card before adding main image and sentiment.
Thank you for tuning in. More creations soon.
Meantime
Happy Crafting!
Shelagh Metselaar
(The Making Lady)









No comments:
Post a Comment