Thursday, 1 June 2017

Clarity Challenge June 2017

Clarity Challenge
June 2017
‘Jitterbug Boogie’

Materials:-
·         Stencils:- Elegant Ladies 4, Jive Dancers
·         Cardstock:- Clarity Stencil card - 2 x 7ins x 7ins;  I x silver mirri; 1 x black
·         Canvas:- 1 x 8ins x 8ins
·         Colour:- watercolour pigment; Fresco Paint – Little Black Dress
·         Texture Paste:- Transparent
·         Miscellaneous:- Silver glitter

Instructions:-
1.       Cut one sheet of stencil card to measure 6ins x 6ins.
2.       Puff a selection of bright pigment colour powder over the card. Spritz with a fine water spray, dry with a heat gun then spray with a more heavy duty spray. (My second spray bottle was a recycled (but cleaned) eco-friendly shower spray and much more powerful.) Dry.
3.        Tape the Elegant Ladies stencil over and sponge through Little Black Dress paint. Clean stencil. Repeat a few times to suit. Dry.
4.       Tape the Jive Dancers stencil over and apply translucent paste.
5.       Remove stencil and rinse the remaining paste away.
6.       Immediately cover paste with a deep coating of dark silver glitter. Allow to firm for only a minutes then pat down gently with fingertips to ensure all areas are covered. Pour off excess.

7.       Leave to dry then mount onto  silver, black, white card then finally onto a canvas which has been edged with silver gilding paste. 

Thursday, 11 May 2017

Chocolate Baroque April 2017 'Fishin' Around!'

Chocolate Baroque
Challenge Blog
April 2017
'Fishin' Around!'


Hello and welcome to my CB blog for April/May. Not much detail this month due to a couple of sad and close family events. 
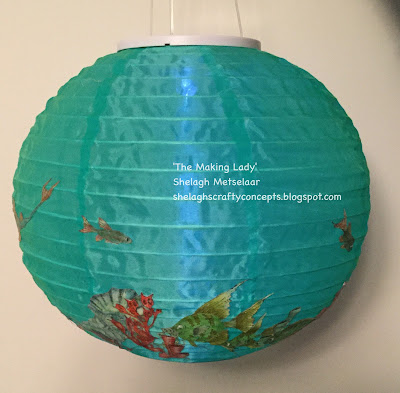
This project was inspired by a 'find' in a cupboard during a bit of an avalanche at which time a box tumbled out. This was the solar globe, purchased a couple of years ago in a sale for £2.50! Time to decorate!!!

Materials:-
  • Stamps:- A Year of Stamping:- July - Standard, Super; August - Standard, Super
  • Inkpads:- Ranger Archival Black Ranger Distress:- Cracked Pistachio, Fired Brick, Barn Door, Vintage Photo; Adirondack Butterscotch
  • Misc:- Tissue Paper; Double Sided Sticky Sheets; Solar Lantern; Coloured Pencils - Inktense, Polychromos, Derwent  Metallic; Spectrum Noir Sparkle Pens; Ranger Glossy Accents


Instructions:-


  1. Using each itemised stamp and Archival Black, stamp each four times. 
  2. Apply double sided sticky sheet, cut to size, to fit each image on the stamped side. 
  3. Turn over and colour elements with itemised ink-pads, pencils and Sparkle pens. 
  4. Cut out elements then add dimension through Glossy Accents.
  5. Peel off the protective backing and apply to suit onto the solar globe.
Et voila! The Global Reef is complete. 


Monday, 1 May 2017

Clarity Challenge May 2017

Clarity Challenge
May 2017
Up in the Air
‘The Moon’s my Balloon’

Well, here we are again - well into Spring and Summer rapidly approaching. When I found out the nature of month’s theme, the trees in my garden – being so far north – were still devoid of both blossom and leaf and from there came the idea for my card.  Add into that the clear skies and the clear sighting of the moon - hey presto! A Card!!!


Materials:-
·         Stamps:- Wee Folk Set 2
·         Stencils:- Winter Tree, Small Framer Stencil
·         Ink Pads:- Distress Weathered Wood, Iced Spruce, Squeezed Lemonade
·         Cardstock:- 1 x 8ins x 8ins card, 1 x A4 white card trimmed to 7ins x 7ins
·         Miscellaneous:- 01, 03 Micron pens, charcoal pencil, sticky note pad


Instructions:-
1.       Place circle from Framer stencil onto 7 x 7 card and tape down. Place Winter Tree stencil over. Tear a landscape from copy paper and blend over Weathered Wood and Iced Spruce. Move the landscape paper from time to time to create hills etc.
2.       Lift the tree stencil carefully and remove the circle blank. Place the Framer ‘outie’ over the white circular area and also the Tree stencil and carefully blend over Squeezed Lemonade.
3.       Remove the Framer, replace the Tree and draw around outline with fine Micron pen.
4.       Remove stencil completely.
5.       Doodle and colour inside the tree outline with black Micron pen. Add the balloon neck and string with same fine pen.
6.       Stamp the little boy from the Wee Folk 2 set.
7.       Doodle a frame around image.
8.       Outline card with a black Sharpie and mount onto 8 x 8 card.

This is my first attempt

Et voila – The Moon’s My Balloon!

Time now for your project.

Bye for now and happy crafting!

Shelagh ‘The Making Lady’

http//:shelaghscraftyconcepts.blogspot.com


Clarity Challenge May 2017

Clarity Challenge
May 2017
Up in the Air
‘Winging It!’


Materials:-
·         Groovi:- Tina’s Flower plate; Feathered Friends
·         Stamps:- Clarity Miniature – Stag Outline moon, tree-scape and eagle; Bird Outline – birds; Word Chain Alphabet
·         Stencils:- Net Pattern, Jo’s Bubbles
·         Ink Pads:- Archival Black; Distress Salty Ocean, Peacock Feathers, Twisted Citron; Distress Oxides Fossilised Amber, Cracked Pistachio, Vintage Photo; Encore Silver
·         Cardstock:- 1 x A4 white – halved centrally down portrait format; white parchment scraps,
·         Miscellaneous:- Glue pen, glitter, holographic mirri card, black card, white card.


Instructions:-
Background:
1.       Dab Salty Ocean, Twisted Citron and Peacock Feathers onto craft sheet. Spritz with water. Drag long rectangle of card as described in ‘Materials’ through ink and repeat until card is covered. Dry with heat gun.
2.       Place Jo’s Bubbles over inked card and dab Oxide Fossilised Amber randomly over. Spritz card as before then dry. Repeat to suit. Remove stencil.
3.        Place over Net stencil and dab over Oxide Vintage Photo. Spritz then dry. Remove stencil.
4.       Dab Oxide Cracked Pistachio onto craft sheet. Spritz with water then drag inked card over in a random fashion. Dry.
5.       Divide and cut card into three. Stamp moon, trees and birds on each of the three inked rectangles.
6.        Stamp sentiment in black Archival then over-stamp with Encore silver. Sprinkle over glitter before the ink dries completely.
7.       Mount each onto holographic mirri then black. Attach side by side to white card background.

Groovi Creatures
1.       Emboss two sizes of dragonfly from Tina’s Flower plate three times each onto parchment. Colour, pierce and cut. Glue smaller onto large. Add small dots of glue from a glue pen and sprinkle over glitter. Attach on to one of the backgrounds.
2.       Emboss two sizes of butterfly from Tina’s Flower plate twice each, colour. Pierce each and attach smaller onto larger. Add glitter as in 1) and attach to second background.
3.       Emboss chosen image from[MM1]  Feathered Friends plate and further emboss isolated areas of same image to create decoupage components. [MM2] Pierce and cut. Layer to form 3D image.
4.       Attach to third background rectangle.

And there we have it – an inky, stencilled, stamped project with Groovi additions – my new favourite  multi-media technique!!!

Over to you to join in the Clarity Challenge!
Happy crafting!
Shelagh ‘The Making Lady’


Sunday, 2 April 2017

Chocolate Baroque Challenge March 2017


Chocolate Baroque Challenge
March 2017
‘Flight of Fancy!’
This is Mike's favourite shot and as my resident photographer, it had to be first.

Having sorted through my CB stamps this morning - oh! what a beautiful selection - a little idea was beginning to form so when Mike came up to check on my progress this afternoon, I was suitably surrounded with re-inkers, ink pads, spritzer bottles of different strengths, card stock galore and quite a selection of stamps. The following project evolved as I experimented, discarded and changed my ideas around. Although not as envisaged, I must say I’m more than happy with the end result - project that will certainly find itself on the stairwell wall, my new display area!
I love the shadow on this shot as it shows the depth of the project.
Materials:-
·         Stamps:- Chocolate Baroque - Sketchy Doodle Landscape - Leaves, Sketchy Doodle Flowers - Scroll-type Leaf, Tangled Garden – Butterfly
·         Card:- Watercolour paper, Kraft card, Black
·         Inkpads:- Distress – Twisted Citron, Shabby Shutters, Aged Mahogany, Milled Lavender; Adirondack -  Butterscotch; Encore – Silver
·         Embossing Powder:- WOW - Dark Silver, Black
·         Misc:- Glossy Accents, Seed Beads, Sequins, Haberdashery silver beads on filament, Clear Sparkle pen
Another angle capturing a different light

(TOP TIP:- I have just, through this project, found out how wonderful and forgiving water-colour paper is thus negating any need for foam pads of 3D glue. Next step is to try it with the smooth variety!

Love the butterfly shading on this shot

Instructions:-
1.       Cut two A4 sheets of water-colour paper in half and sweep Aged Mahogany, Milled Lavender and Twisted Citron over to cover – straight from the pad – onto all four pieces. *NB I found I got a better mix of colour using half A4 (A5) rather than keep the sheet whole.
2.       Choose one as a background and sweep Adirondack Butterscotch around the edge. Spritz inked card with water, allow to soak in then dry with a heat gun. (The colour-mixing once spritzed diluted the Aged Mahogany and once the Butterscotch ink was added, the resulting colours achieved.)
Trim to create three strips 2.5ins wide. Carefully sweep each edge of the strips with Encore Silver inkpad, add Silver embossing powder then heat-set.
3.       Mount onto black card, Kraft card, black card, Kraft card, black card – in that order. Set aside.
4.        Spritz the other three with water and dry as before. Brush with talc/baby powder/ anti-static bag and stamp sets of leaves using Encore Silver. Add Silver embossing powder. Heat emboss. Cut leaves out.
5.       Stamp a silver butterfly on chosen area of remaining inked card, add black sparkling embossing powder and heat-set. Cut out.
6.       Arrange leaves and butterfly onto pre-prepared background and attach using Glossy Accents.
7.       Paint butterfly with Sparkle pen then add sequins using Glossy Accents. Tip each filament with Glossy Accents then gently feed these filaments under the butterfly head for the antennae.
8.       Dot a flight path with Glossy Accents then add a silver seed bead to each.
9.       Manipulate the leaves and butterfly to suit.
Et voila – Le Papillon ou Mariposa ou Vlinder – depending on your chosen language but otherwise known as my ‘Flight of Fancy!’


Happy crafting!

Shelagh
'The Making Lady'
shelaghscraftyconcepts.blogspot.co.uk


Saturday, 1 April 2017


Clarity Challenge
 April 2017
‘It’s Only Words’
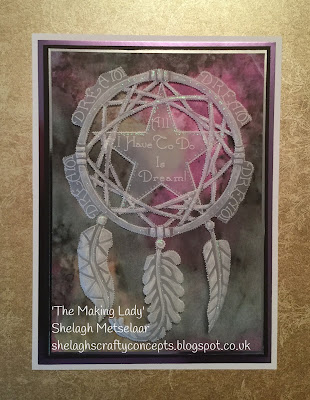
‘Dream’

. . . . . . . And here we are in April . . . . . . . . or even ‘Oh, to be in England now that April’s there’ (‘Home Thoughts from Abroad’ - Robert Browning.) . . . . . . . . and . . . . . . the theme is ‘It’s Only Words.’ Where do I begin, I asked myself? Time was very much against me . . . . . . it had to be a couple of quick projects – well, if you believe that , you’ll believe anything! Up therefore, to ‘The Making Lady’s abode and a quick sort through stamps and stencils.

And this is what emerged!


Materials:-
·         Stencil:- Clarity NDSC 15 Dream Catcher
·         Groovi:- Plates - Small Alphabet Picture Frame, Nested Stars; Parchment tools
·         Paper/Cardstock:- 1 x A4 white parchment sheet; 1 x A5 white parchment sheet; 1 x Clarity Papers sheet; 1 x A4 sheet silver mirri; 1 x A4 sheet lilac mirri; 1 x A4 sheet white card; I x A4 black card
·         Misc:- glue pen, fine glitter, white pencil,

Instructions:-
1.       Trace the Dreamcatcher onto parchment and emboss. Add star and words.
2.       Pierce with double needle tool. Cut to form picot edging.
3.       Dot with glue pen and apply glitter.
4.       Mount onto trimmed Clarity paper of choice.
5.       Mat onto silver, black, lilac, white – in that order.

And to my second example:-

Same Stencil - Different Take!!!


The texture paste images on the canvas having been staring at me for a few days and I had one or two ideas as to where the next steps would lead. . . . . but how to get there? As the theme included ‘Words,’ I decided to stamp onto such and my library houses some old poetry books, bought from a country school sale many years ago when, as an eight year old, I loved the richness of leather bound books and one of them, a collection of Longfellow’s works, contained ‘The Song of Hiawatha.’ The rest, well, you can work it out.

Materials:-
·         Canvas:-
·         Stencil:- Clarity NSDC 15 Dreamcatcher
·         Stamps:- Clarity Rope Frame Scene – horse and rider, Scarecrow Field – crows, Native American Man, Alphabet
·         Ink pads:- Staz-On Black, Distress Oxide - Iced Spruce; Distress – Hickory Smoke, Black Soot Artistry – Aged Stucco
·         Paper/ Card:- Recycled Poetry Book, tissue paper
·         Misc:- Transparent texture paste; Tonic Nuvo glitter – Graphite, Silver, Black; pages from poetry book; charcoal pencil; Mod Podge – matte, gloss; Perfect Pearls Mists – Green Patina, Pearl, Mint; Cosmic Shimmer; gesso – white; Faber Castell Polychromos

Instructions:-
1.       Coat canvas with mate Mod podge and apply tissue paper sheet over. Trim at reverse.
2.       Paint ‘tissued canvas’ with white gesso. Allow to dry.
3.       Spray Perfect Pearls Mist to suit. Brush the canvas with a large paint brush to create an uneven finish.
4.       Attach ‘Dreamcatcher’ stencil onto canvas with low-tack masking tape and pull through a layer of texture paste; allow to dry. Leaving stencil in place, sprinkle over silver glitter and pat down gently. Allow to dry.
5.       Pull translucent paste through chosen feather at each corner and add black glitter. Allow to dry.
6.       Pull translucent paste through a different feather around perimeter spaces, add graphite glitter and pat down as before. Allow to dry.
7.       Using Staz-On (Second Generation) and onto poetry pages, stamp Native Indian man, horse and rider, crows, ‘I dreamed a dream in time gone by.’
8.       Colour Native American man using grey Polychromos.
9.       Rip around stamped words to leave a border then edge with Hickory Smoke and Black Soot. Further enhance edges with charcoal pencil and smudge.
10.   Attach all stamped images to suit on canvas using double-sided sticky tape then dab over Mod Podge gloss to cover.

. . . . . . and there we have it!
Stamps and stencil may be found on the Clarity website - claritystamp.com
Best wishes in the Challenge!

Shelagh
'The Making Lady' 

Wednesday, 1 March 2017

Clarity Challenge March 2017 'It's a Man's World.'

Clarity Challenge
March 2017
‘It’ a Man’s World!’

Another month, another Clarity Challenge and another chance to compete for a £50 Clarity voucher!
Between working on a magazine commission and doing my level best to create a rather large number of cards for friends and family for this very birthday heavy month, my brain was rather frazzled thinking of ideas to best illustrate March's theme which is 'It's a Man's World!'  Phew!!! Made it!
Thank you for looking in . . . and
 . . . . I hope you like my offerings. 


Example 1
Materials:-

Stamps:- Clarity Canal set – horse and heron; Animal Totem set; Christmas Jumper
Inkpads:- Archival Black
Cardstock:- White; Kraft card; Silver Mirri
Miscellaneous:- Faber Castell Polychromos; Micron Pen; Garden Twine; Mini Wire Coat Hangers

Instructions:-

1.       Score, fold and join Kraft card to create seven ‘pages.’ Cut seven pieces of mirri card slightly smaller than each pages and attach.
2.       Cut seven pieces of Kraft card (I used scraps from the main construction) slightly smaller than the mirri. Punch two holes evenly at each top corner; thread through twine and secure using red liner tape. Attach to each mirri mat using foam tape.
3.       Stamp jumper seven times using Archival Black; select focal stamp then stamp and mask on body and sleeve.
4.       Colour waistband and neck rib with various shades of brown pencils. Add stitch lines with extra fine black Micron pen 005.
5.       Cut out each jumper. Attach each coat hanger to reverse using foam tape and attach one to each page of card.


 . . . . . And here we have ‘One for Every Day of the Week.’


Example 2
Materials:-

Stamps:- Clarity Summer Shades; NDC 91 - Pocket
Cardstock:- White; Pale turquoise mirri
Papers:- Clarity Candy Shop, New England Fall, Northern Lights
Inkpads:- Archival Black
Miscellaneous:- Acetate; Gold Metallic Sharpie; Buttons – 2 large faux bone, 4 small faux bone; Micron Pen, Black Sharpie; black and white sewing thread.

Instructions:-

1.       Cut white cardstock to A5. Edge with black Sharpie.
2.       Mount onto turquoise mirri and trim.
3.       Cut a rectangle of blue circle paper from Candy Shop and trim to leave a small white border of white. Attach to white. From the offcuts, cut a strip for the front buttonhole facing. Add some faux stitching with black Micron pen 005. Attach to shirt front. Cut a triangle from the offcuts, add faux stitching as before and attach to top of shirt to suggest a collar.
4.       Cut zig-zag paper from New England to fit over shirt. Before attaching over shirt, fold back a triangle to create a lapel. Attach over shirt front.
5.       Using Archival black, stamp the pocket onto a zigzag offcut and cut out. (I stamped the pocket a second time, cut out the top area and added it as a contrast.)
6.       Add white thread to three of the small buttons and glue into place; add black thread to two large and one small and attach to jacket front and pocket.
7.       Stamp glasses onto card and cut out including lens area. Using extra fine red liner tape on reverse, attach glasses to acetate. Trim.
8.       Place inside pocket, attach with red liner tape and trim so that at least one lens is showing.
9.       Attach pocket to jacket using foam tape.
10.   Construct a bow tie (I used off-cuts from Northern Lights pad), trim and add to top of shirt.


. . . . . . And there we have Example 2 – ‘For the Well-dressed Gentleman!’


Example 3
Materials:-
·         Parchment:- A4 White, A4 Blue, A5 white
·         Groovi Plates:- Ocean Swirl Border, Diagonal Piercing Grid, Starter Kit Background 
·         Stamps:- Clarity Harbour set – boat
·         Miscellaneous:- Faber Castell Polychromos; white card blank.
Instructions:-
1.       On scrap card, stamp image of boat. Trace onto A5 sheet of parchment with white pencil.
2.       Using plate, emboss a wave pattern around boat image. Emboss detail on waves using Diagonal plate.
3.       Add background using starter plate.
4.       Colour the reverse of parchment to suit.
5.       Create a white ‘foamy’ frame using the same border plate on white parchment. Pierce and cut to create a picot edge around.
6.       Create blue waves by embossing the same plate onto blue parchment and follow instructions at 5).
7.       To attach the layers to a white card blank, sew each corner using the embossed lines to camouflage the stitches.


. . . . . And here we have 'Ahoy There!'

Et voila! These are my examples for the month of March 2017 Clarity Challenge - 'It's a Man's World!'

Happy crafting and best wishes!

Shelagh  ;~}