Friday, 27 May 2016

The Posing Peacock - Chocolate Baroque Challenge May 2016

Chocolate Baroque Challenge
*Stamps          - Chocolate Baroque Birdcage Collage, Steampunk Christmas, Music Fanfare

*Inkpads         - Archival Black, Stampin Up Wisteria Wonder, Certainly Celery, Wild Wasabi, Distress Dusty   Concord, Wilted Violet, Peacock Feathers, Twisted Citron, Peeled Paint
*Spectrum Noir Sparkle Pens - Clear
*Polychromos
The Posing Peacock!


Double-stamped  tree from Steampunk Christmas.
Sponged background over 'torn copy paper' hills.
Overlaid layers of Birdcage Collage.
Birds and flowers highlighted with Clear Sparkle pen.
Music Fanfare stamp to create 'bubble border' (first, second, third generation stamping and over stamping.


Five Layer Parchment Birthday Card

Five Layer Parchment Birthday Card

Clarity Groovi  - Plate Mate 
                         Plates:- Nested Hearts, Nested Circles, Frilly Circles, Lace Flowers,                                    Diagonal Groovi Grid
                         Borders:- Ribbon and Stitching, Ribbon and Hearts, Occasions 
Parchment       - White - Clarity Groovi; Turquoise and Rainbow - Pergamano
Pens                - Distress Markers - Scattered Straw
Tools               - Embossing styli, single piercing and twin piercing styli, Solingen scissors


Completed 
Five Parchment Layers
 Base Layer - White
 Turquoise pierced and embossed overlay
 White Daisy and Heart Circlet
 Individual Daisies Images
When assembled, mounted onto rainbow parchment then onto 8x8 card

Tuesday, 17 May 2016

Clarity Challenge 39 'Anything Goes' Mid-month Reminder


Clarity Challenge 39 May 2016
‘Anything Goes’
 Mid-month

Hi and thank you for visiting my blog, it's truly much appreciated. 
Already we are nearing the halfway point of May and time for a little nudge to remind you of this month's Clarity Challenge, 'Anything Goes.'
My mid-month contribution is a parchment shade, ready to sit atop a wine glass (LED night light is a must!!!) I used the trellis plate for the first time and had just taken delivery of new scissors hence the decorative top and bottom. The most perplexing part was drawing out a template and you will see the gist of how it was done. I used lids, plates, string and eventually my gran's pavlova plate was almost the right size. 
Looking forward to your art work!

Materials:-
·         Clarity Groovi Parchment - A4 size
·         Groovi Starter Kit
·         Groovi Plates: - Lace Flowers, Trellis. (Large Lace Netting and Frilly Circle were used in the step by step photos)

·         Large sheet of paper/card
·         Twin needle piercing tool
·         Fine scissors

Instructions:-
*To make the template, I had several attempts before using the 'plate and string'  method which I made up as I went along. Basically I drew around a very large plate onto 16x16 inch card, used string to divide it into three and on one of the thirds, added a tab before cutting out. There are a few photos below to give you an idea.


The blue shade above was where my idea began but had no idea how to go about forming a template.


1.       Draw around the template on the parchment with a soft pencil.


2.       Place the Lace Flowers plate into the Groovi Plate Mate and emboss the top and bottom of the parchment shape by fitting each scallop from the frame along the edges.

3.       Emboss flowers from the plate along the parchment.

4.       Remove this plate and replace with Trellis plate. Emboss blank areas, moving the parchment when necessary until all blank areas are filled.

5.       Using number four and three styli, add white work to the flowers. (Add white work to the trellis at this stage too, if desired.)
6.       Pierce around scalloped edges with the twin needle tool then cut, using fine scissors.

7.       Trim excess parchment from the sides. Cut a slit in the plain side using a craft knife and slot the tab in. (At this point, I folded the tab back which meant there was no need for any form of adhesive.)
Et voila! A wine glass lampshade!

*Please remember to use the LED nightlights! 

There are some stunning pieces of art already on show on the Clarity Challenge website so please think about having 'a go.' As I've said before - It's fun and it's free!! Remember you could be the lucky one, winning a £50 Clarity voucher. 

Best wishes to you all,

Shelagh
The Making Lady. 

Sunday, 1 May 2016

Clarity Stamp Challenge 39 May 2016 'Anything Goes'

Clarity Challenge 39 May 2016
Anything Goes
'La Belle Dame Sans Merci'


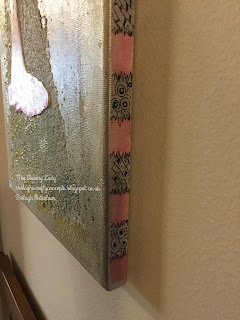
Hello and thank you for visiting Shelagh-land and viewing my contribution to this month’s Clarity Challenge ‘Anything Goes.’  The canvas took a convoluted route before arriving at what you can see before you. The canvas itself, from my ‘little’ stash, is long and narrow and my original idea – even after re-working, did not quite fit the bill. Sadly, there are no photos of the project’s progress as it took many twists and turns over the weeks before evolving into the finished article. Whilst not entirely accurate regarding its subject, the phrase ‘Alone and palely loitering’ from Keats poem immediately came to mind, so I have called the canvas ‘La Belle Dame Sans Merci.’


Materials:-
Canvas:-  50cm x 20cm
Stencil:- NDSC 4 Mirror Image, Pine Needle
Stamps:- Filigraphy Foliage
Inkpads:- Versamark
Gelli Plate
Paints:- Fresco Finish Acrylics – Sherbet, Nougat, 
Perfect Pearls:- Mists – Blue Smoke, Forever Blue, Pewter, Pink Gumball, Blue Raspberry, Pearl
Embossing Powder – Wow Gold
Grunge Paste
Texture Paste – coarse and fine 
Mod Podge
Miscellaneous:- Copy Paper, White Gesso, Charcoal Pencil, Posca Pens, Micron Pen, Ruler, Polychromos

Instructions:-

Canvas

1. Paint entire canvas with two coats of white gesso, allowing canvas to dry in between applications. 
2. Tear up a few sheets of copy paper into strips along the long side. Paint desired area of canvas with gesso and add strips to suit, painting over with gesso in between layers. Allow to dry.
3. Thinly skim over areas with coarse texture paste and allow to dry. Add fine texture paste over and around the dry paste. Allow to dry.
4. Spray dry canvas with Perfect Pearl Mists to suit and tip canvas top to bottom and side to side, allowing the liquid colours to mingle. (If necessary, mop up excess with kitchen roll.)
5. Allow to dry.
6. Attach the Pine Needle stencil to the top right-hand corner of the canvas with a ‘hinge’ of low-tack masking tape and ‘pull’ through a layer of grunge paste. 
7. Sprinkle over a good covering of gold embossing powder and dry with a heat gun. DON’T BE ALARMED!!!! The grunge paste will ‘puff’ up whilst the embossing powder melts and this creates texture.
8. Repeat on the next section at the top of the canvas.  
9. Ink one of the leaves from the ‘Filigraphy Foliage’ set (I used the second largest) with Versamark and stamp along the bottom left-hand corner. Add gold embossing powder and heat-set. Repeat to suit. (Due to the texture paste, the stamped image will not always be  perfect but I didn’t mind this as it added to the vintage effect.)

Lady Image

1. Previously, I had used my gelli plate to mix a number of Fresco paints (detailed in ‘Materials’ for backgrounds. From these, I chose the pink-hued print. 
2. Draw around the ‘Lady’ image on the reverse of print and cut out. Decide on the style of dress and cut the neckline accordingly. Draw around the 'Lady' image on plain paper (I used paper heavier than copy paper) cut out and add hair to image with Polychromos.
3. Shade areas of the dress image with Polychromos, adding depth to the hem and sleeve.
4. Paste the reverse of the Lady with Mod Podge and place on canvas. Apply more Mod Podge over image and add dress. Paste over gently entire image to seal. 
5. Using a charcoal pencil, add shading to define the outline.
6. Using a ruler and a soft pencil, measure 2cm intervals along length and width of all sides.

7. Paint alternate rectangles with diluted pink and silver from Posca pens. (I scribbled these two colours on a mat and watered them down as I went along.)

8. Using a Micron pen, scribble uneven lines oven the faint pencil marks. Add Zentangle patterns to every silver area around canvas. 

Et voila! Here we have 'La Belle Dame Sans Merci.' 

This month's Clarity Challenge 'Anything Goes' is open to interpretation but please remember to check the rules. Your contribution may just win you a £50 voucher to spend on your favourite Clarity goodies!

Looking forward to all your creative projects. 

Best wishes,

Shelagh.

Thursday, 14 April 2016

Clarity Stamp Challenge 38 Mid-month

Clarity Stamps Challenge April 2016
Techniques – Masking
'Butterfly Magic!'

Hi again and welcome back to 'Masking Month' in Shelagh-land. This is my second exhibit for the 'Masking Challenge' and I this time I used one stamp. This butterfly image has a variety of lines you can follow to allow you to decoupage it and that's just what I've done here. I made a number of these using different colouring mediums and I have listed them at the end of this blog, including 'the one that got away.' So - grab your Clarity stamps and matching masks or, as I have done, arm yourself with a sticky note-pad and have a go. A £50 Clarity Voucher awaits the winner. Happy Masking!
(Remember to check out the rules and also how to send your submission via your own blog or to claritystampchallenge.blogspot.com in which case it will be posted on your behalf.)

Materials:-
·         Cardstock:- Clarity Stencil card 7x7
·         Stamps:- Clarity ‘Butterfly’ from ‘Butterfly and Montage’ set, ‘Magical’ from Word Chain 7
·         Stencil:- Clarity Round Aperture
·         Inkpads:- Archival:- Watering Can
·         Pencils:- Polychromos
·         Embossing Powder:- WOW Black Sparkle
·         Perfect Pearls:- Blue Smoke, Forever Blue, Forever Violet, Forever Green, Mint
·         Red Liner Tape
*Most items are available from the Clarity Stamp website www.claritystamp.co.uk

Instructions:-

1.    Stamp the butterfly onto a ‘post-it’ pad. Cut out four masks – no need to repeat, just peel off four sheets prior to snipping! (Please ensure the image is stamped onto the where the ‘sticky’ bit is - I know because I’ve stamped it elsewhere and after much fussy-cutting the mask was fit to be junked!)


2.    Attach circle aperture to card with low-tack tape and lightly draw a faint pencil-line around inner circumference. Remove stencil.

3.    Ink up the butterfly stamp with ‘Watering Can’ Archival and stamp at top of 7x7 card, aligning horizontal wing separation with circle line. Mask.
4.    Ink up and stamp again to right of butterfly, again keeping mid-wing line in tune with the pencilled circle. Mask.


5.    Repeat around circle line – seven butterfly images in total. (N.B. I found it easier to leave the first mask in place.)
6.    On another card stamp seven separate butterflies to create 'free-flying butterflies' using the same ink pad as before. (The photo above shows one butterfly attached to the top image and four that have be cut out in decreasing size for a decoupage effect. I also chose to use a different central word.) PS The change in word was due to my mislaying the 'Magical;' now repatriated with its other pals on the 'Chain Gang!'

7.    Colour each butterfly with selected colour-choice of Polychromos and also the extra ‘free-flying’ butterflies to tone in.
8.    Cut out the free- flying butterflies and and gently curl wings around a pencil, finger, paintbrush handle or what ever is nearby. Attach to coloured-in images on card. (I used white glue.)


9.    Stamp ‘Magical’ (or 'Amazing' as above) using Versamark, add embossing powder and heat with heat gun.
Coloured with Polychromos

10.  Apply red-liner tape around the perimeter of card, select and apply Perfect Pearls of choice. ‘Stipple’ in Perfect Pearls with brush.

11.  Et voila! Magical Butterflies!

Coloured with Distress Markers.


This was my favourite colouring as it comprised more muted tones but as you can see, I made a right mess of stamping 'Magical.' Will find some use for it though - too much work to go to waste.

Thanks again for visiting my blog and remember 'You've got to be in it to win it,' as one famous game host said. 

Best wishes,

Shelagh.


Friday, 1 April 2016

Clarity Stamp Challenge 38 Technique - Masking

Clarity Stamp Challenge 38
Technique - Masking

Clarity Stamps Challenge April 2016
Technique – Masking
‘Save the Last Dance!’


Hello there and welcome once again. Here we are with lengthening evenings, nesting birds,trees and shrubs in blossom and not forgetting the prolific sprouting of the grass - time to learn how to use the petrol mower, I think. 

This month's brief is a bit of a departure from the usual as it is technique-based. MASKING!

Happy Masking!

Materials:-
·         Cardstock:- Stencil card 7x7;
·         Stamps:- 1)Wedding Folk 5, 
2)‘Big Top’ (tent) from Circus set, 
3)Frame and Sentiment from ‘Happily Ever After’ set, 
4)Musical stave from ‘Joy and Birdsong’ set, 
5)‘Vines’ border from ‘Treehouse and Vines’ set.
·         Stencils:- ‘Stripes,’ ‘Circle’ and ‘Wavy Circle from ‘Framer Shapes sets 1&2’
·         Inkpads:- Distress ‘Spun Sugar,’ Versafine Onyx Black
·         Detail Clear Embossing Powder


Instructions:-

1.    Place the ‘Framer’ circle stencil to fit the 7x7 card and lightly draw the inside circle with a pencil to form a placement guide for the stamps.
2.    Make mask by stamping onto post-it notes (please make sure they are stamped nearest the sticky side
1) the lady with hat and the single tuxedo-ed gentleman from the ‘Wedding Folk 5’ set;
2) the frame from the ‘Happily Ever After’ set, the musical stave from the 'Joy and Birdsong' set and cut each out.
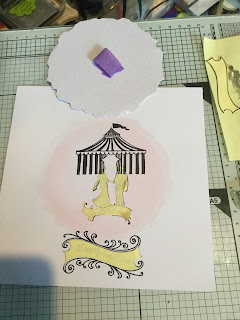
3.    Stamp the lady onto the lower third of the outlined circle using Onyx Black then heat emboss. Stamp the gentlemen next to the lady as before. Mask each figure. 


4.    Stamp circus tent above couple as above and heat emboss. Stamp musical stave to appear that the couple are standing on it. Mask.
6.    Place Circle aperture over the masked images and secure at top with low-tack tape. (No photo for this)

7.    Load Clarity brush with Spun Sugar and sweep around and over circle. Remove stencil.Replace with irregular aperture and sweep more Spun Sugar so the frilly edge is lighter than the regular circle.

Stamp frame between foot of pink circle and bottom of card.Stamp the 'Happily Ever After' sentiment. (Here I have placed the clean stamp on the stamped frame in the correct position.)
This photo shows the mount placed over so it can be stamped in the correct position.

 Mask.


9.    (N.B. I have misplaced the stencil 'innie' since making this card - we've had workmen in the house and things were 'put' away' - and writing my step by step so I made one by drawing round the inside circumference and doing a bit of fussy cutting.)


10.  Remove aperture stencil and replace with ‘Irregular innie.’ (I made a loop with low tack tape, placed it on the reverse of shape to secure.) 


Place over ‘Stripes’ stencil and sweep over more ‘Spun Sugar.’ Remove ‘Stripes’ and replace again to complete the stripes on the card. Sweep once more with ‘Spun Sugar.’

11.  Remove stencils and masks. Scribble an outline around circle and irregular circle using a Micron pen. Decorate each line on the circus tent with scalloped edges using a Micron pen and draw a horizontal line at its base to 'ground' it. Add some tufts of grass to suit.


12.  Edge with a black Sharpie or similar. Mount onto a square card or try out the idea below.
From here I placed the ‘Circle’ stencil over another 7x7 sheet of Clarity stencil card, lightly drew around the inner circumference then using a glass mat as a base, cut out the inner circle with a craft knife. (Very unusual for me as I always seem to drag the card layers but for once it was a success!!)
I then repeated as before (twice – one for the inside and one for the front) with the ‘Stripes’ stencil, edged, cut back and mounted onto an aperture card which I’d cut to suit. The vines were stamped in black for the inside and with Versamark and a variety of pink ‘WOW’ embossing powders for the exterior.

Et Voila! 'Save the Last Dance For Me!!!'