Anything Goes
'La Belle Dame Sans Merci'

Hello and thank you for visiting Shelagh-land and viewing my contribution to this month’s Clarity Challenge ‘Anything Goes.’ The canvas took a convoluted route before arriving at what you can see before you. The canvas itself, from my ‘little’ stash, is long and narrow and my original idea – even after re-working, did not quite fit the bill. Sadly, there are no photos of the project’s progress as it took many twists and turns over the weeks before evolving into the finished article. Whilst not entirely accurate regarding its subject, the phrase ‘Alone and palely loitering’ from Keats poem immediately came to mind, so I have called the canvas ‘La Belle Dame Sans Merci.’


Materials:-
• Canvas:- 50cm x 20cm
• Stencil:- NDSC 4 Mirror Image, Pine Needle
• Stamps:- Filigraphy Foliage
• Inkpads:- Versamark
• Gelli Plate
• Paints:- Fresco Finish Acrylics – Sherbet, Nougat,
• Perfect Pearls:- Mists – Blue Smoke, Forever Blue, Pewter, Pink Gumball, Blue Raspberry, Pearl
• Embossing Powder – Wow Gold
• Grunge Paste
• Texture Paste – coarse and fine
• Mod Podge
• Miscellaneous:- Copy Paper, White Gesso, Charcoal Pencil, Posca Pens, Micron Pen, Ruler, Polychromos
Instructions:-
Canvas
1. Paint entire canvas with two coats of white gesso, allowing canvas to dry in between applications.
2. Tear up a few sheets of copy paper into strips along the long side. Paint desired area of canvas with gesso and add strips to suit, painting over with gesso in between layers. Allow to dry.
3. Thinly skim over areas with coarse texture paste and allow to dry. Add fine texture paste over and around the dry paste. Allow to dry.
4. Spray dry canvas with Perfect Pearl Mists to suit and tip canvas top to bottom and side to side, allowing the liquid colours to mingle. (If necessary, mop up excess with kitchen roll.)
5. Allow to dry.
6. Attach the Pine Needle stencil to the top right-hand corner of the canvas with a ‘hinge’ of low-tack masking tape and ‘pull’ through a layer of grunge paste.
7. Sprinkle over a good covering of gold embossing powder and dry with a heat gun. DON’T BE ALARMED!!!! The grunge paste will ‘puff’ up whilst the embossing powder melts and this creates texture.
8. Repeat on the next section at the top of the canvas.
9. Ink one of the leaves from the ‘Filigraphy Foliage’ set (I used the second largest) with Versamark and stamp along the bottom left-hand corner. Add gold embossing powder and heat-set. Repeat to suit. (Due to the texture paste, the stamped image will not always be perfect but I didn’t mind this as it added to the vintage effect.)
Lady Image


1. Previously, I had used my gelli plate to mix a number of Fresco paints (detailed in ‘Materials’ for backgrounds. From these, I chose the pink-hued print.
2. Draw around the ‘Lady’ image on the reverse of print and cut out. Decide on the style of dress and cut the neckline accordingly. Draw around the 'Lady' image on plain paper (I used paper heavier than copy paper) cut out and add hair to image with Polychromos.
3. Shade areas of the dress image with Polychromos, adding depth to the hem and sleeve.
4. Paste the reverse of the Lady with Mod Podge and place on canvas. Apply more Mod Podge over image and add dress. Paste over gently entire image to seal.
5. Using a charcoal pencil, add shading to define the outline.
6. Using a ruler and a soft pencil, measure 2cm intervals along length and width of all sides.

7. Paint alternate rectangles with diluted pink and silver from Posca pens. (I scribbled these two colours on a mat and watered them down as I went along.)
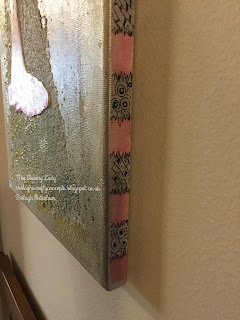
8. Using a Micron pen, scribble uneven lines oven the faint pencil marks. Add Zentangle patterns to every silver area around canvas.
Et voila! Here we have 'La Belle Dame Sans Merci.'
This month's Clarity Challenge 'Anything Goes' is open to interpretation but please remember to check the rules. Your contribution may just win you a £50 voucher to spend on your favourite Clarity goodies!
Looking forward to all your creative projects.
Best wishes,
Shelagh.
Do like this hope its going to stay on the wall x
ReplyDeleteThanks, Julie. Yep, it's in the hall as a backdrop for a vase of spring flowers. Just a pity all the sparkles don't show on the photos! ;~}
DeleteHi there Shelagh. You do like a crafty journey don't you. This piece is no exception. Loving all the elements you have used to create this piece of wall art. Great step by step too. Thank you for sharing xx
ReplyDeleteEvening, Emma. Thank you, indeed! You know me well by now - why go in a straight line when you can take a contorted path!! This was not what I'd planned but all in all, probably turned out better. ;~}
DeleteLove your attention to detail, Shelagh. Those little Zentangle patterns around the sides really add a professional touch to your dreamy canvas. x
ReplyDeleteHi Lesley and thank you for your kind words. I'm sure you have many other things to occupy you, so I really appreciate it. ;~}
DeleteOooh, this is lovely Shelagh. It must look even more gorgeous in real life: so shimmery and sparkly. Xxx
ReplyDeleteHi Barbara and thank you. You are correct in thinking it is a tad more sparkly 'in the flesh.' The hallway light is quite muted so the twinkly bits only shimmer as you pass. ;~}
DeleteAmazing Shelagh, your canvas is gorgeous. I love how you are able to change things around as you go, and always end up with great artwork. x
ReplyDeleteHi Angela and thank you. I am more inclined to work at the canvasses to turn them around than when using card stock, possibly due to the bigger investment in both cost and time. ;~}
DeleteLovely Shelagh, so much work gone into creating your canvas. It looks so mystical and I do like the gold embossed ferns. Beautiful a work of art. xx
ReplyDeleteHi Lynne and thank you. This was one occasion when I did actually pare things back as the whole look was easily swamped. ;~}
ReplyDeleteA very beautiful canvas Shelagh and a great blog. Hugs.
ReplyDeleteThanks, Naomi. It's just a pity I did not take photos along the way but then again, I didn't expect it to turn out like this. ;~}
ReplyDeleteThis is a fab canvas Shelagh and great instructions - i do like the way you have finished the sides too xx
ReplyDeleteHi Linda and thank you. It was a bit of a therapeutic activity, doodling all the way around the canvas - thinking without really having to think! ;~}
Delete