Clarity Challenge 45
November 2016
Blast from the Past
Bingo July 2015 – straight line using stamps,
stencils, grunge paste
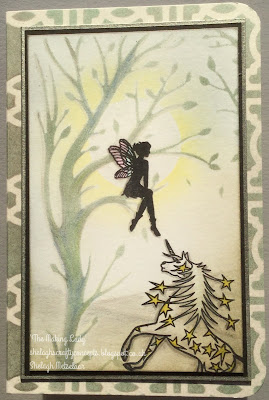
‘Noteworthy’
Hello and welcome once again to the Clarity Challenge. In this one 'Blast from the Past,' you have the freedom of choice to revisit a theme from times past. My first choice is a great favourite of mine - 'Bingo' from July 2015 where from a selection of nine items, a choice of straight line, diagonal, four corners or full house from the following items :-
FLOWERS GILDING FLAKES SHRINK PLASTIC
STENCIL STAMP GRUNGE PASTE
PERFECT PEARLS DIES GLITTER
The first time round, it had to be a 'Full House'
'Medusa' from July 2015
but this time I was a bit more circumspect and opted for the middle line - Stencil, Stamp and Grunge Paste.
'Noteworthy' November 2016
Every year I make little Christmas gifts for my mum's many carers and attendants and this year's offering is the 'Noteworthy' note book; below you'll find details of how I went about making them.
Now it's over to you and your creative mind!
Looking forward to your projects over the next thirty days!
Best wishes,
Shelagh
'The Making Lady.'
Materials:-
·
Stencils :- Clarity - Oriental Lattice, NDC Twin Trees,
Wild Grasses1
·
Cardstock :- Double sided pearlescent card,
black matte, Clarity white 7x7 stencil card
·
Inkpads :- Ranger Distress Hickory Smoke,
Evergreen Bough, Squeezed Lemonade, Black Soot, Iced Spruce, Old Paper, Ground
Espresso; Staz-on Black
·
Mask :- Clarity moon
·
Miscellaneous :- Matte varnish, Spectrum Noir
Sparkle pen – clear, Polychromo pencils, modelling paste, silver gilding wax,
Goosebumps – sparkling, Alcohol pen, Silver pen, red liner double-side sticky
tape.
Instructions :-
Notebook Cover
1.
Cut pearlescent card to measure 8.5 ins x 6 ins
.and score at 4ins and 4.5ins along the long side. Round the corners if
desired.
2.
Tape Oriental Lattice stencil over this and
blend Hickory Smoke all over, moving stencil to fit the pattern and fill the
card. Blend some Evergreen Bough around the edge followed by a light dusting of
Black Soot.
3.
Turn over and repeat (2) with Hickory Smoke and
Iced Spruce.
4.
Spray each side with matte varnish allowing each
to dry in between – this seals the ink on the pearlescent card.
Outside Decoration
1.
Cut white stencil card to 3.25 ins x 5.25 ins,
secure tree ‘outie’ stencil over to suit and blend over Iced Spruce.
2.
Remove stencil and place moon mask to suit. Tape
over tree ‘innie’ and sweep Squeezed Lemonade around circumference.
3.
Stamp fairy onto bough with Staz-on Black and
Unicorn in bottom right corner.
4.
Shade with Polychromos and add Sparkle.
5.
Edge with toning alcohol pen, mount onto silver
edged card and attach to front cover.
Inside Cover
1.
Cut a strip of card 5 ins x 0.5 ins and score at
2ins, 2.5ins, 3ins. Apply double-sided red liner tape to areas 0-2ins and
3-5ins. Fold to make an inverted ‘V’ at the scores and attach over middle folds
of inside cover. (This is the pen holder.)
This is not the actual but a trial with paste and glitter.
2.
Tape Wild Grasses stencil over 3.5 ins x 5.5 ins
matte black card. Spread over modelling paste, remove stencil and wash
immediately and set card aside to dry.
3.
When dry, apply black gesso and leave to dry
again.
4.
Spray over Goosebumps and allow to dry.
5.
Replace stencil and dab over silver gilding
paste. (I like Pebeo – it is easy to apply.)
6.
Edge card with silver pen and attach to inside
front cover.
7.
Edge another piece of black 3.5ins x 5.5ins and
attach notepad
Et voila - 'Noteworthy!'
To join the Clarity Challenge this month :-
1.choose a theme from the past,
2. create a project using Clarity stamps, stencils or Groovi plates,
3. photograph project
4. either upload to own blog and link to Clarity Challenge or email to claritystampchallenge@hotmail.com
. . . . And that's it! You may be the lucky recipient of the randomly awarded £50 Clarity voucher.
Best wishes,
Shelagh
P.S.
Hope to see you soon. I'm off to complete my mid-month example. Now I wonder which 'Blast from the Past' I've chosen for it? I'l give you a clue - it was one I had real difficulty with!!!!
shelaghscraftyconcepts.blogspot.co.uk


I love this. lot work gone into both these pieces xx
ReplyDeleteThank you - I will add a photo of the box of them all ready to go down to Mum's. ;~}
DeleteAll I can say is thank you God for you wonderful designers . I rarely have an original idea and your inspiration is so helpful . Joy now and merry Christmas
ReplyDeleteJanice
Thank you kindly, Jan. I greatly appreciate your comment. I made 24 of these for my mum to hand out (oops forgot to take a photo of the boxful - all in little decorated gift bags using the Clarity ribbon 'Thank you' stamp. And a very happy festive season to you and yours too. ;~}
Delete