Sunday, 1 November 2015

Clarity Challenge 33 - November 2015
Clean and Simple
Clean and Simple

Hello again, hello (as the song goes) and welcome back to Shelagh-land once more. Never mind the month, where has the YEAR gone??? I just cannot believe we are on the first day of the eleventh month! It has been a bit busy here this week as I'd set myself five deadlines - anniversary cards, birthday bunting, birthday cards and also my mum's Advent boxes. This leaves me with six projects for next week and so on until all the Christmas prep is done. Not planning my life away, honestly!!

'Clean and Simple' is the theme for this month's Clarity Challenge and I was a bit stumped until I espied some lovely hessian canvas boards in a little art shop in Kuwait City; they proved to be the inspiration behind my project and having stopped off for a cooling 'lemon mint' on the way home, the notebook was out, sketches made and the idea became a reality. 
I'd bought the lovely 'Matrix Feather' stamps at the Retreat and was itching to put them to use so that evening I set to work and the basic idea formed. I refined it a bit more the next day, played around with the colour of pencils and then called a halt! (That was the most difficult part, believe me!)

Materials:- (All items are available from the Clarity Stamps website.)
·         Stamps:- Clarity Matrix Feather Stamps and Verse set
·         White Card
·         Gelli Plate, Clarity Gelli Mount - 7 x 7
·         Stencils:- Clarity Framer Shapes Stencils Set 1
·         Inkpads:- Versafine Onyx Black; Distress Antique Linen, Pumice Stone
·         Brayer
·         Spectrum Noir Colouring Pencils
·         Micron Pen


Instructions:-
Card

1.       Cut white card to a 7ins x 7ins square and attach the stencil with the square aperture at the top with low tack masking tape.
2.       Using Versafine and the ‘Wing’ verse on 5 x 5 Clarity mount, line the stamp up in the middle of the stencil aperture. Stamp and heat set.

3.       Lift the stencil and stamp the large feather at the bottom left and top right corners. Heat set as before. Stamp also onto Post-It Notes and cut two masks out.

4.       Place masks over the feathers and replace stencil. Set aside on a craft mat.
Gelli
N.B. I wanted to echo the linen effect of the canvas and achieved this by using Distress Inks, a Gelli Plate and a brayer.

5.       Place 6 x 6 Gelli Plate centrally onto 7 x 7 Gelli Mount.
6.       Daub Antique Linen and Pumice Stone over Gelli Plate.
7.       Brayer inks so the colours mingle.
8.       Place the inked Gelli over the stamped image,see (4) and press gently until you see the ink transferring equally onto the white card.
9.       Carefully turn over the ‘bundle’ and remove the card/stencil but leave stencil and masks in place.


10.   Using a make-up sponge, sweep in some of the residual ink from the stencil to darken the edges of the inked aperture.

(N.B. This was a technique which Barbara shared with us at the Retreat; thanks, Barb!)

11.   Remove the stencil and gently scribble an outline around the coloured square with a Micron pen.
12.   Colour in the feathers, again using a technique from the Retreat. Choose three coloured pencils – Light, Medium, Dark and colour each area of the feather ¾ light, ½ medium, ¼ dark. (Thanks again, Barbara. What a difference this has made to my colouring!!!)

Having placed the completed item on the hessian canvas, wasn’t too happy with the definition of the end result and as I’d made a number of these before choosing the one that ticked all the boxes, I chose one of the rejects, edged it with a black Sharpie then scribbled another line near to the edge to tie it all together. Happier with it now, I repeated this on the No1 example, mounted it onto the hessian canvas.


Et voila! 'Clean and Simple' complete!

I hope you find this easy to follow. It wasn't without the odd trial and tribulation as I had a limited amount of craft stash and even make-up sponges were difficult to find. (Although I tried the small Ranger blending foam pads and also Cut ' n' Dry, they weren't as good as the humble make-up sponge.)

Many thanks again for visiting my blog. It will be lovely to see your projects posted on the Clarity Challenge blog. You are all so talented and never cease to amaze and delight! If you haven't joined in the 'Challenge' before, then please consider doing so. You can find all the details on the Clarity Stamp website and don't worry if you don't have a blog, you can email your entry and it will be posted for you - that's how I started.

'Til next time,

Sincere best wishes and happy crafting!

Shelagh.


Monday, 26 October 2015

Groovi Stamping!


First Attempt!

Hello and greetings from a blustery Aberdeen but at least there is no rain - YET!

Last month, I spent hours making my mum's special Christmas cards - far longer than usual - but as they were all made with the Groovi system, it was never a chore. I then got to thinking of traditional parchment work and armed with an online book, decided to trace a design and what better than the Clarity 'Columbine' stamp, the same one I used in September's 'Shaped Card' blog. 

I traced the stamped image with a white Faber-Castell Polychromo pencil and then set to work with different sizes of embossing tools before playing around with the different Groovi plates and borders as you can see above. 

I also have two family anniversaries pending at either ends of the spectrum in a few days time, one - a 1st Anniversary and the second - a 57th so I used the above design again but this time - another first - I coloured the reverse with my Polychromos. Wasn't too sure at the start, though!

This red one was made on two different pieces of parchment and I used tiny glue dots to fix the square onto the frame.


This one was made on one piece as second time around, I'd worked out how to to incorporate the square into the frame. Will remember that for the future and save a sheet of parchment! I haven't decided which card will go where but need to make my mind up by tomorrow as they need to  be posted by then!

Hope you like them! 

Many thanks for looking at my blog.

See you soon.

Shelagh.

Thursday, 1 October 2015

Clarity Challenge 32 – October 2015
 Stencils
Hi there - greetings from Shelagh-land again. So sorry the extra posts have not materialised but I've been nursing a very sick computer and despite shelling out a fair amount to return it to full health, I'm writing this on my brand new laptop. I've yet to learn how to shut it down but at least it's working and connected to the printer! 
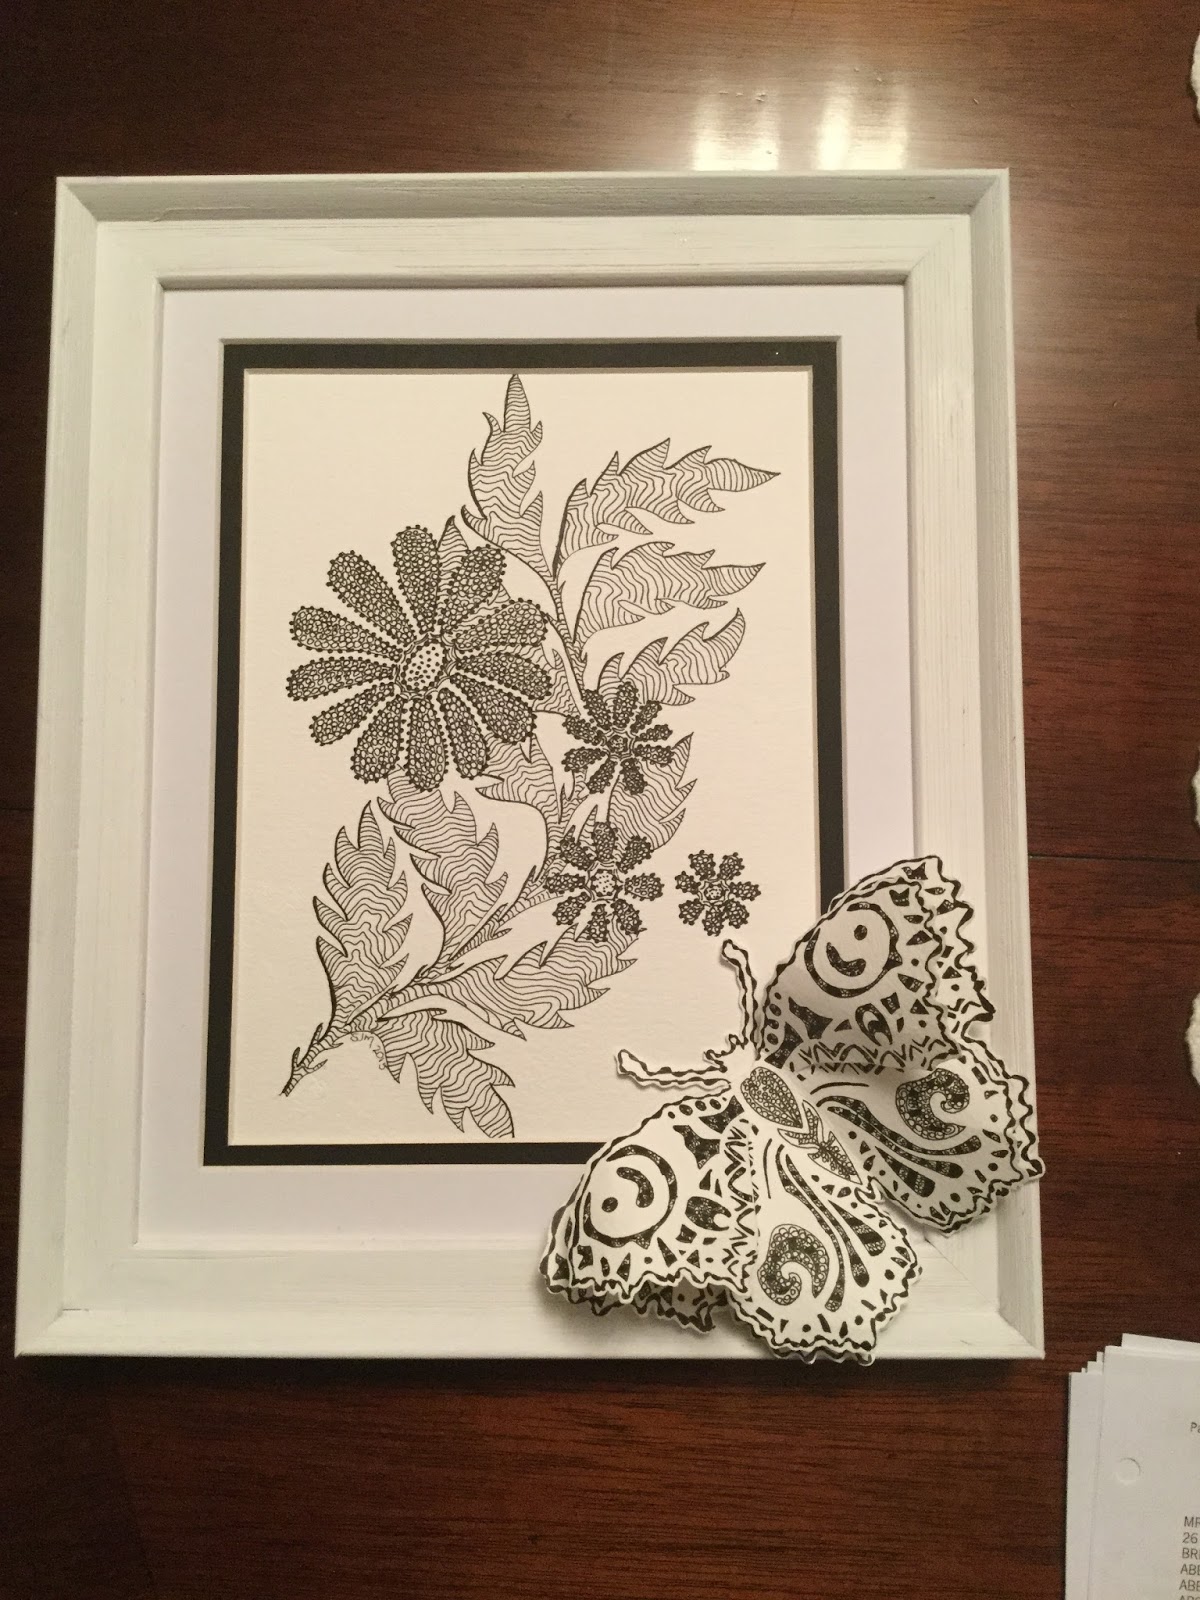
This month's Clarity Challenge is entitled 'Stencils' and I decided to go down another route by drawing inside the stencil shape with my Micron pen, an idea which took shape whilst doodling in a 'zentangle' book in Schipol Airport. I knew I wanted to use the 'Flower Power' stencil and from there it was a question of sorting through my collection of Clarity stencils and selecting a suitable one for the background. I also wanted a bit of texture so I used water-colour paper for both butterfly and background. Once the stencils had been outlined, it was again back to doodling to fill them in and quite therapeutic it was, too. (All materials are all available from the Clarity website.)


Materials:-
·         Watercolour Paper
·         Clarity Stencils: - Flower Power, Leafy Strip, Filigraphy Butterfly  
·         Micron Pen
 Instructions:-
1.       Tape the butterfly stencil onto a sheet of the watercolour paper. Using the Micron 01 pen, outline the butterfly stencil and all its markings twice.  
2.       Using the Micron pen, doodle Zentangle-type patterns inside each shape pattern.
3.       Cut out each butterfly and set aside.

4.       Tape the Flower Power stencil onto another sheet of watercolour paper and when happy with the placement, outline the desired flower pattern again using the Micron pen. Remove stencil.

5.       Over this outline, tape the Leafy Strip stencil to suit and draw in the outline with the Micron pen, ensuring the leaves are behind the flowers.

6.       Again using Zentangle-type patterns, create line work on each leaf.

7.       Cut black then white mounts to suit and place in a frame.

8.       Remove the head from one of the butterflies (quite painless, really!), cut into the wings of the same butterfly and manipulate to create shaped wings.

9.       Attach this over the second butterfly and attach to framed picture to suit.

N.B. I wasn’t happy with the frame as the white was tinged with yellow so I painted it twice with Fresco Finish Snowflake. It now was the right ‘white’ but too matte so I found a tin of lavender floor polish in my cleaning materials and sat for an evening working this in around the empty frame with my finger. It was actually quite therapeutic! Once it was fully absorbed, I repeated this another couple of times until the required look was achieved.
Below are a few of the trials before I settled on the final draft.


Many thanks again for tuning in to my blog; I do greatly appreciate you spending your valuable time reading it.  Once more I am very much looking forward to your challenge entries; you never disappoint! If you have not entered before, please consider doing so either by your own blog or emailing your contribution to claritystampchallenge@hotmail.com
The Clarity website can be found at www.claritystamp.co.uk and Clarity also has a Facebook page - https//:www.facebook.com/claritystamp.co.uk

Have fun!
Warm wishes to all,
Shelagh.


Monday, 28 September 2015

Thank You Card
September 28th

Hello again, hello! 
Back from Overseas-land and currently grappling with the complexities of my new computer so thought I'd try out a post before the next Clarity Challenge 'D Day!'

During my time in Kuwait, we were invited to a 'soiree' and a very pleasant evening was enjoyed by all! The host certainly deserved a 'Thank You' card and this is what I was able to do with my limited choice of stamps (I'd only taken out Christmas themed ones to experiment with.) 
I stamped the tree house, masked it, brayered over with 'Weathered Wood' Distress inks, added a hilly background and a moon before decorating with a variety of stamps. The house foundation was elongated with a Micron pen, the tree-trunk (seen behind the deer) was used to create the fence posts and the house lightly shaded with Spectrum Noir pencils.

As the completed card was too large for any envelope, I made this little pocket to contain it, the card being retained in place by two little card triangles.
A card square was used to keep the pocket closed. 

This was done with limited crafting resources but when needs must, it's amazing how many little challenges can be resolved.

Many thanks to you for reading this. If you'd like to leave a comment, then please do as they are greatly appreciated.

Will be back with another post on 1st October!

See you soon,

Shelagh.


Tuesday, 1 September 2015

Shaped Card – Clarity Challenge 31 – September 2015
Ring a ring o’ flowers!
Hello there and welcome to Shelagh-land once more and thank you for your visit to my blog.
September is here and perhaps we'll be rewarded with an Indian Summer as our 'real' summer has not been too evident here in the north-east of Scotland. The golfers are none too happy with it either, I hear. Thank goodness our crafting takes place indoors - here it can rain, hail, sleet or snow while we're cosily tucked away, working on our next project.


Well, what an exciting month this has been. 
After a plethora of notable events and all requiring cards - sister's anniversary on 1st, uncle 83 on 2nd, nephew 20 on 9th, great-niece reaching the Terrible Twos on 10th, school-friend - 60 on 12th and the biggest celebration of all was a short stay in Dubai for my husband's birthday on 13th - September is set to be a tad quieter with only two family birthdays and our 29th anniversary. 

Then, of course, there was the event I'd been excited about and looking forward to since February - my first visit to Crowborough and the Clarity Retreat and what a treat indeed it turned out to be. Fab-u-lous!!! Two days of crafting bliss! Barbara and Paul, the dynamic duo, shared techniques, skills and encouraged, Jane catered for us all effortlessly and the behind-the-scenes Clarity team ensured all our Clarity product wishes were realised. 
Met up with ladies whose names I recognised from the Clarity Challenge blog, Lynne and Moya, sat opposite Dawn and next to Karen who was driving all the way back to Yorkshire that Thursday evening - hope you had a safe and uneventful journey, Karen and in my chosen hotel, enjoyed the great company of Margaret and Chris, two Scots lasses who'd travelled down by train from Glasgow.
'The Crowborough Five!'

After all that, I then discover that my blog is currently featuring in 'Papercraft Inspirations' Issue 143 October 2015 as Blog of the Month!

Now down to business!

Shaped Card
The inspiration for this month's challenge started from raking through my boxes of Clarity stamps, looking for some way to use one/some of them in a different way to meet the brief for a 'Shaped Card.' The 'Columbine' stamp was the right fit!
Materials:-
·         *Clarity Stamps: - Remountable Gentian and Columbine, Remountable Maple leaf set;  A Million Thank Yous stamp
·        * Watercolour Paper
·        * Inkpads:- Pearlescent Beige; Distress Inks – Worn Lipstick
·        * Clarity Brushes
·        * Embossing Powder – Detail Clear
·         Ivory doubled-sided pearlescent card A4 x 3 - from stash
·         Dies:- circles, frame both from stash
·        * Spectrum Aqua Pens - Peach, Blossom, Spice, Begonia, Sepia
·        * Perfect Pearls: - Forever Red, Mandarin, Perfect Copper
·         Self-adhesive gems
·         *Glitter – Glamour Dust
·         Quickie Pen
·         Glue of choice
N.B. Starred items are available from the Clarity Stamps website. 
Instructions:-
1.       Fold an A4 sheet of Ivory Pearlescent card (I found a sheaf of this during a craft room clear-up) in half and die-cut a card blank using a plain circle die. Choose a smaller circle die and die-cut the centre from ONE half of the card only to create a frame. *N.B. The photo below is not quite accurate as I experimented with an open base. 
2.       Measure halfway horizontally on this top frame and score across to make a semi-circular frame as in photo.

3.       Die-cut a frame of the same outer and inner circle size and attach to the semi-circular top frame of the card.
4.       Die-cut four circular fancy frames (these serve to strengthen the circular frame as well as being decorative but plain ones as in (3) would serve the same purpose.) Reserve two and brush two with Tattered Rose. Off-set one onto the other and attach to the open circular frame. Lightly brush frame 3 and attach to the inside of the folded frame.
5.       With the residual ink, brush the last frame and attach to the solid card base.
6.       Using Brilliance Pearlescent Beige inkpad stamp Columbine stamp six times onto Watercolour Paper. Add clear detail powder and heat emboss. *N.B. The photo shows it stamped in black. 

(Stamp and emboss singly otherwise ink is too dry to collect the embossing powder.)
7.       Colour each flower trumpet with chosen Spectrum Aqua pens, from the centre out so the colour is less intense towards the top of each petal. 
I used Peach, Blossom, Spice and Begonia, scribbled the colours onto a Clarity Blending Mat and picked up the colours with a fine paintbrush and from there added watered-down colour to each petal, flicking out from centre.
8.       On a palette or similar, mix Red, Mandarin and Copper Perfect Pearls with a drop of water and paint each flower centre. Once dry, cut out each flower head; cut into each flower along each petal and gently bend to create movement. Reserve.
9.       Stamp thirty large maple leaves from Remountable Maple Leaf set onto watercolour card - a remainder from (6) with the same Brilliance stamp pad and emboss as before. Colour along veins using same colour pens as in (7.)

10.   Stamp ‘Thank You’ from set detailed above onto card base, again using Pearlescent Beige add detail powder and heat emboss. Colour in random stripes using the Spectrum Aqua Sepia pen - fine point side.
11.   Attach leaves and flowers around top frame to suit. Repeat on base.
12.   Add self-adhesive gems to each flower centre; dot a little glue from a Quickie Pen around each gem and dust with glitter.
Et voila - my take on September's Clarity Challenge. 

Thank you for reading through my blog; I welcome comments and/or questions and will help where I can. I have made a resolution this month to add posts more frequently and from now I intend to do this weekly. It's not that I don't craft between the Clarity Challenges, I just give the items away before I remember to photograph them!!! I hope this has given you some ideas and as ever, I look forward to viewing your Clarity Challenge submissions. You are an extremely talented and innovative group and I love seeing what you come up with. If you haven't entered the Clarity Challenge before, please consider 'having a go;' it took me a long time to pluck up the courage and I do so wish I had attempted it earlier on. You can enter through a link to your blog found at the foot of the Clarity Challenge blog or by email at claritystampchallenge@hotmail.com

Wishing you all a sunny September!

Happy crafting,

Shelagh  ;~}


Saturday, 1 August 2015

Clarity Challenge 1st August 2015 - Bingo!

Clarity Challenge 1st August 2015

 Bingo

(Full House - Stamps, Stencil, Grunge Paste, Gilding Flakes, Glitter, Die Cuts, Shrink Plastic, Flowers, Perfect Pearls.)

Medusa


Hi there and welcome again to Shelagh-land! 

August is upon us and we should be still be enjoying summer but this is Great Britain, I'm in the north east of Scotland so-o-o-o-o balmy days are not quite the norm! July passed in a flash as there was a lot for me to keep up with and in o-o-o-o-nly four days time I'll be down in Crowborough attending two fabulous days of Barbara and Clarity's workshops. Can't wait!!!!

We-e-e-l-l-l this challenge has gone in an opposite direction as intended - I had prepared a three piece wall plaque to decorate but whilst gathering all the paraphernalia together, masks kept getting in the way - I've only got two - and I hope you like the (literally) off-the-wall result.
This was great fun although the alchemy corner (Mike's term for my 'wet area') in the kitchen took a bit of a pasting. N.B. Must dissuade him from a new kitchen for the time being!!!!

However, when first introduced to the 'Bingo' theme, the old bonce was scratched more than a number of times - Two Little Ducks, Legs Eleven (my dear departed Dad's nick-name for me), Kelly's Eye No One, (can't believe it myself but I actually had composed something along these lines) - b-u-u -t -  how far off base was I!!!! Then all was revealed - choose a designated option from the grid - four corners, any vertical line, either diagonal or a full house and create a piece of art to include the designated products. At that point, the brain whirred into action!

Meantime enough of the preambles and down to business.

Let me introduce you to Medusa!

Medusa

Materials:-
·         Canvas :- One 8 ins x 8 ins canvas, one 12 ins x 12 ins canvas
·         Card :- 7 ins x 7 ins Gelli card, heavy duty watercolour card
·         Gesso – White, Black
·         Color Burst – Lemon Yellow, Phthalo Green, Ultramarine Blue
·         Stencil – Clarity :- Tree of Life (NDC), Leafy Swirl
·         Grunge Paste
·         Paint – Silver
·         Papier Mache mask
·         Acrylics – Fresco Finish Snowflake, Nougat
·         Stamps – Clarity :-  Remountable Spring Day set, Butterfly Montage
·         Inkpads :- Encore Silver, Archival Black
·         Embossing Powder :- Holographic Silver
·         Gilding Flakes :- Clarity Silvery Moon
·         Glitter :- Holographic Silver
·         Shrink Plastic - Clear
·         Perfect Pearls :- Forever Blue, Forever Green, Blue Smoke, Perfect Pearl
·         Dies :- Tattered Lace Flourishing Hearts
·         Glue: - Glossy Accents. Low-melt glue gun, Clarity Double sided sticky

Instructions :-
Cover work surface well – I taped a bin bag over the work top.
Canvas
1.       Spritz the 8 x 8 canvas lightly with a fine water mist then puff on Color Burst Lemon Yellow, Phthalo Green then Ultramarine Blue – SPARINGLY. Spray again across the canvas allowing the water mist to settle. Allow to dry then turn the canvas to resemble a diamond shape, deciding which corner you wish to be at the top.

2.       Select the ‘Tree of Life’ stencil and mask off all but the bare branches. Place stencil over coloured canvas and ‘pull’ grunge paste through. Allow to dry. Rotate canvas by one corner and repeat.  Do this once more.(At this point I added a little water and silver paint to Grunge before using. The dry results were still too ‘grainy’ for what I wanted so I re-applied the stencil and painted over with a thick concoction of white glue mixed with silver paint.)

Mask
3.       Paint the brown papier mache mask with gesso – I used three coats. Paint over with Snowflake when dry.  Too stark, so I painted it with Nougat.
4.       Sketch the eyes and mouth on in soft pencil and colour in with desired colour. Apply Glossy Accents to these areas.
5.       Apply silver paint to mask, painting carefully around eyes and mouth.

Mask embellishments :-
Hair and Wings
6.       On watercolour paper, draw around ‘Tree of Life’ three times and cut out. (I tried other papers but this proved to be the best to ‘manipulate’ into curls around a paintbrush handle.) Paint both sides of each with black gesso. When dry, roughly paint one side of each with silver paint. When dry, repeat on reverse. When dry, apply Mod Podge to first side and leave until tacky. Apply gilding flakes. Repeat on reverse. Glue to side of mask to suit.

7.       Stamp butterfly (I have mislaid mine in my nice and tidy craft room – NOT - so had to use the collage stamp!!!) a few times onto a scrap of card (I used lightweight black pearlescent) using Encore Silver, add silver embossing powder and heat to set. Cut out butterfly images. I have made six but decided to use only two.)
8.       Mix Perfect Pearls Forever Blue, Forever Green, Blue Smoke and Perfect Pearl to suit and paint butterflies. Cut wings from body (ouch!!) twice and further cut one pair of wings, following the lines,  to make a smaller set.
9.       Die-cut Tattered Lace ‘Flourishing Hearts’ a few times, cut to suit and paint with same Perfect Pearls mix. Attach a frond to the foot of each of the larger wings.
10.   Glue the wings top and bottom to one of the mask eyes using Glossy Accents. Attach each smaller wing over.

Flowers :-
11.   Attach ‘Leafy Swirl’ stencil to a piece of Gelli card. Spritz with water. Apply Color Burst as in (1) and pull a number of prints from this. (How about the impromptu drying line - cooking string tied between two door handles - wet prints placed above hob as the drips were easy to clean there, wouldn't do that in a new kitchen!!)
12.   When dry and using Encore Silver, stamp the Tulip circle from the Spring Day Remountable set six times onto a print. Apply silver embossing powder and heat emboss. Colour each tulip and vertical leaf to suit. (I used Spectrum Noir) Cut out. Colour reverse of each circle with chosen colour. Apply Quickie Glue Pen to each leaf around circumference and apply glitter of choice.
13.   Cut along edge of each vertical tulip leaf on each circle, shape. Off-set and attach a circle to the centre of another to form three flowers.
14.   Stamp the same as at 12) three times onto clear Shrink Plastic using Archival ink. Colour to suit on reverse of stamped side using permanent pens and cut out around perimeter. Shrink using either a heat gun or oven as per directions. Glue to centre of flowers.
15.   Place and glue in place onto mask to suit.
16.   Attach mask to canvas using low melt glue gun.

Background canvas:-
17.   Mask 12 x 12 canvas as in photo and apply a mixture of silver and gold gilding wax to create a frame.
18.   Using Clarity double sided sticky sheet, apply (as a diamond)to centre of background canvas. Place main canvas over.
Et voila! Medusa is in our midst!
This is my favourite project since joining the Challenge DT in January; my brain took me on the most enjoyable journey and I did want to add so much more, however exercised a modicum of restraint although it is probably not too apparent! Medusa certainly enticed me into her lair!
Many thanks for looking in and as always, any questions etc I will attempt to answer.

Once again looking forward to seeing all of your fascinating projects in this month's Clarity 'Bingo' Challenge; just have a look at the rules, decide which line, diagonal, four corners or full house you wish to use, have a play and submit your art work via your own blog or by email.

Best wishes,

Shelagh  ;~}


Sunday, 5 July 2015

Something from Nothing


Something from Nothing!


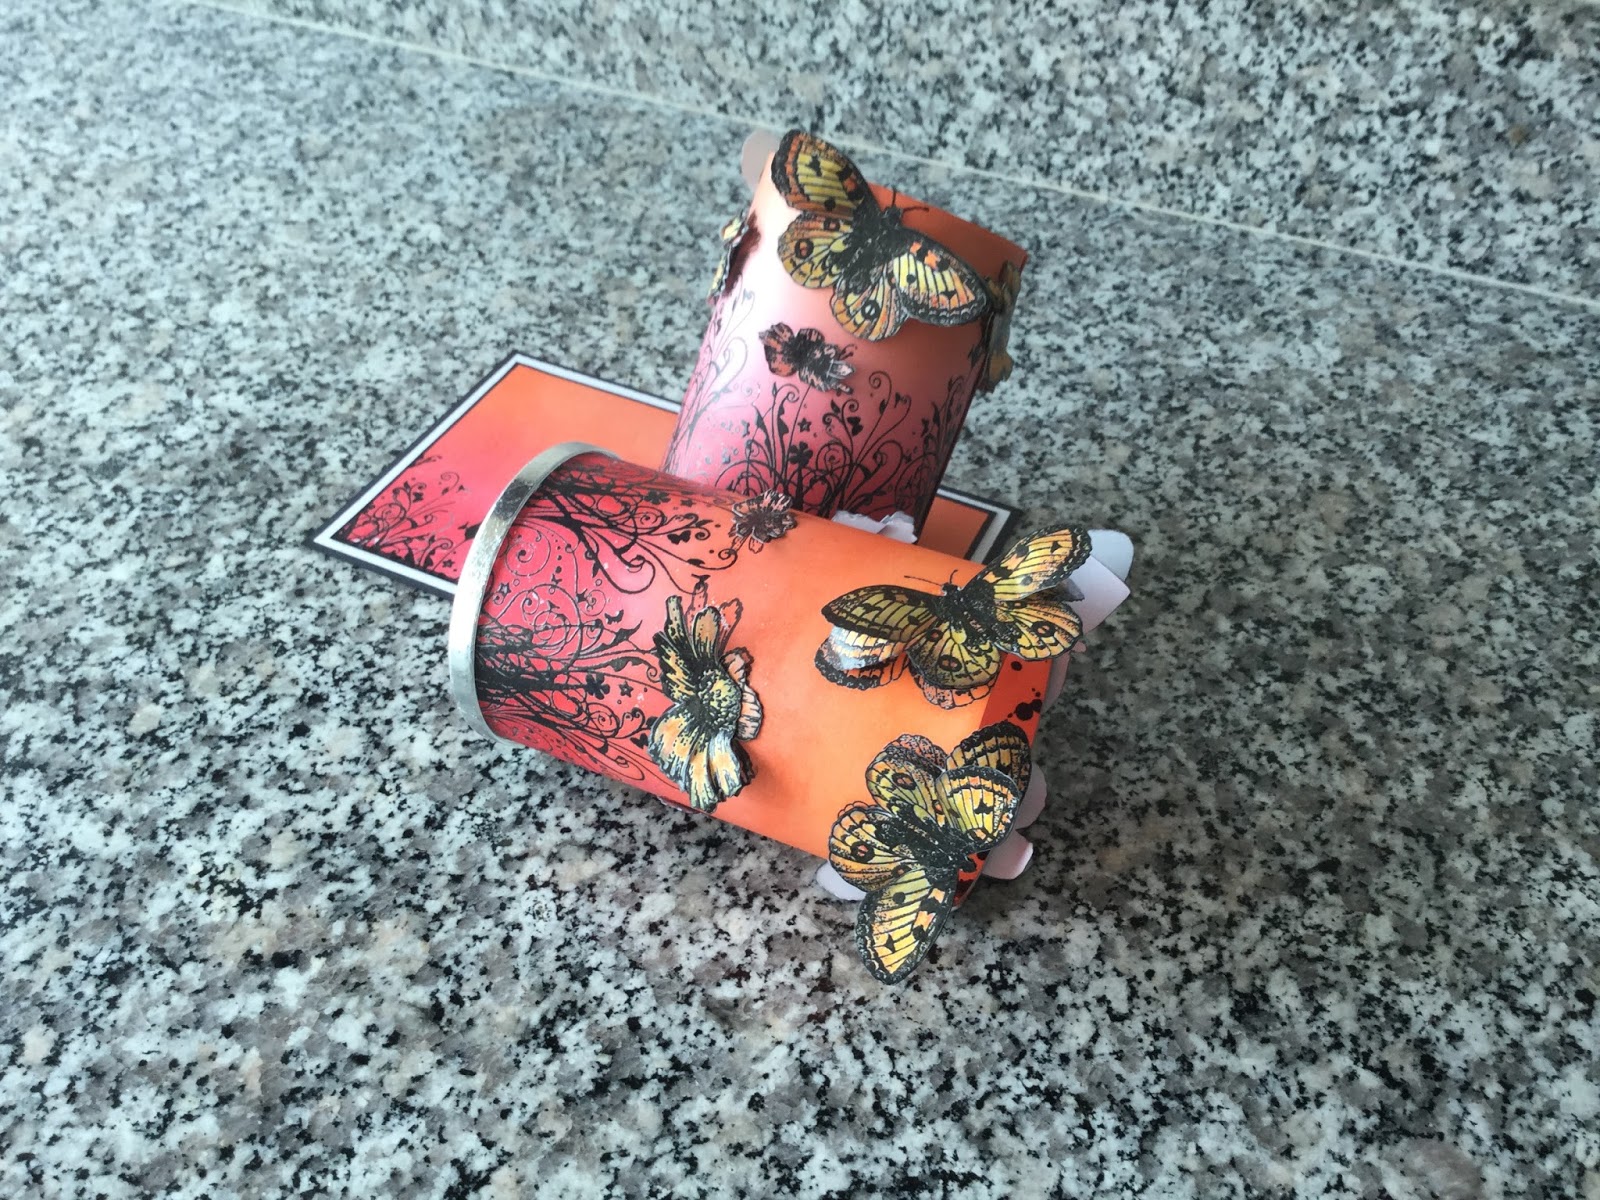
Hello again,from me in Shelagh-land. I was overseas for a spell earlier this year and set off with an extra suitcase filled with crafting goodies as I knew I would have some time to fill in. One afternoon I'd had my fill of cards etc so decided to go off on a tangent and make a pot for my brushes and pencils to sit on the desk. 
Cut a crisp carton in half and glue the lid to the open top so you now have two cylinders.
Stamp, heat emboss then blend Festive Berries, Worn Lipstick and Ripe Persimmon over a sheet of super smooth paper to wrap around each cylinder.
Stamp a number of flowers and butterflies, colour and cut them out, then use them to decorate the cylinders.
To hide the plastic lid rim, I ran a line of super sticky double sided tape around it then applied a sheet of gilding leaf. 
Stamp, heat emboss and ink another sheet for the base. To give it substance, I triple mounted it onto black, white the black card before attaching the cylinders to it. 
To finish, I stamped and inked another sheet to place inside the pots. 
Et voila! Something from nothing. 

Thanks again for your visit. I will be adding some other items I made whilst away over the next week or so, so please come and visit again soon. Meantime, happy summer crafting.
                                                            Best wishes,
                                                               Shelagh. 
                                                                   ;~}